What is a course
A course is the core learning unit of the Onboarding.team platform: it lets you deliver the knowledge and skills your employees need, step by step.
Every course consists of one or more lessons. Lessons can hold training materials in a variety of formats: text, video, SCORM, instruction files, policies, documents, images, and anything else an employee needs to do their job.
Any lesson can also include a homework assignment. Assignments help you check understanding, get detailed feedback from the employee, or assess how they handle practical tasks. Assignments are optional — you decide at which points in the training they're needed.
Here's what a course structure looks like:
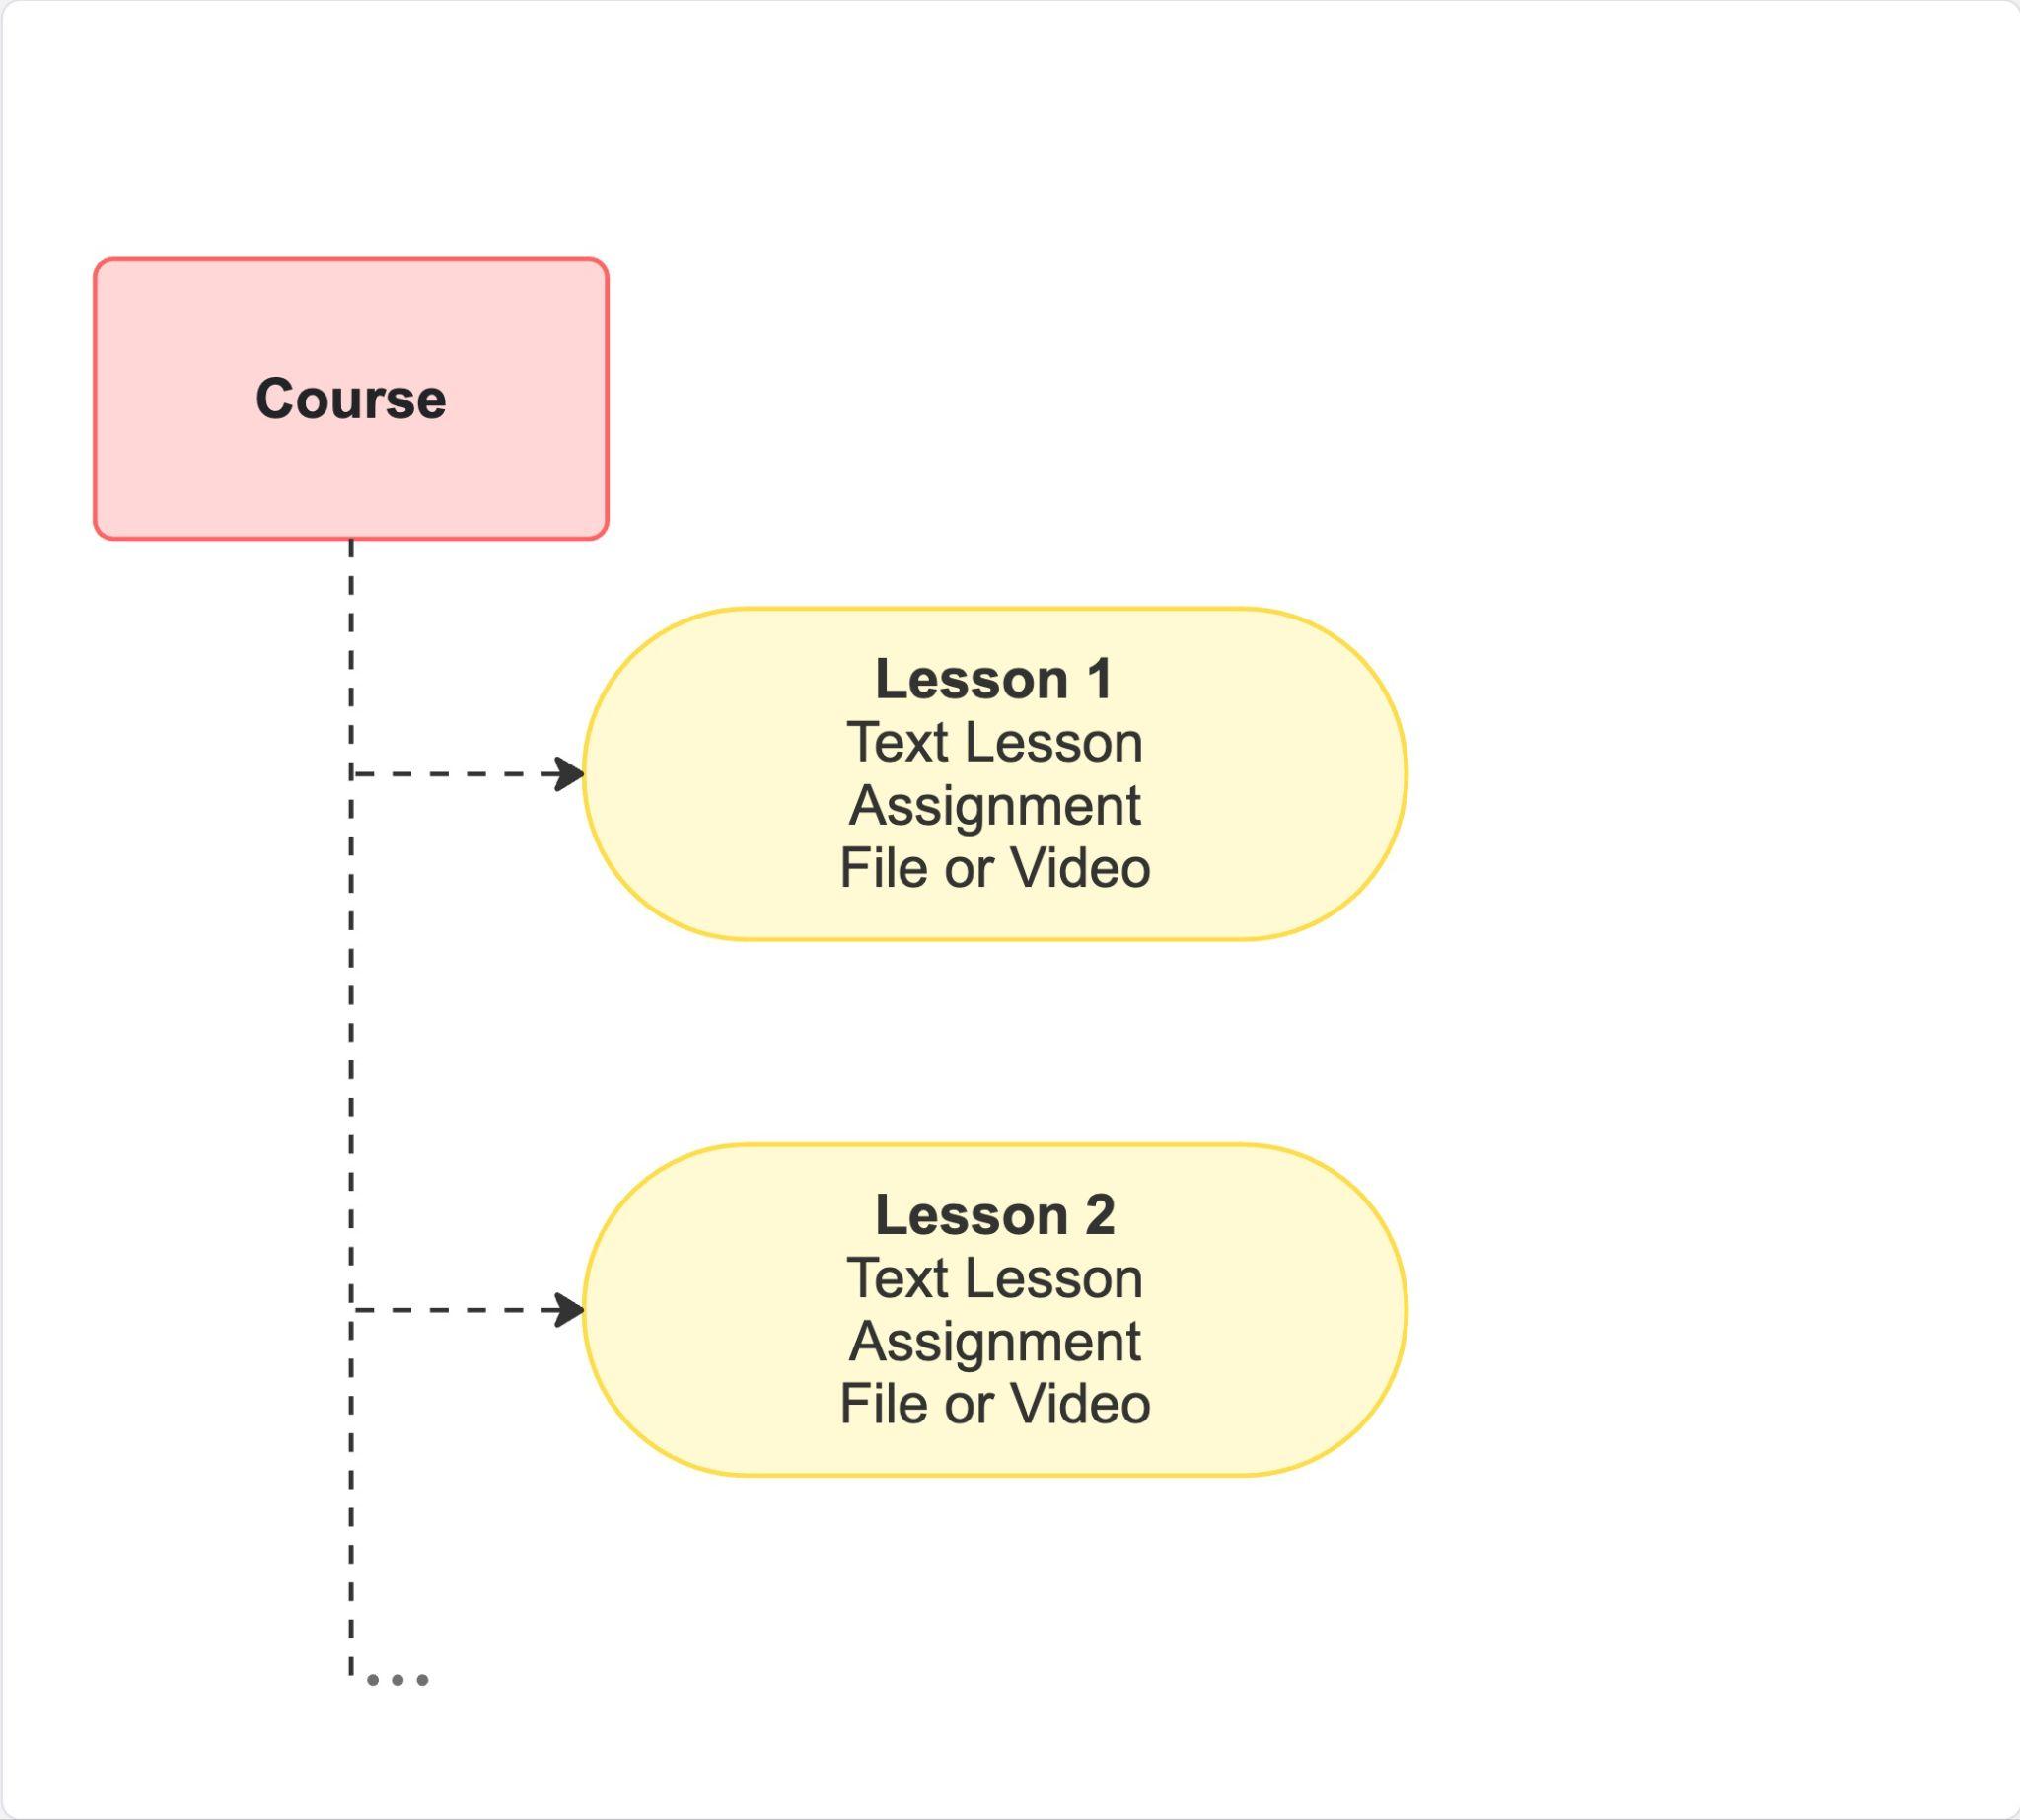
There's no limit on the number of lessons and assignments in a course. You can build anything from a short course of a few lessons to a complete training program for new employees.
Creating a course
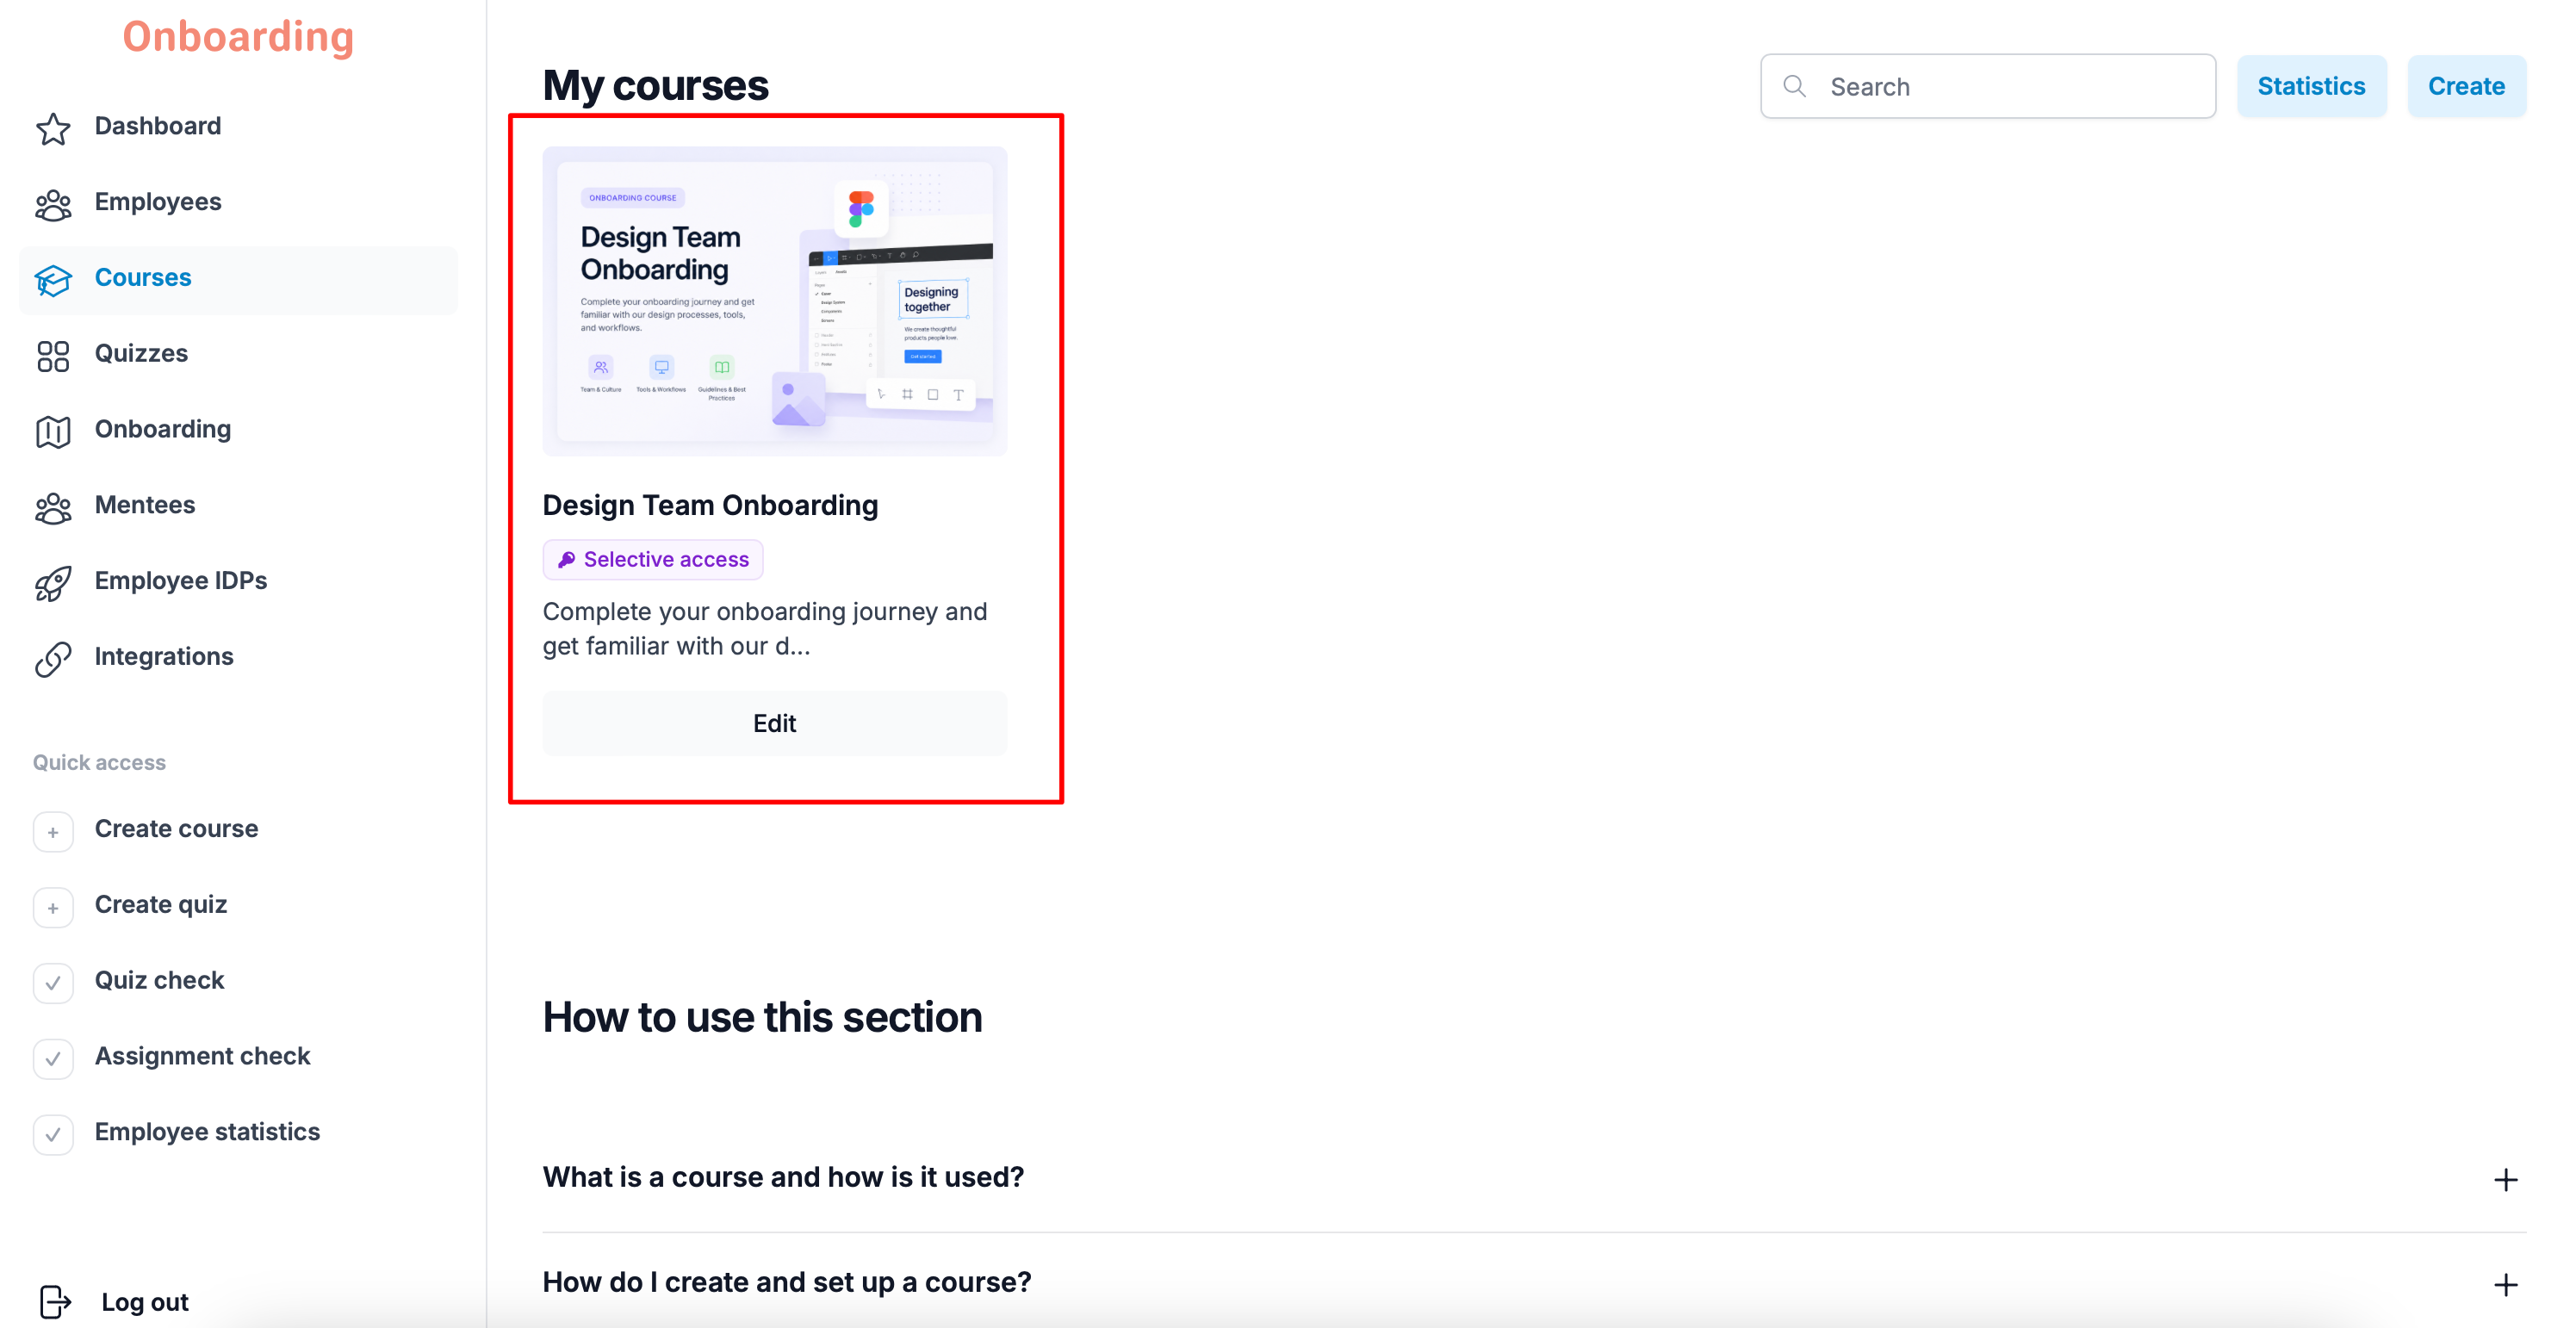
To create a new course, open the «Courses» section and click «Create course» in the middle of the page, or click «Create» in the top-right corner.
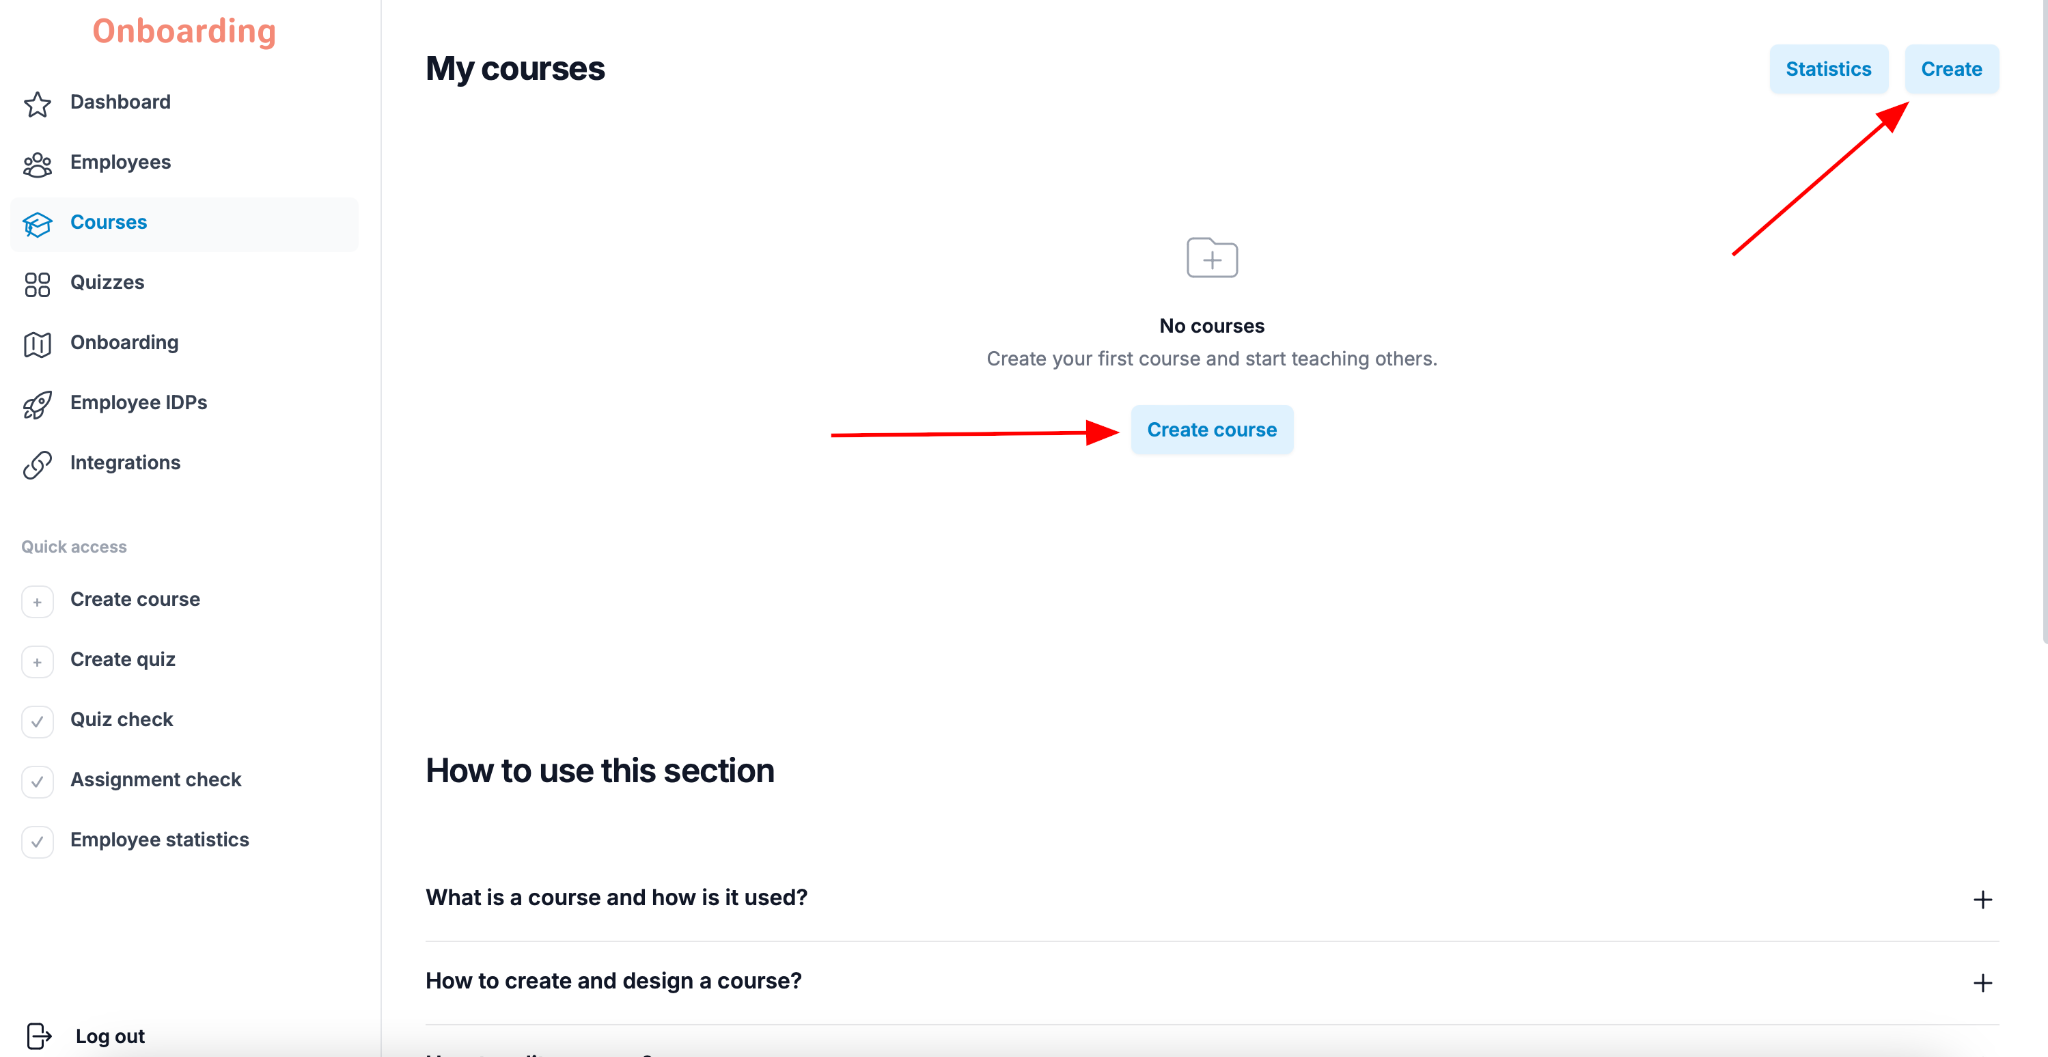
On the course creation page, fill in the following fields:
- Course name – the name employees will see.
- Course cover – optional. Upload an image to give the course a visual identity if you like.
- Description – briefly describe the goal of the course and what employees will learn from it.
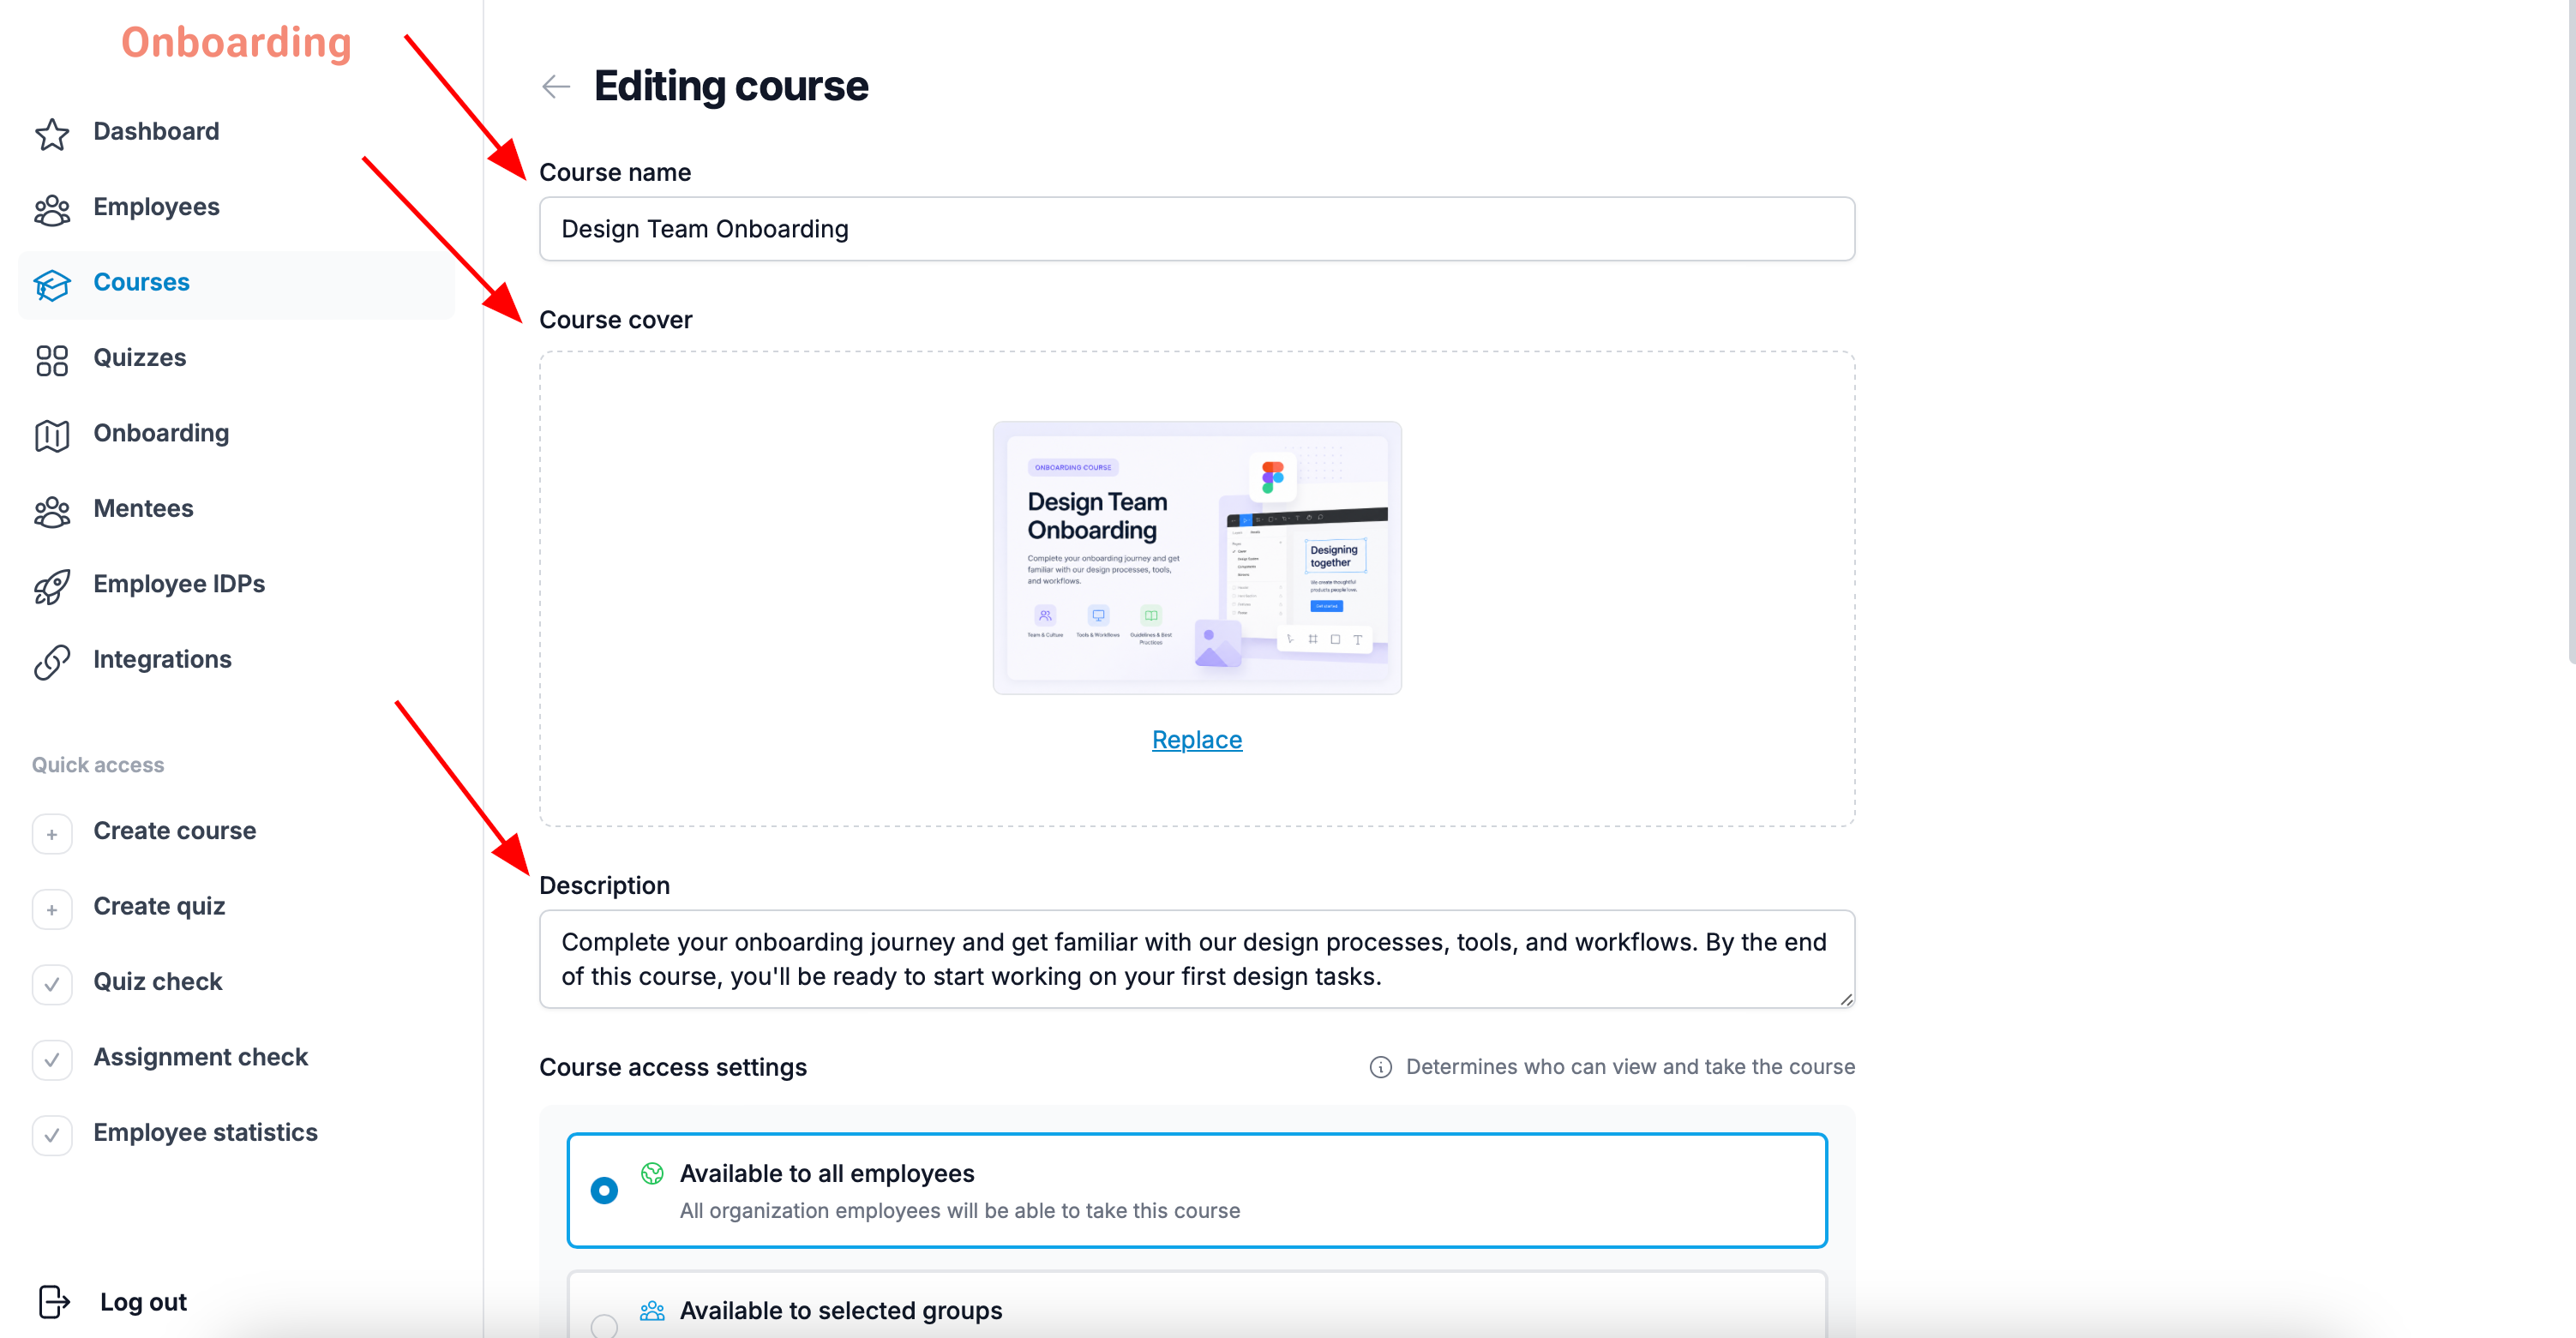
Setting up course access
At this stage you also decide who can take the course.
Choose one of the following options:
- Available to all employees – the course is assigned to every user on the platform.
- Available to selected groups – the course is available only to the selected group.
- Custom access settings – lets you combine groups and individual employees.
Access settings can be combined. For example, you can give a specific group access to the course and also assign it to individual users at the same time.
If you've set up access for individual employees and want to switch to group access, clear the current employee selection first, then pick the group that should have access to the course.
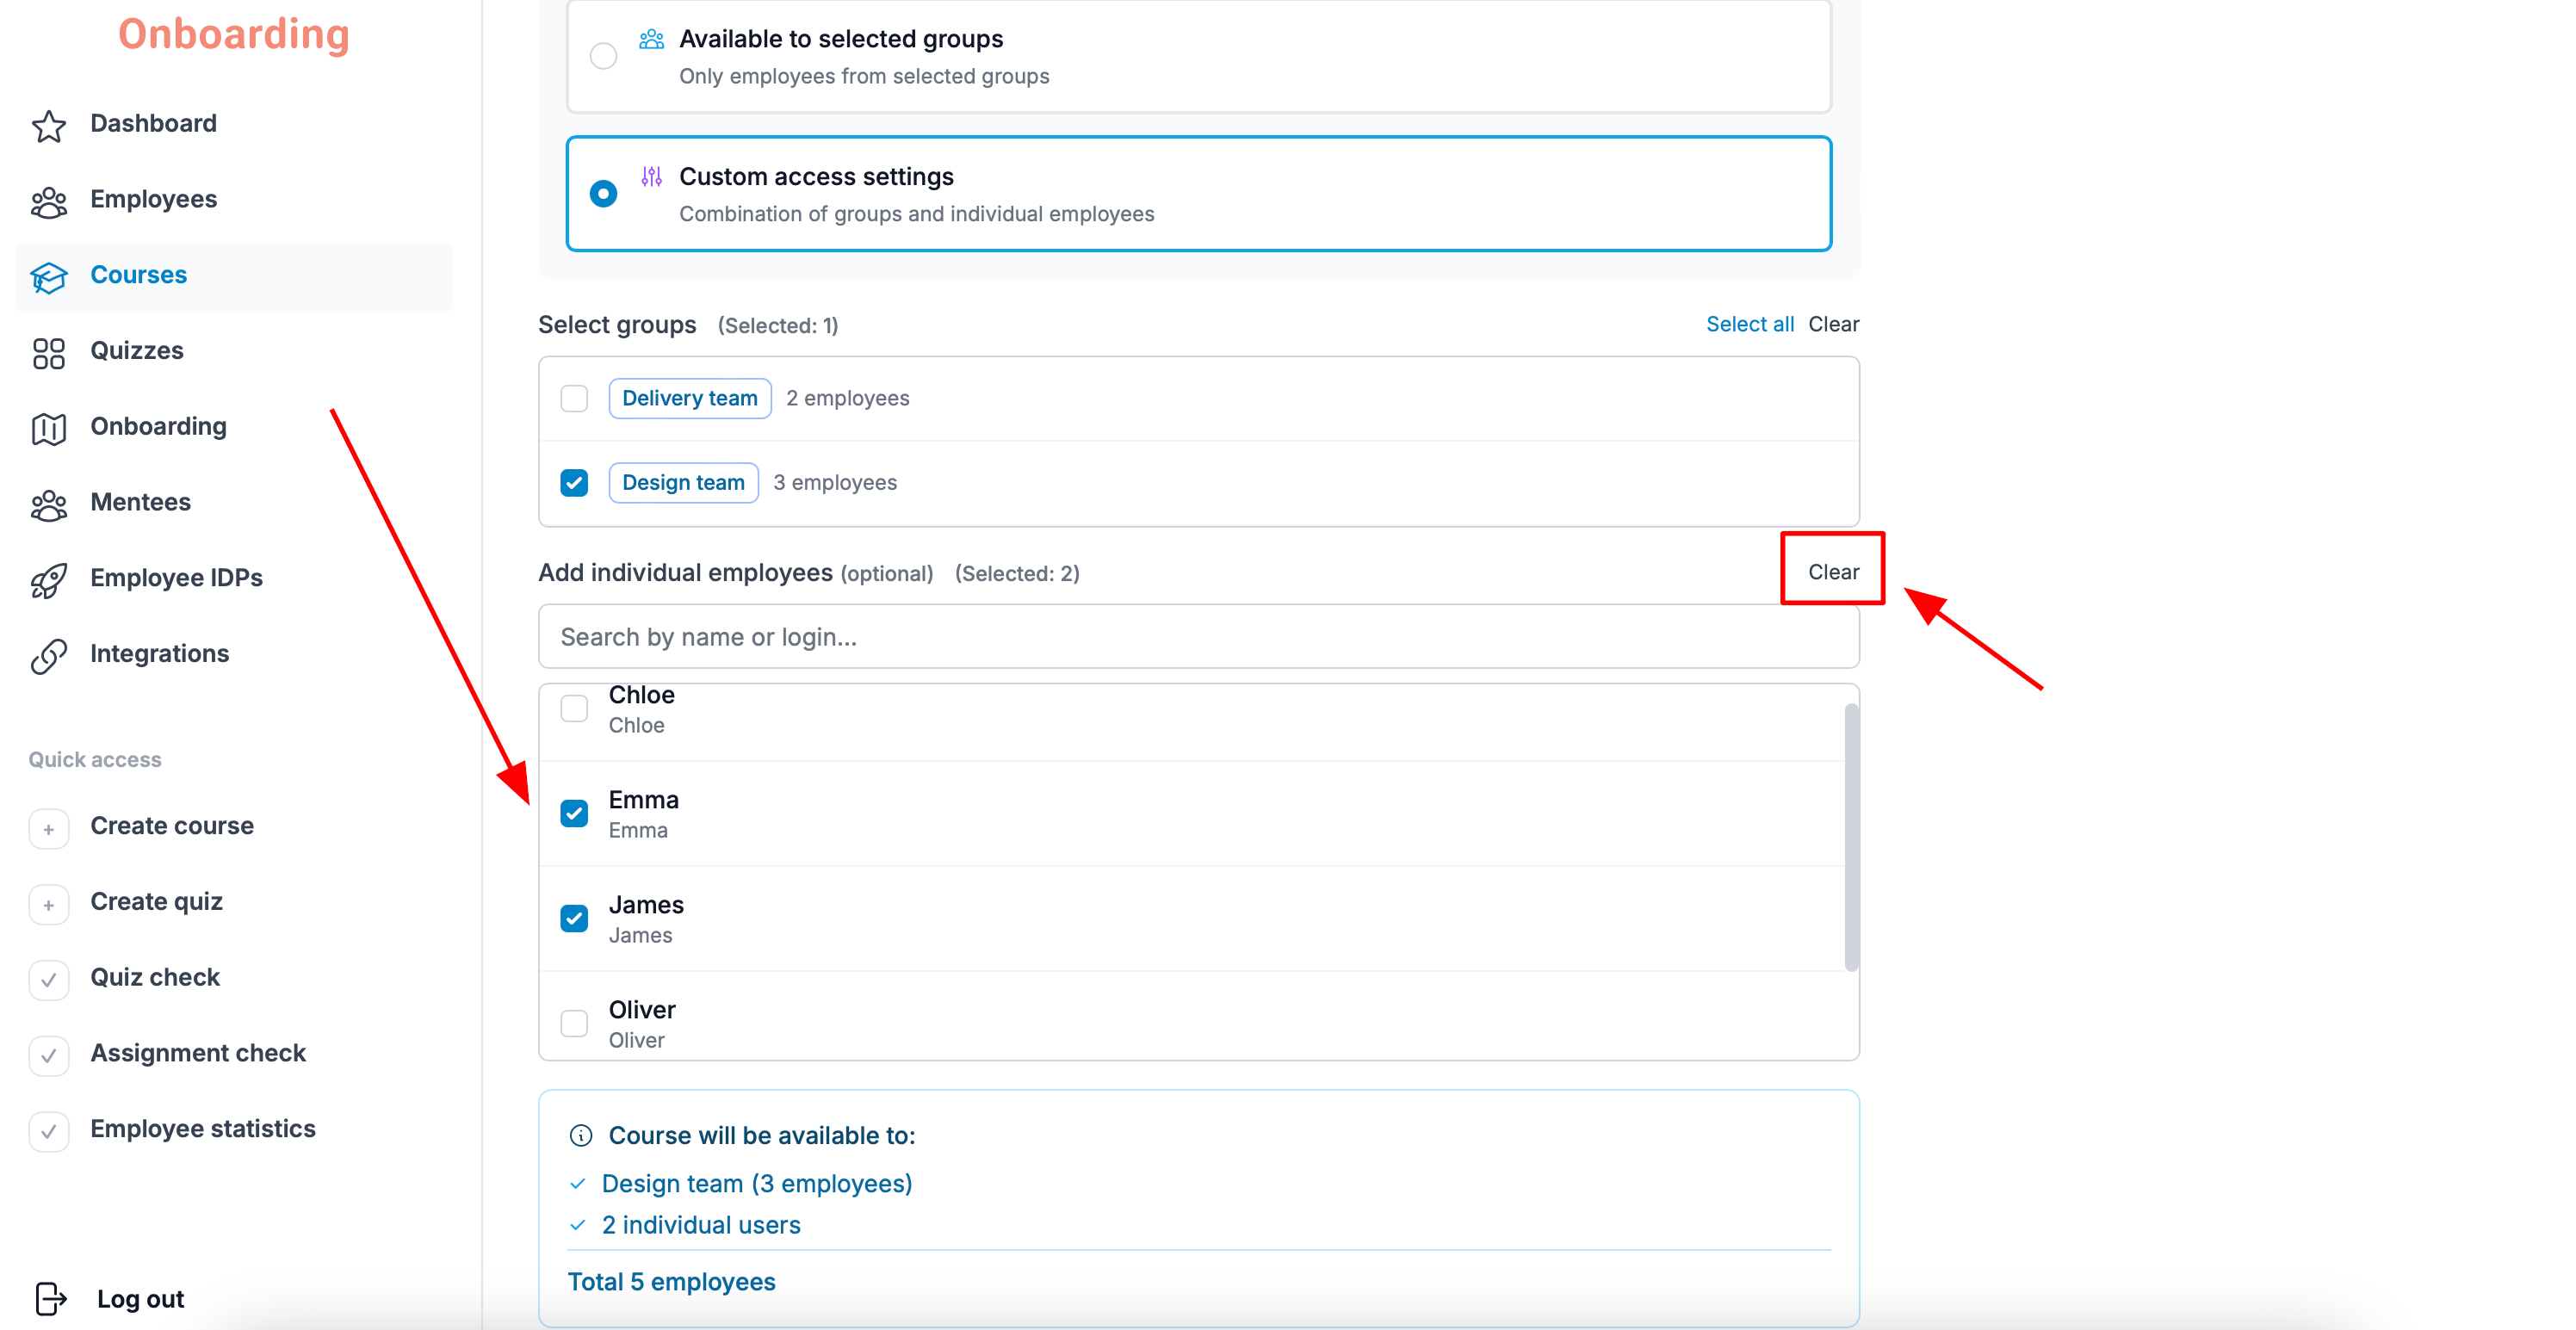
You must select at least one group or user; otherwise the course won't be available to anyone.
Once you've filled in all the required fields, click «Create course».
The course has been created 🎉
After you click «Create course», the course editor opens, where you can start filling the course with lessons, homework assignments, and training materials.
The new course will also appear in the course list.
Use clear, specific course names that tell employees exactly what the training covers. For example, instead of «Training #1», go with «Server Work Standards» or «Warehouse New Hire Onboarding».
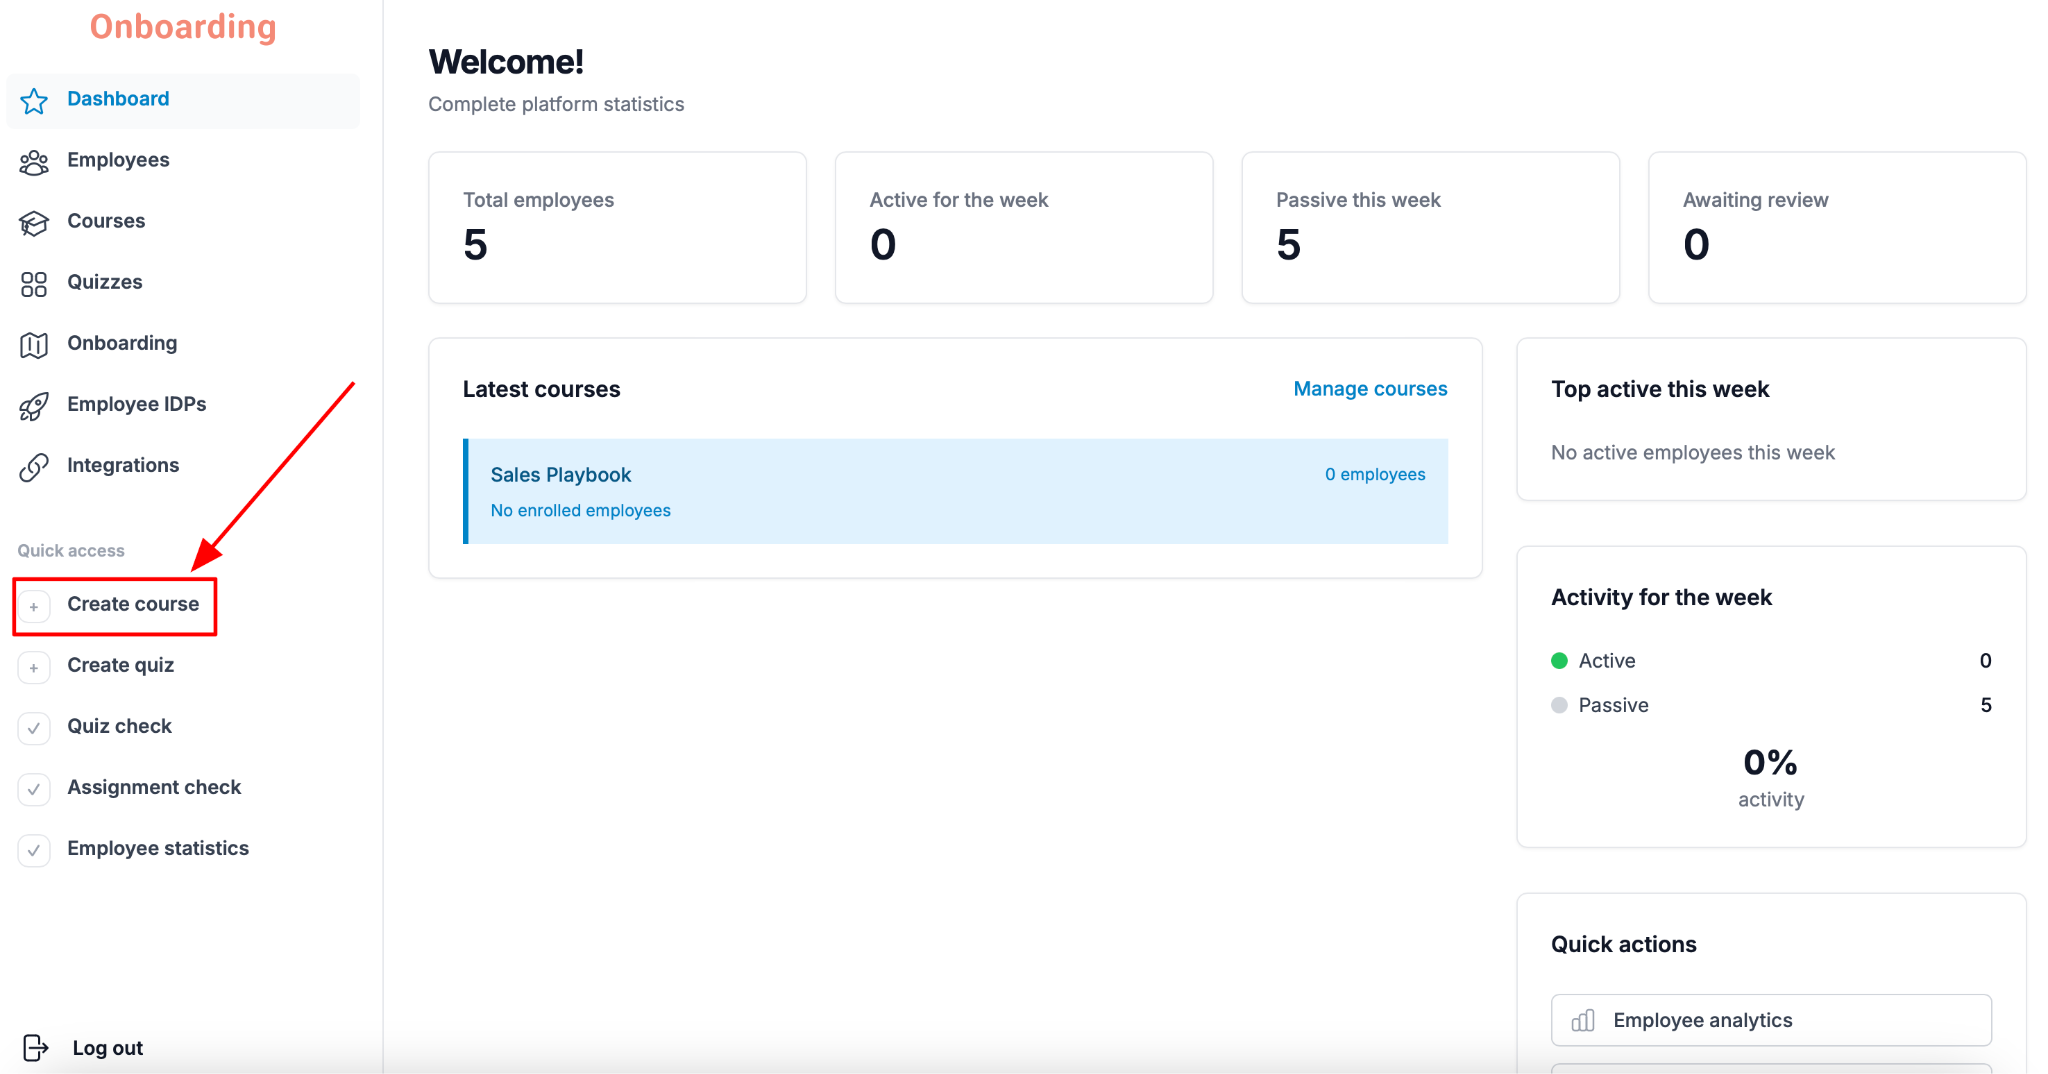
You can create a course not only from the «Courses» section, but also via the «Create course» button in the quick access menu.
Creating course lessons
After creating a course, you land in its editor. This is where you fill the course with training materials.
A course is made up of lessons.
A lesson is a single step in an employee's training that holds materials for learning and knowledge checks. Depending on your goals, a lesson can contain text, files, videos, or assignments.
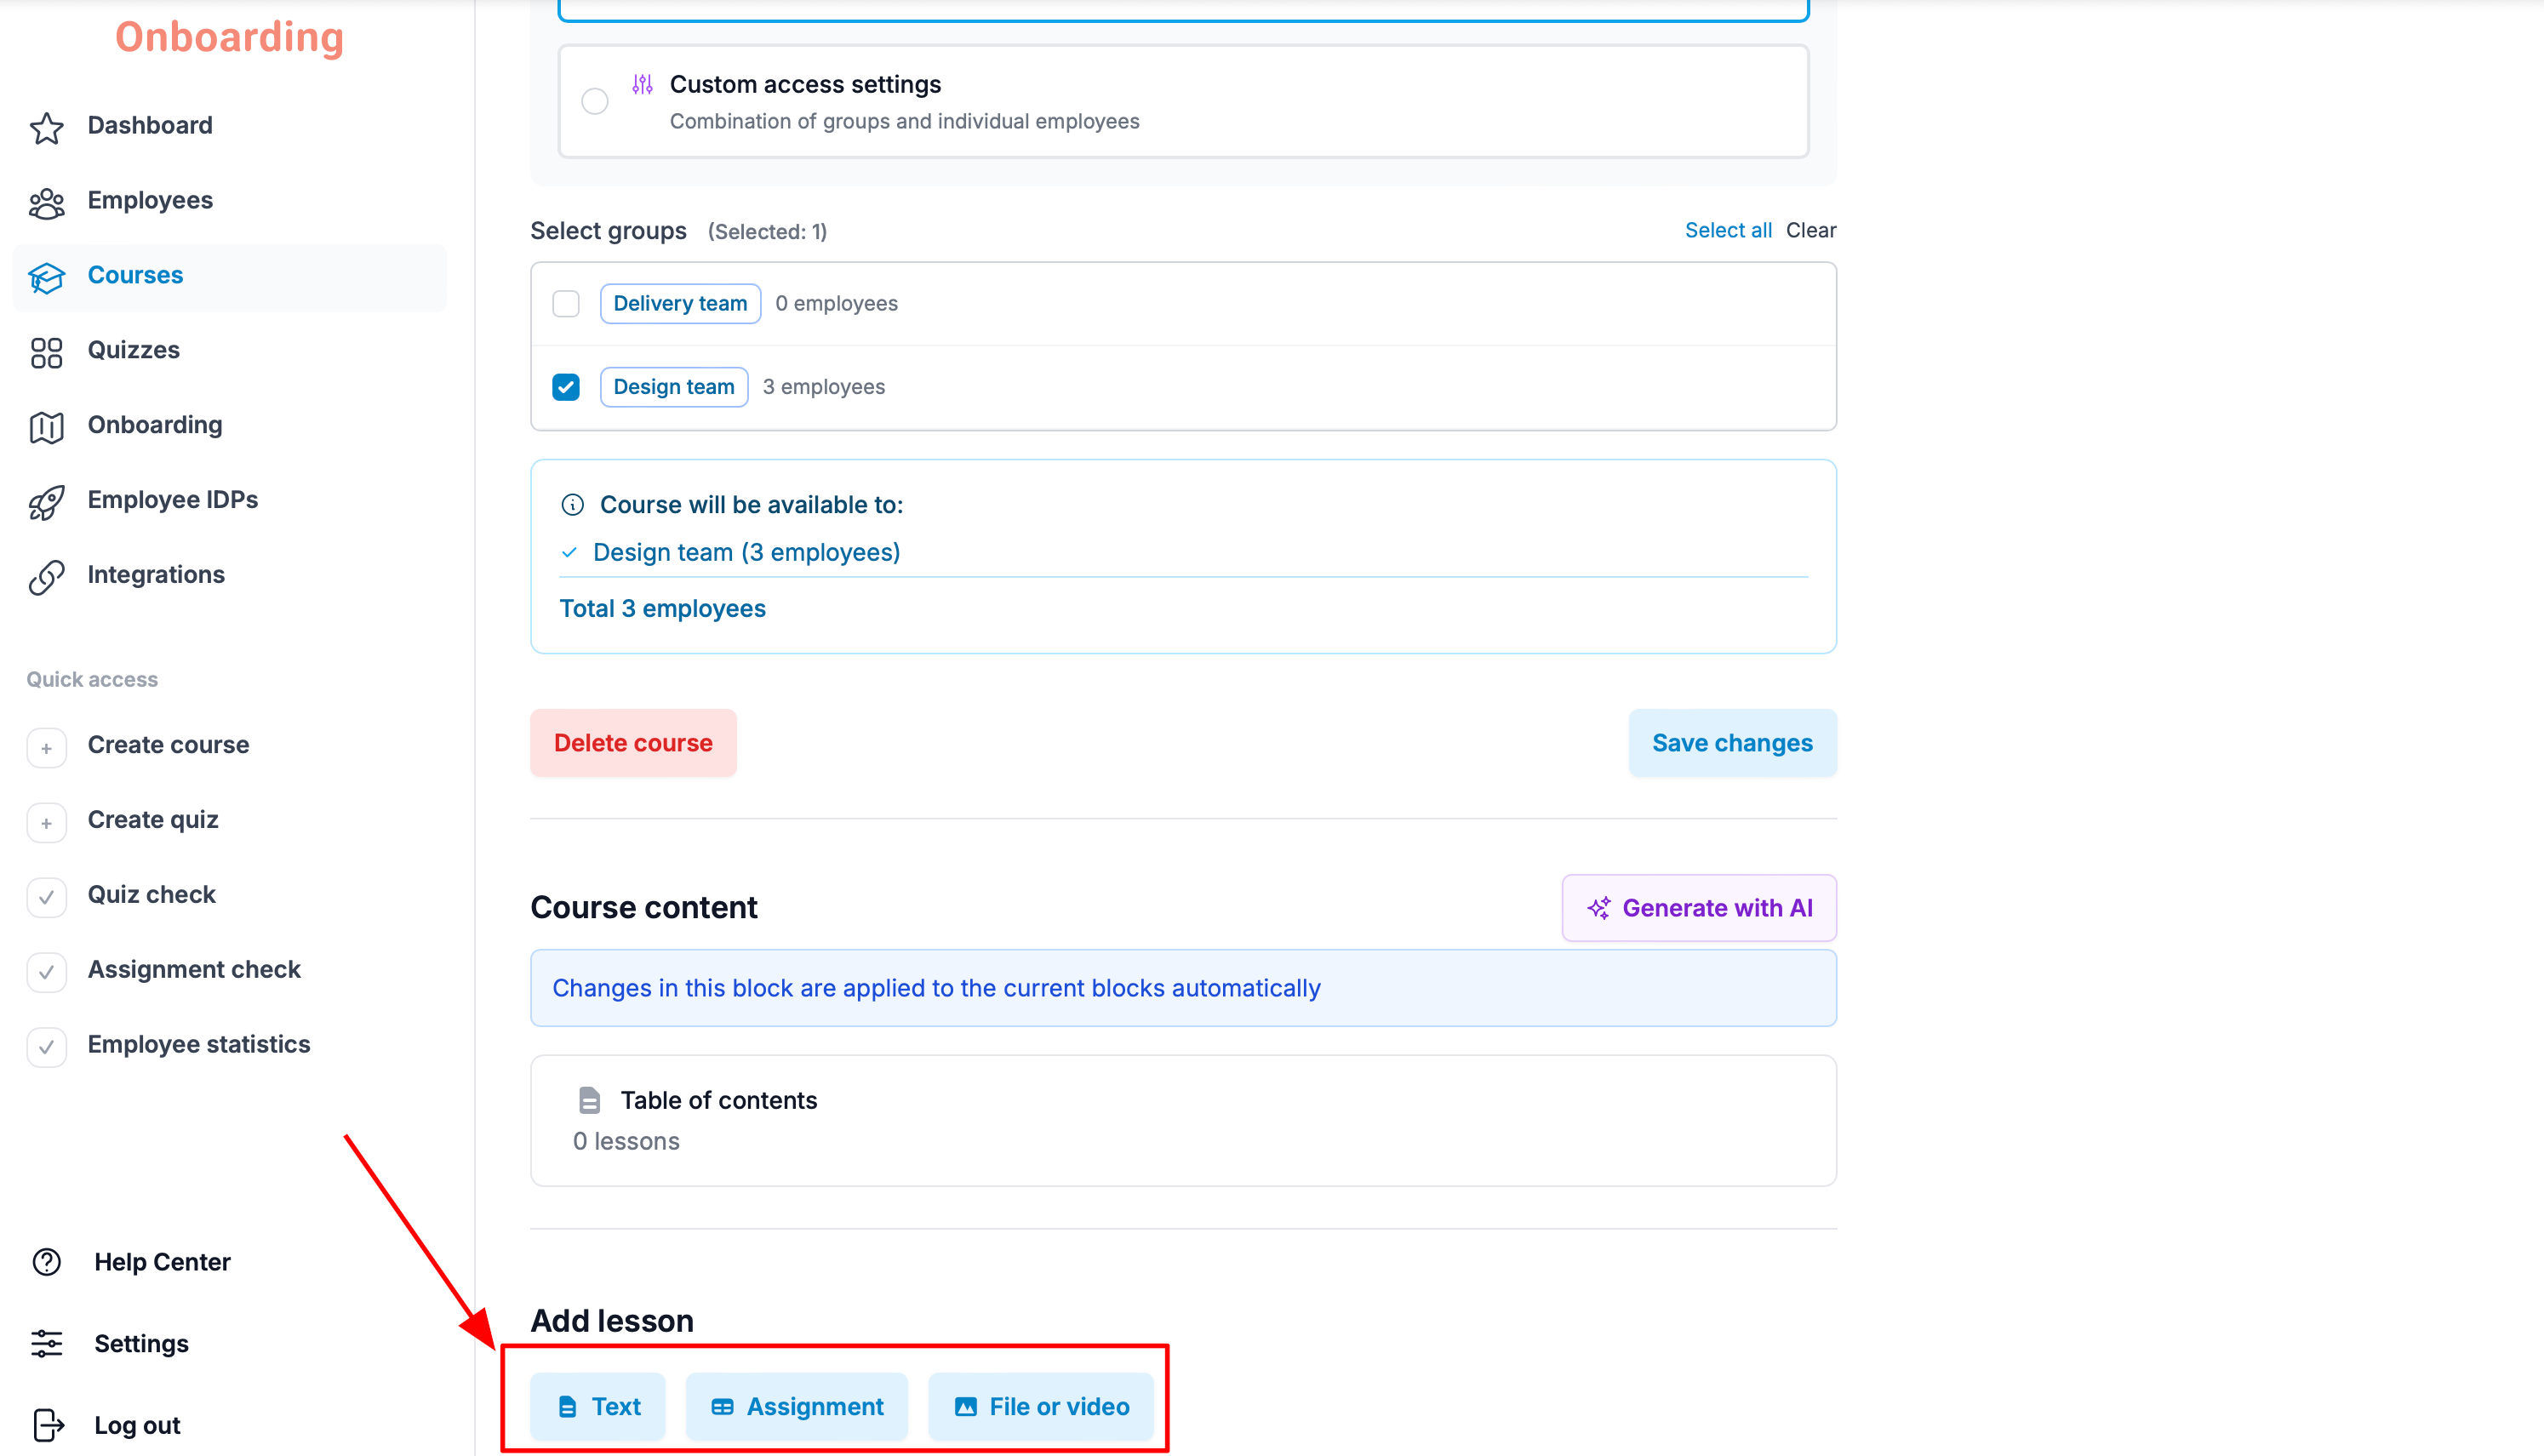
The platform supports the following lesson types:
- Text – for instructions, policies, work standards, and other written materials.
- Assignment – for checking knowledge, collecting feedback, or assessing an employee's practical skills (homework).
- File or video – for uploading documents, presentations, images, videos, and other materials.
Creating a Text lesson
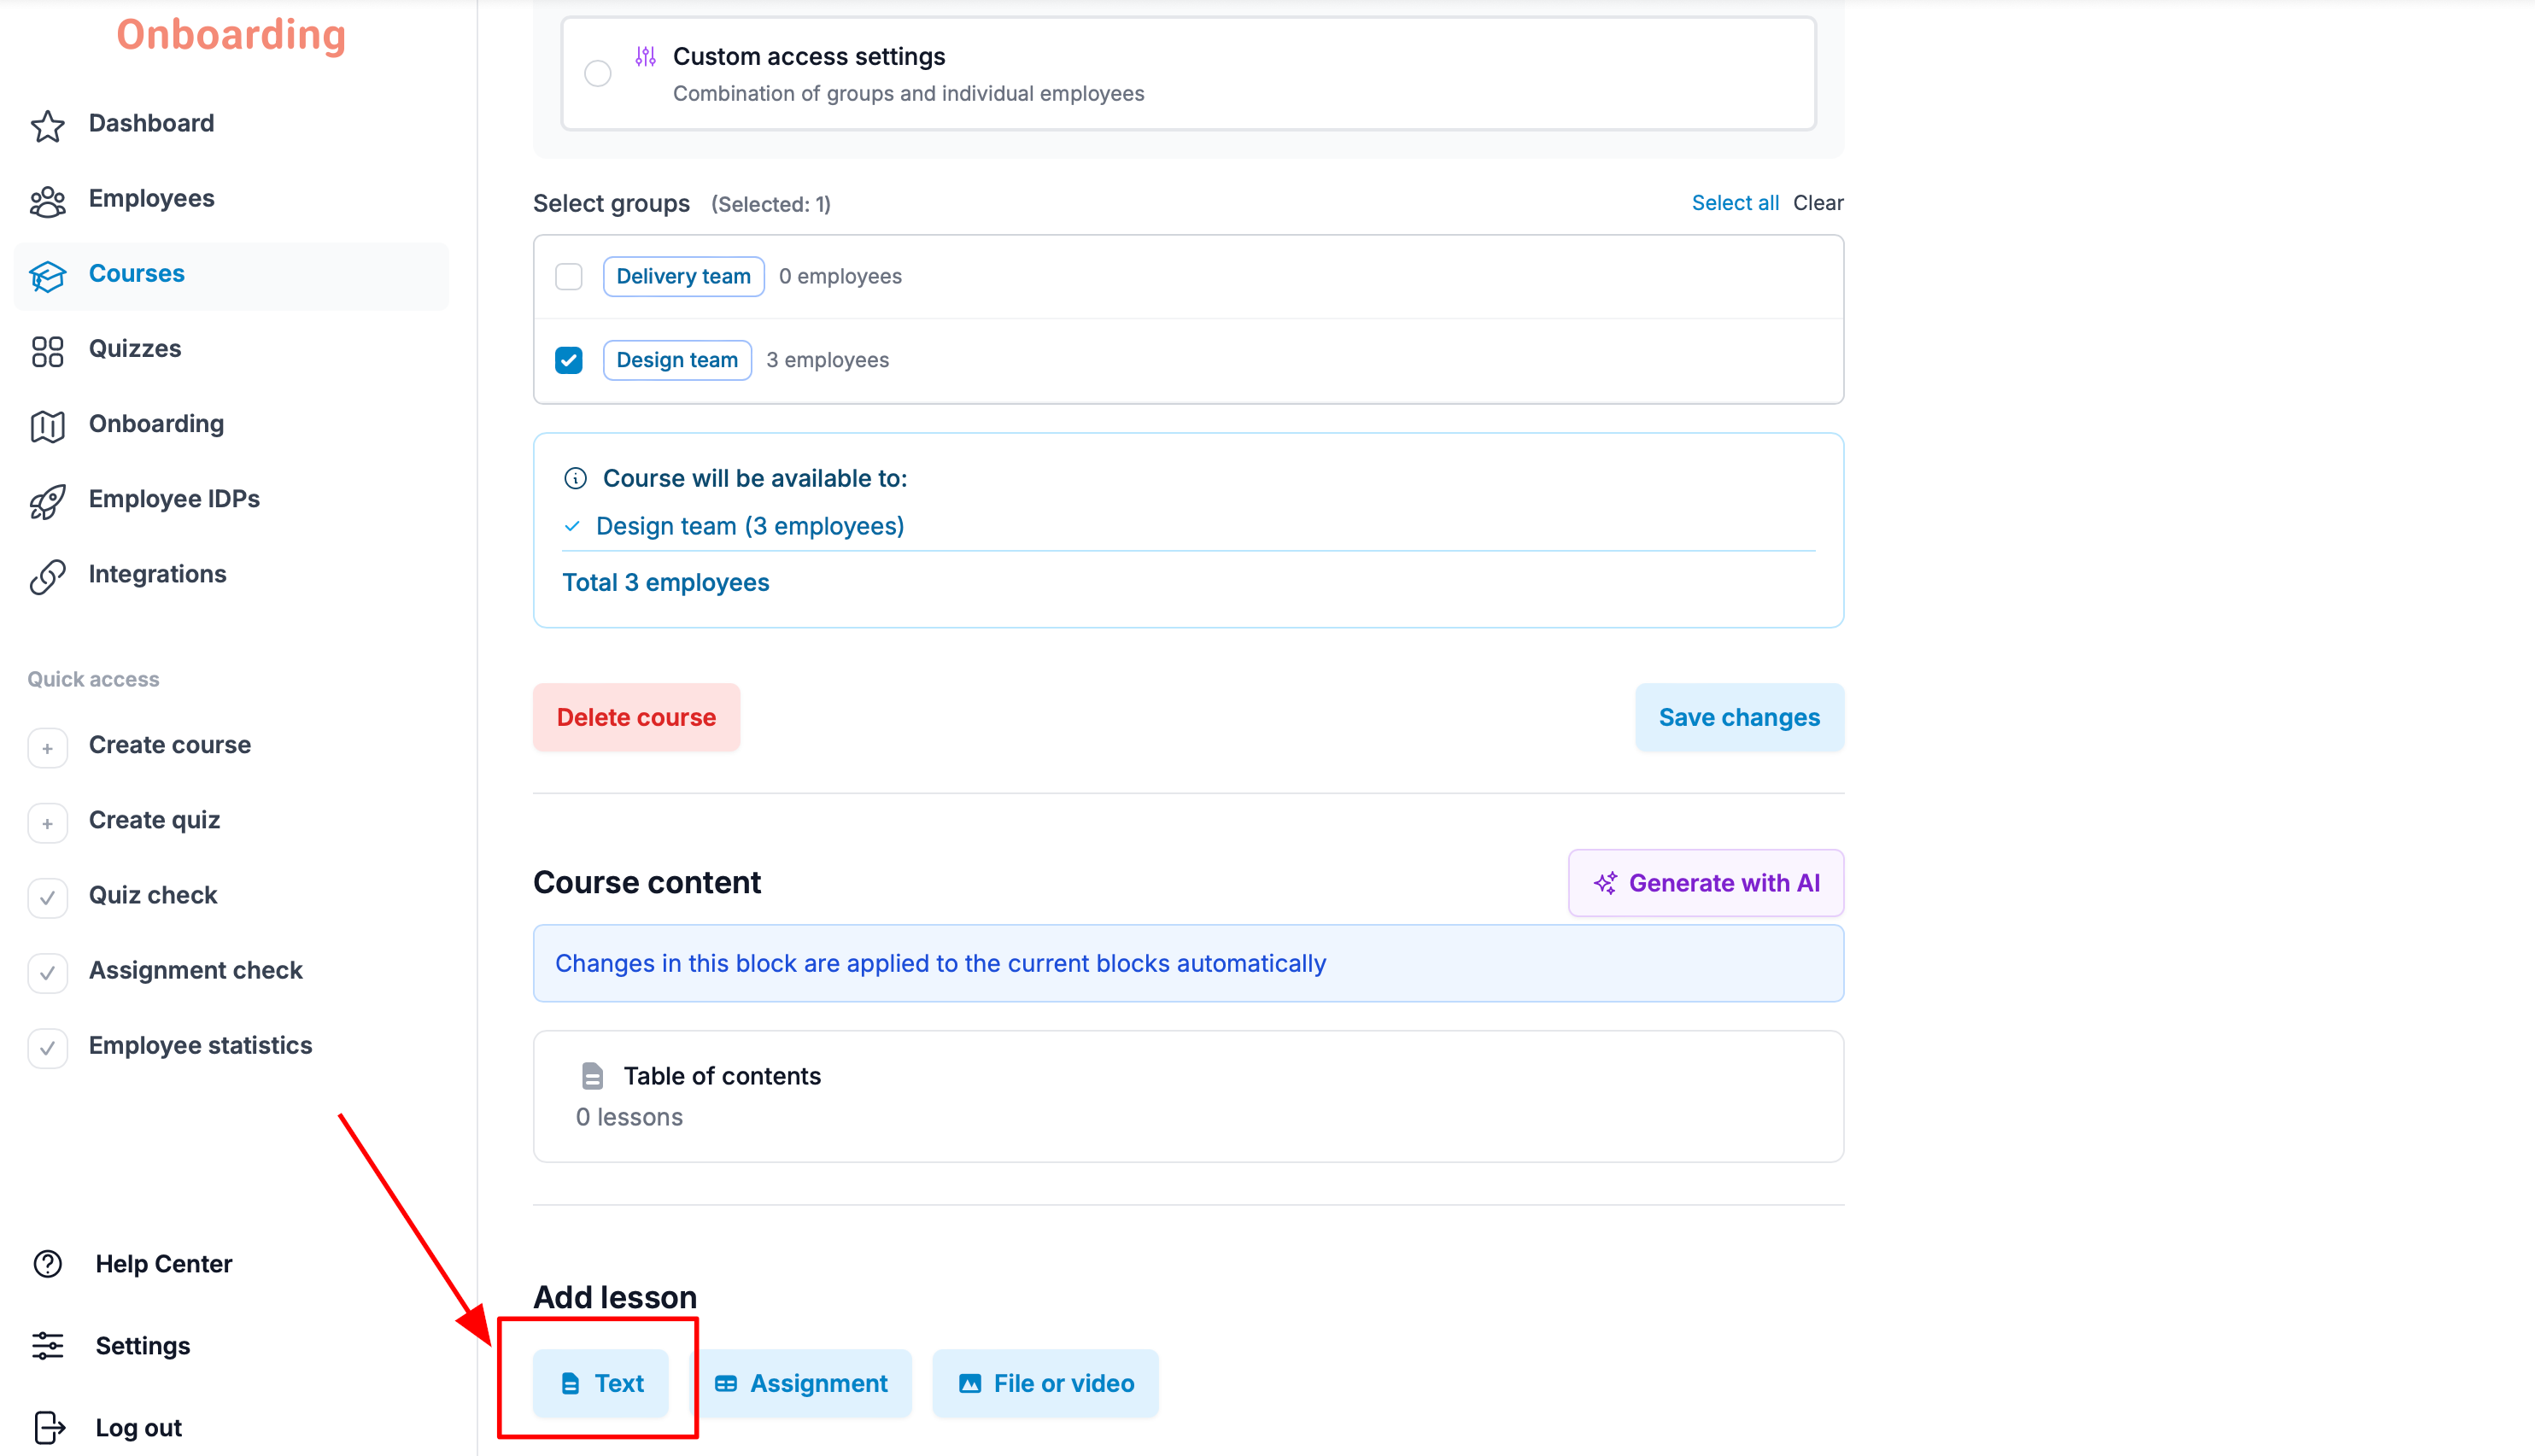
To add a text lesson, click the «Text» button in the «Add lesson» block on the course editing page.
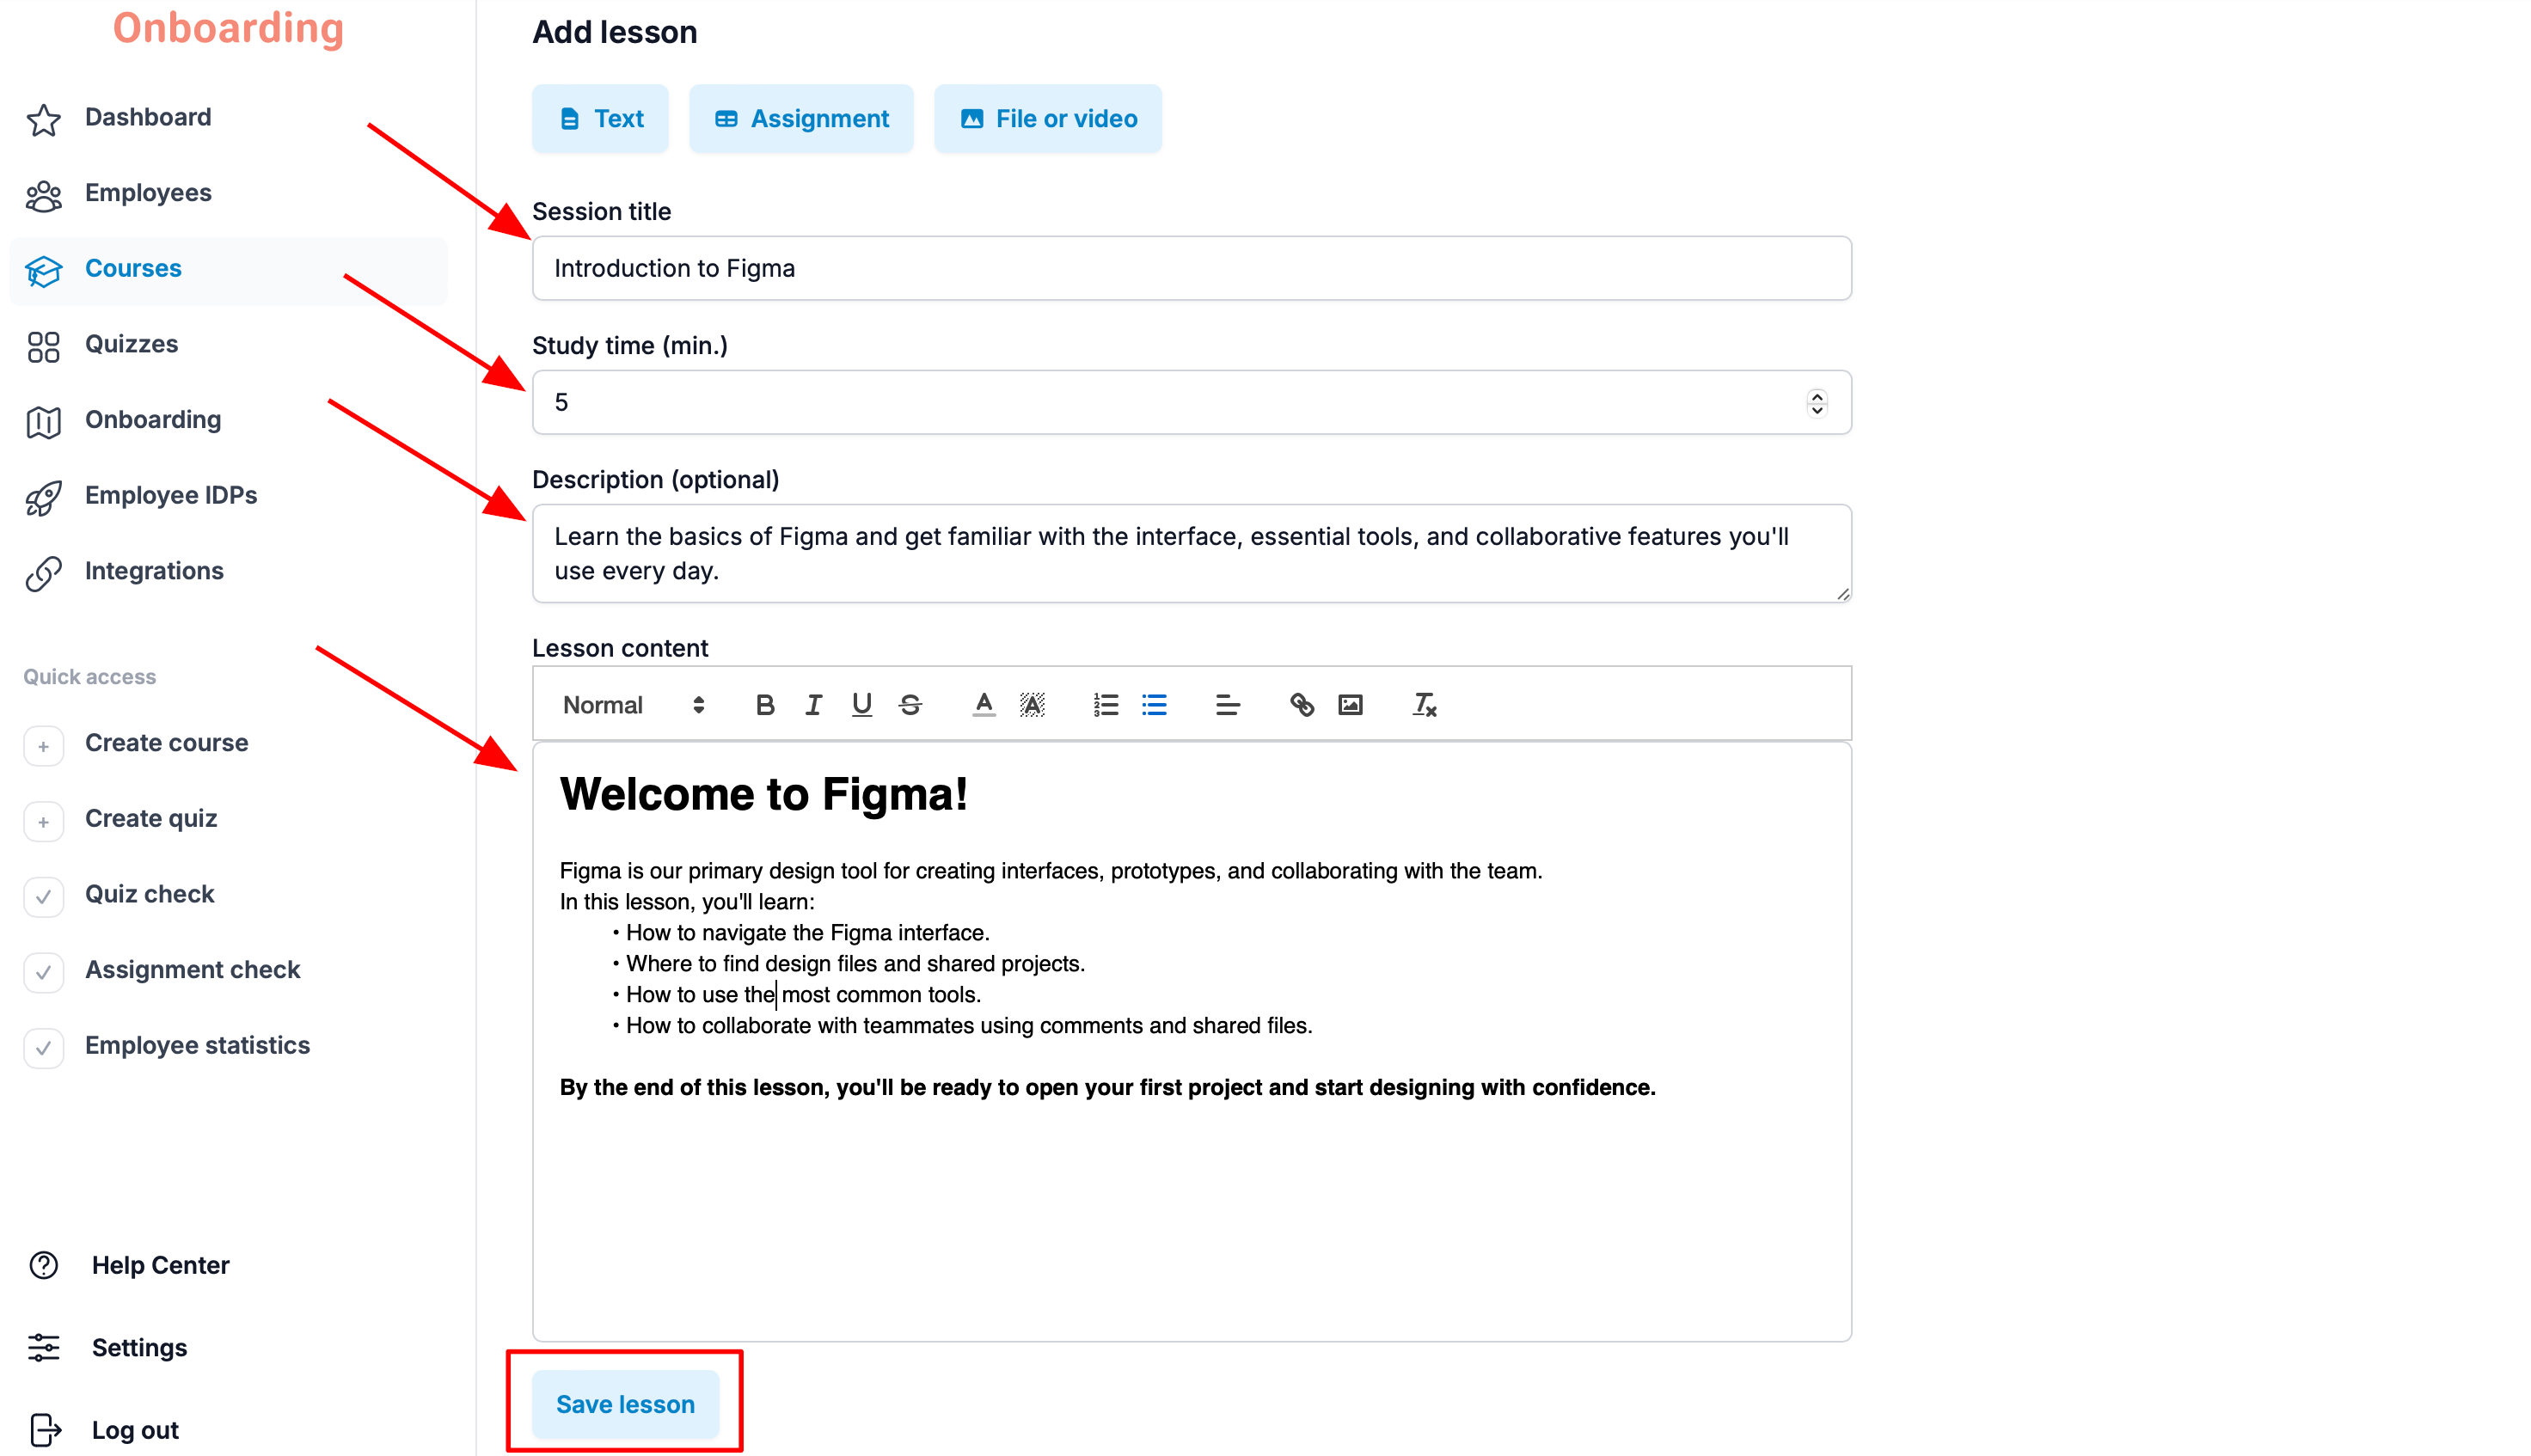
A lesson creation form opens below, with the following fields:
- Session title – the lesson name employees will see.
- Study time (min.) – roughly how long the employee will need to work through the material.
- Description – optional. A short note on what the lesson is about.
- Lesson content – the main text field where the training material goes.
Once you've filled in all the required fields, click «Save lesson».
The new lesson now appears in the «Course content» block and is part of the training program 🎉
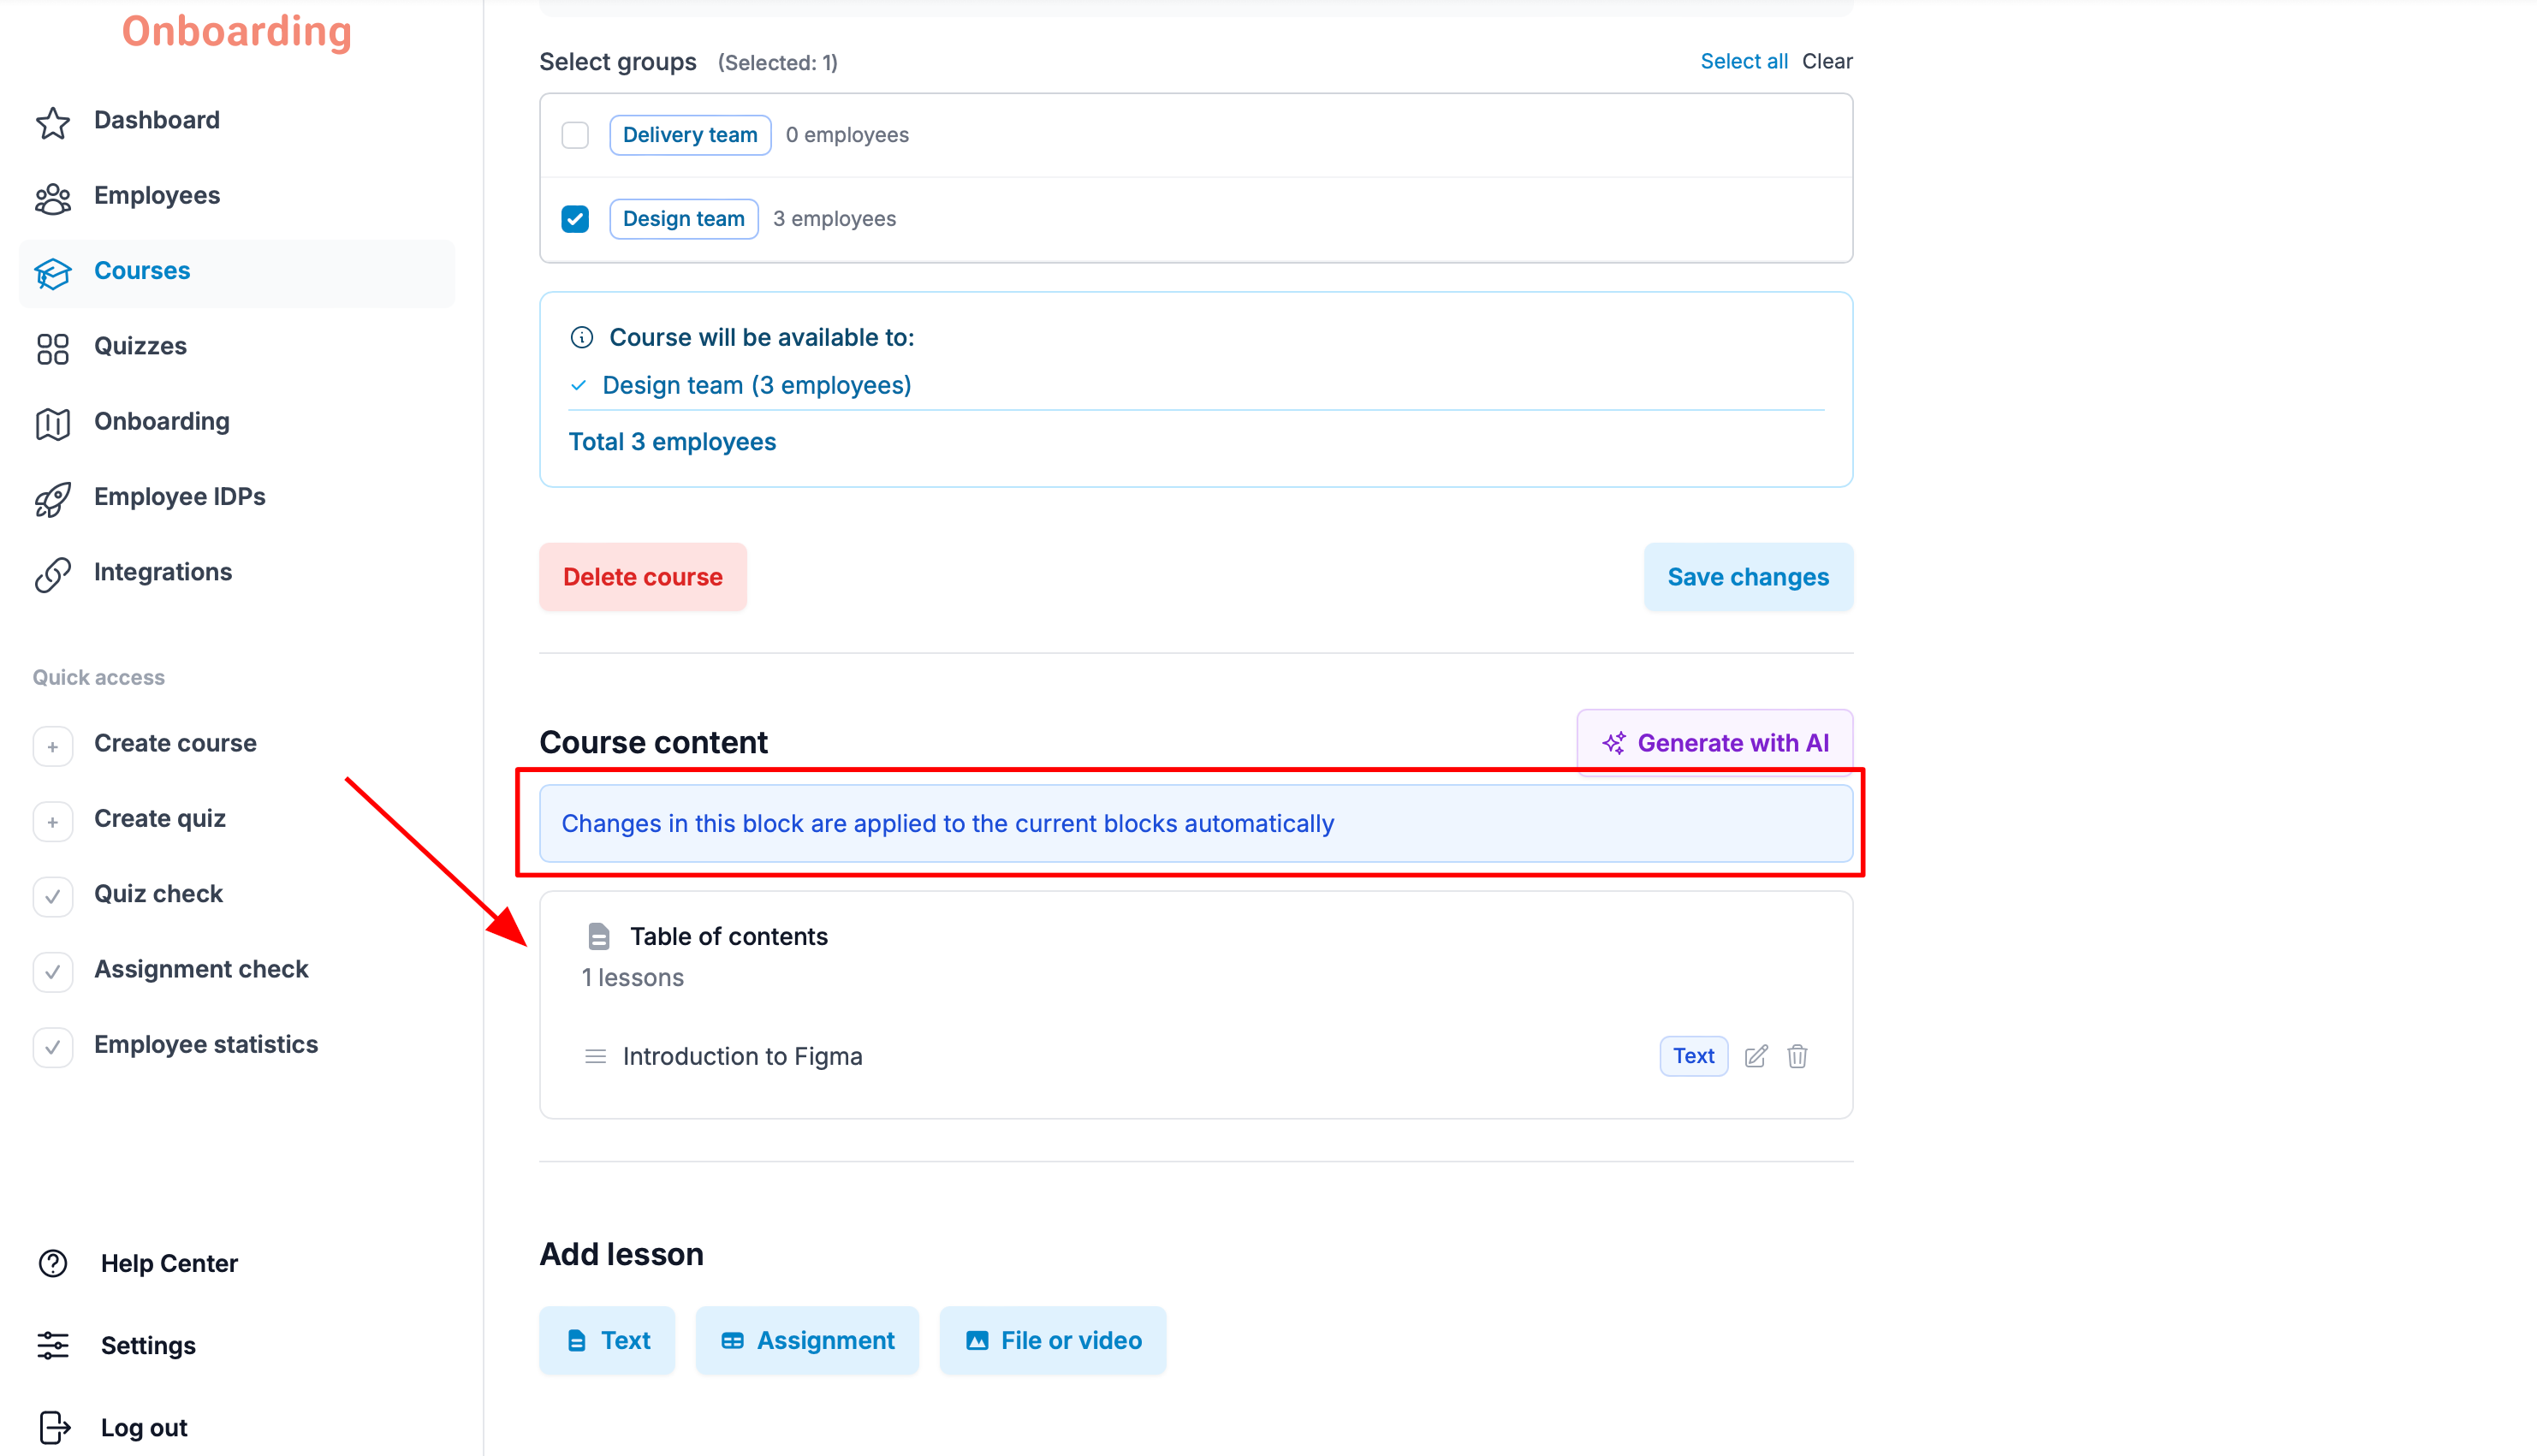
All changes in this block take effect automatically. If you add a new lesson or update the course structure, the changes become immediately visible to every employee with access to the course.
Make use of text formatting when building lessons: headings, lists, bold text, links, images, and other layout elements.
Well-structured material is easier for employees to take in, helps them find key information faster, and keeps them more engaged in training.
Creating an Assignment Lesson
An assignment is the employee's homework — a way to check that the material has sunk in after a lesson.
An assignment can be added after any lesson in a course. Assignments are optional — you decide where in the training you want to double-check an employee's knowledge or collect their feedback.
When completing an assignment, the employee submits an answer and can attach files as proof of completion if needed.
For each assignment you set:
- Maximum score – the highest grade an employee can receive.
- Passing score – the minimum number of points needed to pass the assignment.
When an employee submits their answer, the assignment goes into the review queue. You'll need to grade it:
- If the employee scores at or above the passing score, the assignment counts as completed.
- If the employee scores below the passing score, the assignment is sent back for another attempt.
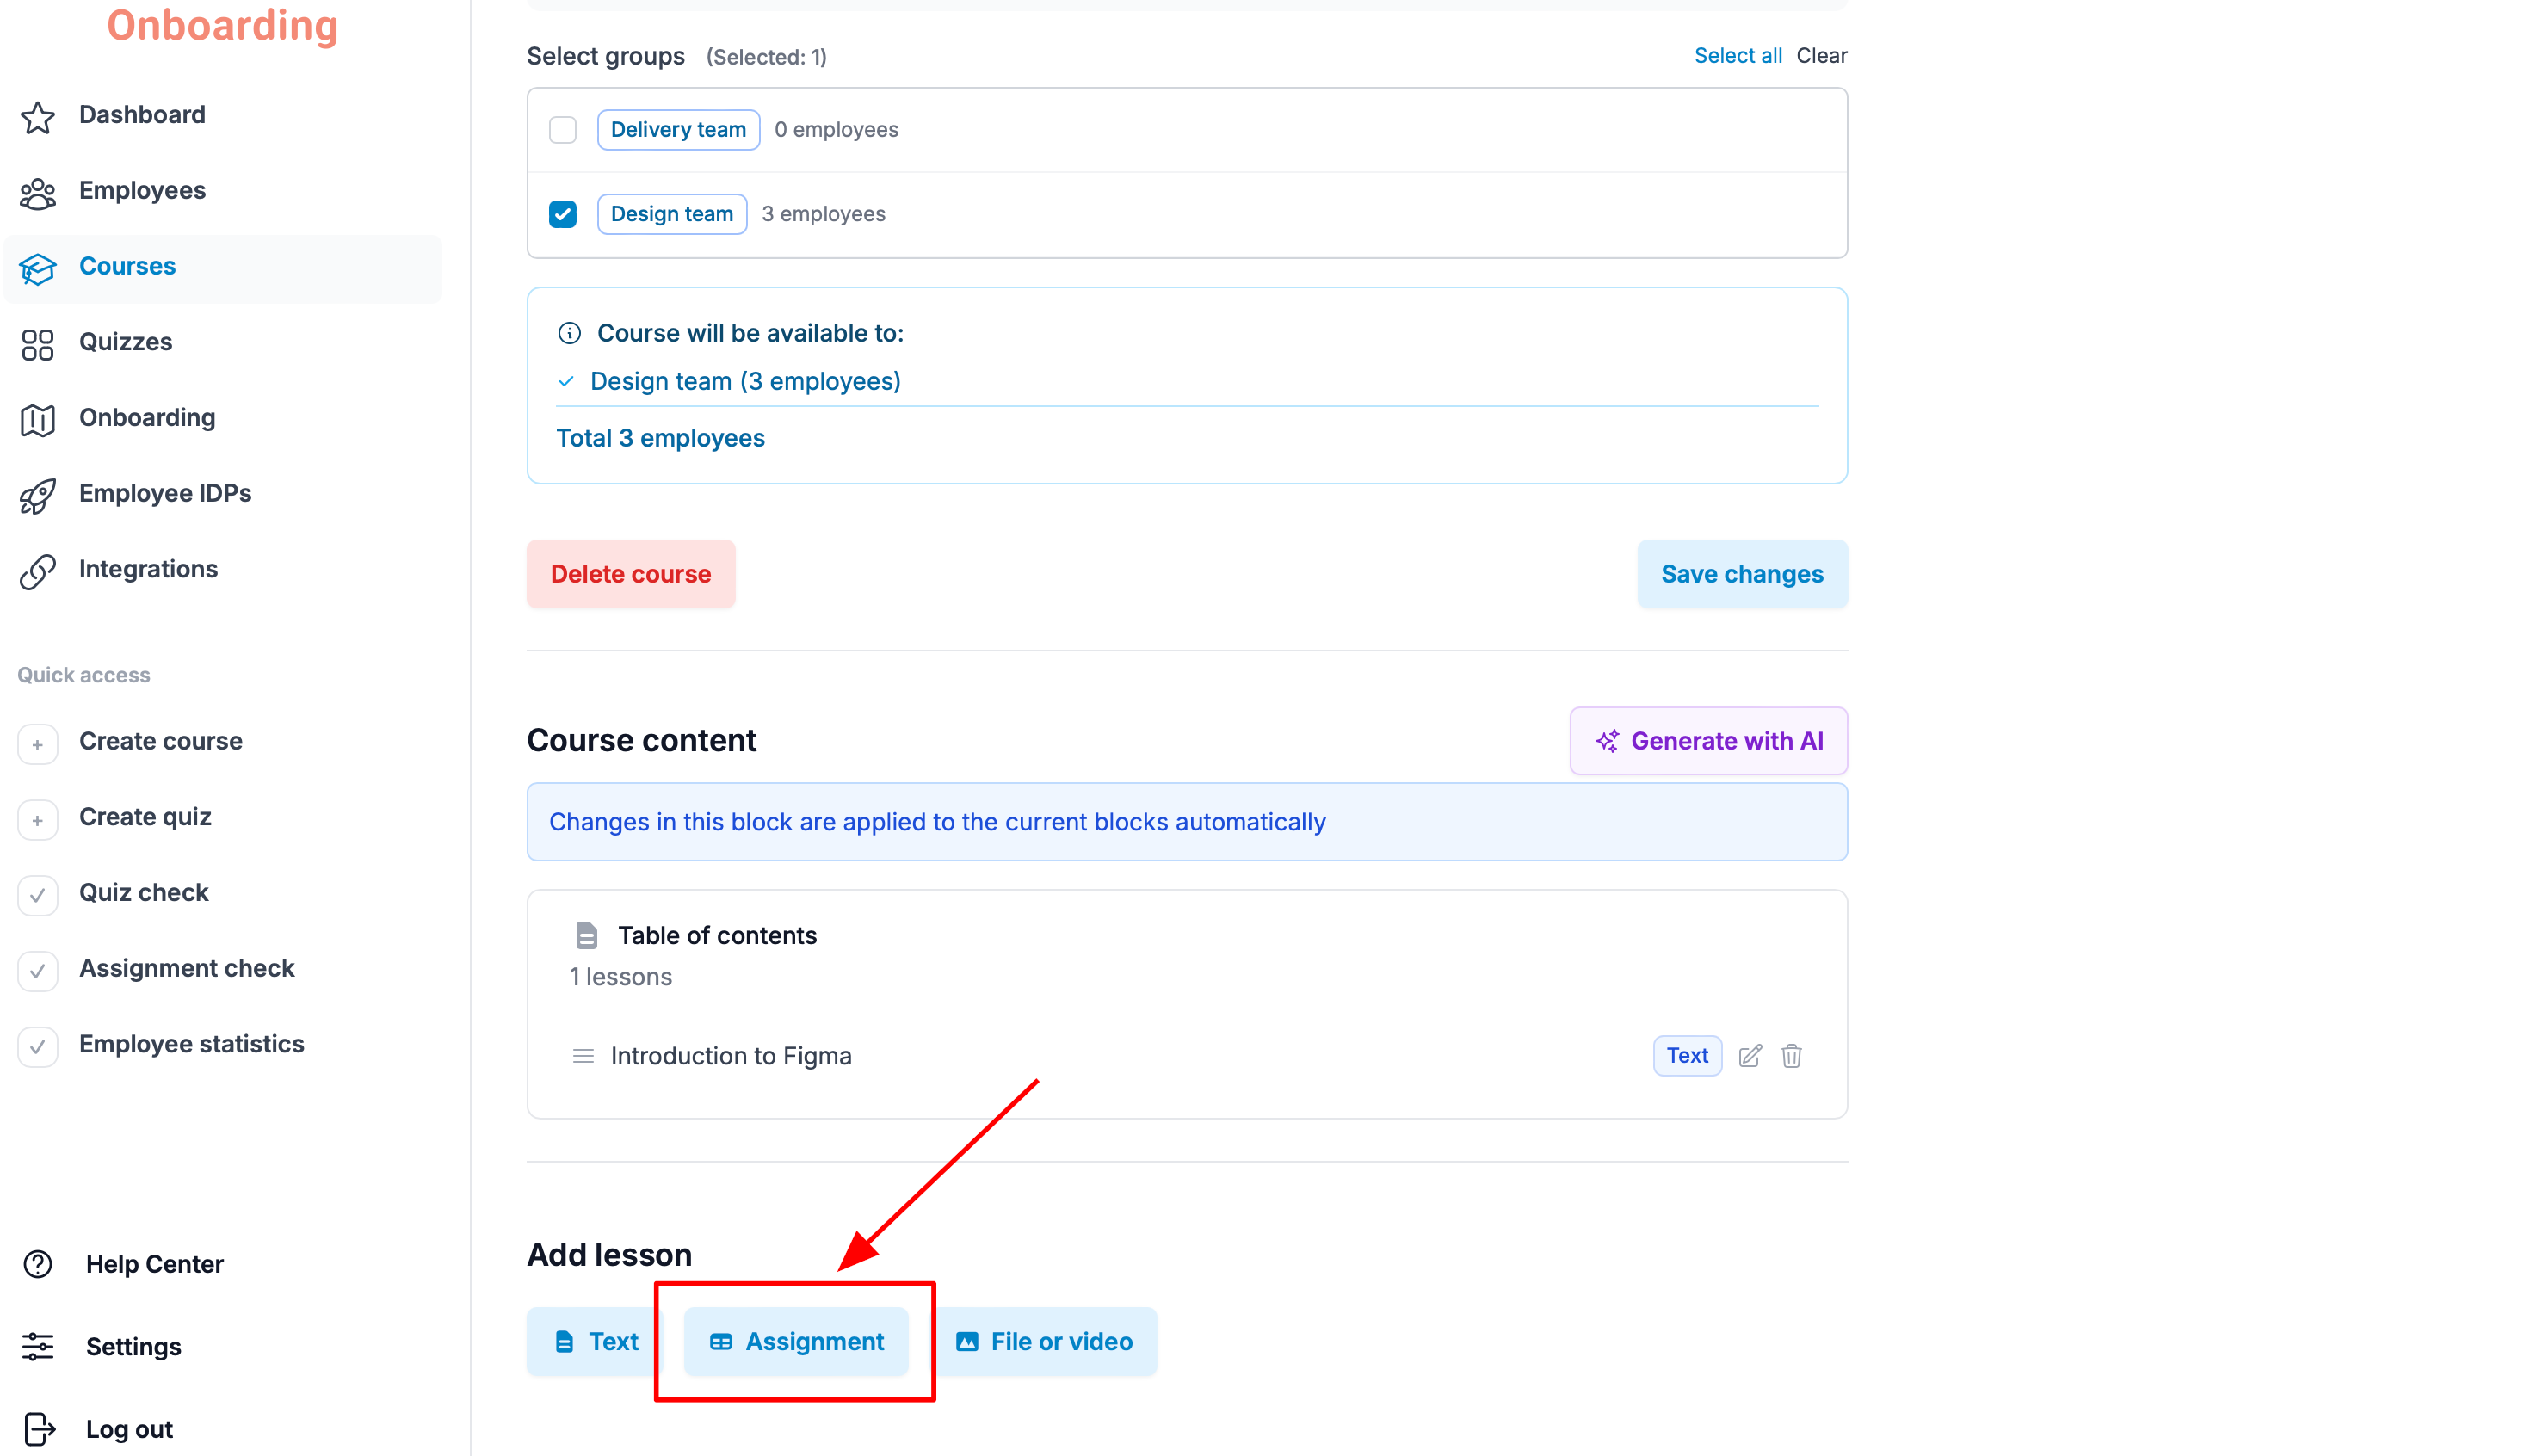
To add an assignment lesson, click the «Assignment» button in the «Add lesson» block on the course editing page.
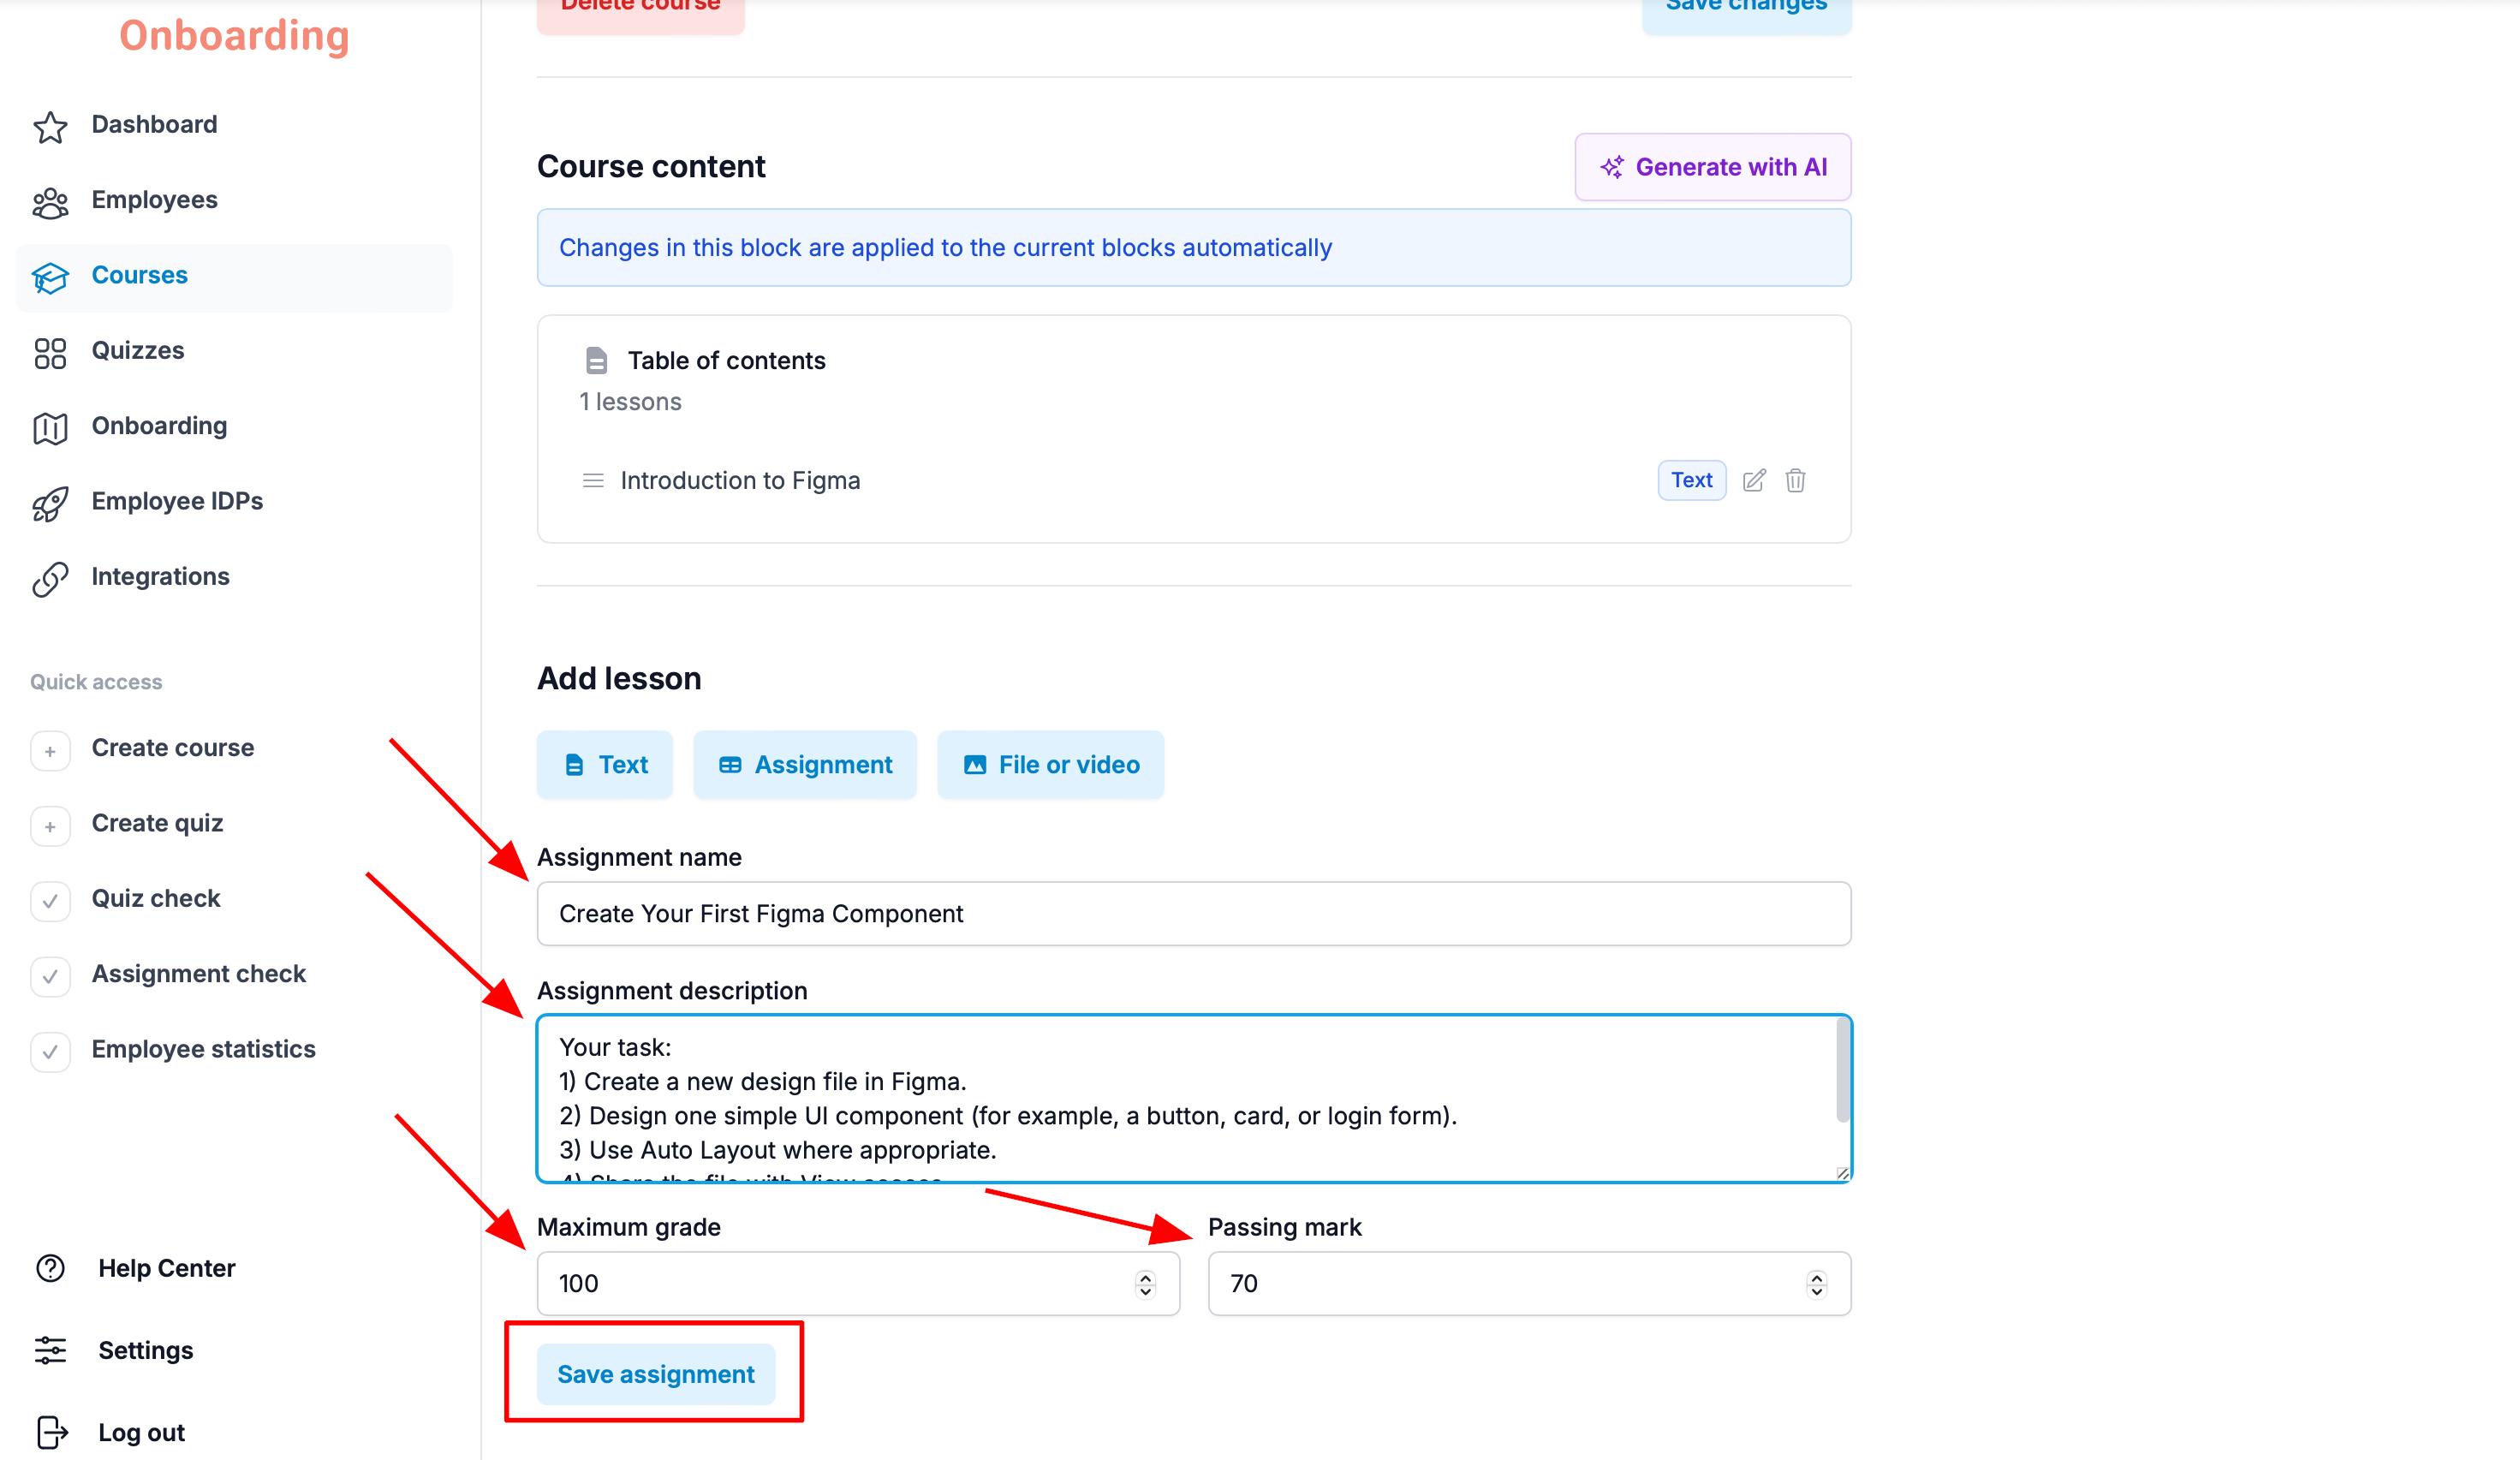
An assignment creation form opens below, with the following fields:
- Assignment name – the name employees will see in the course.
- Assignment description – a detailed description of what needs to be done.
- Maximum grade – the highest grade for the assignment.
- Passing mark – the minimum grade needed to pass.
Once all the fields are filled in, click «Save assignment».
The assignment now appears in the «Course content» block and is available to employees as part of the course 🎉
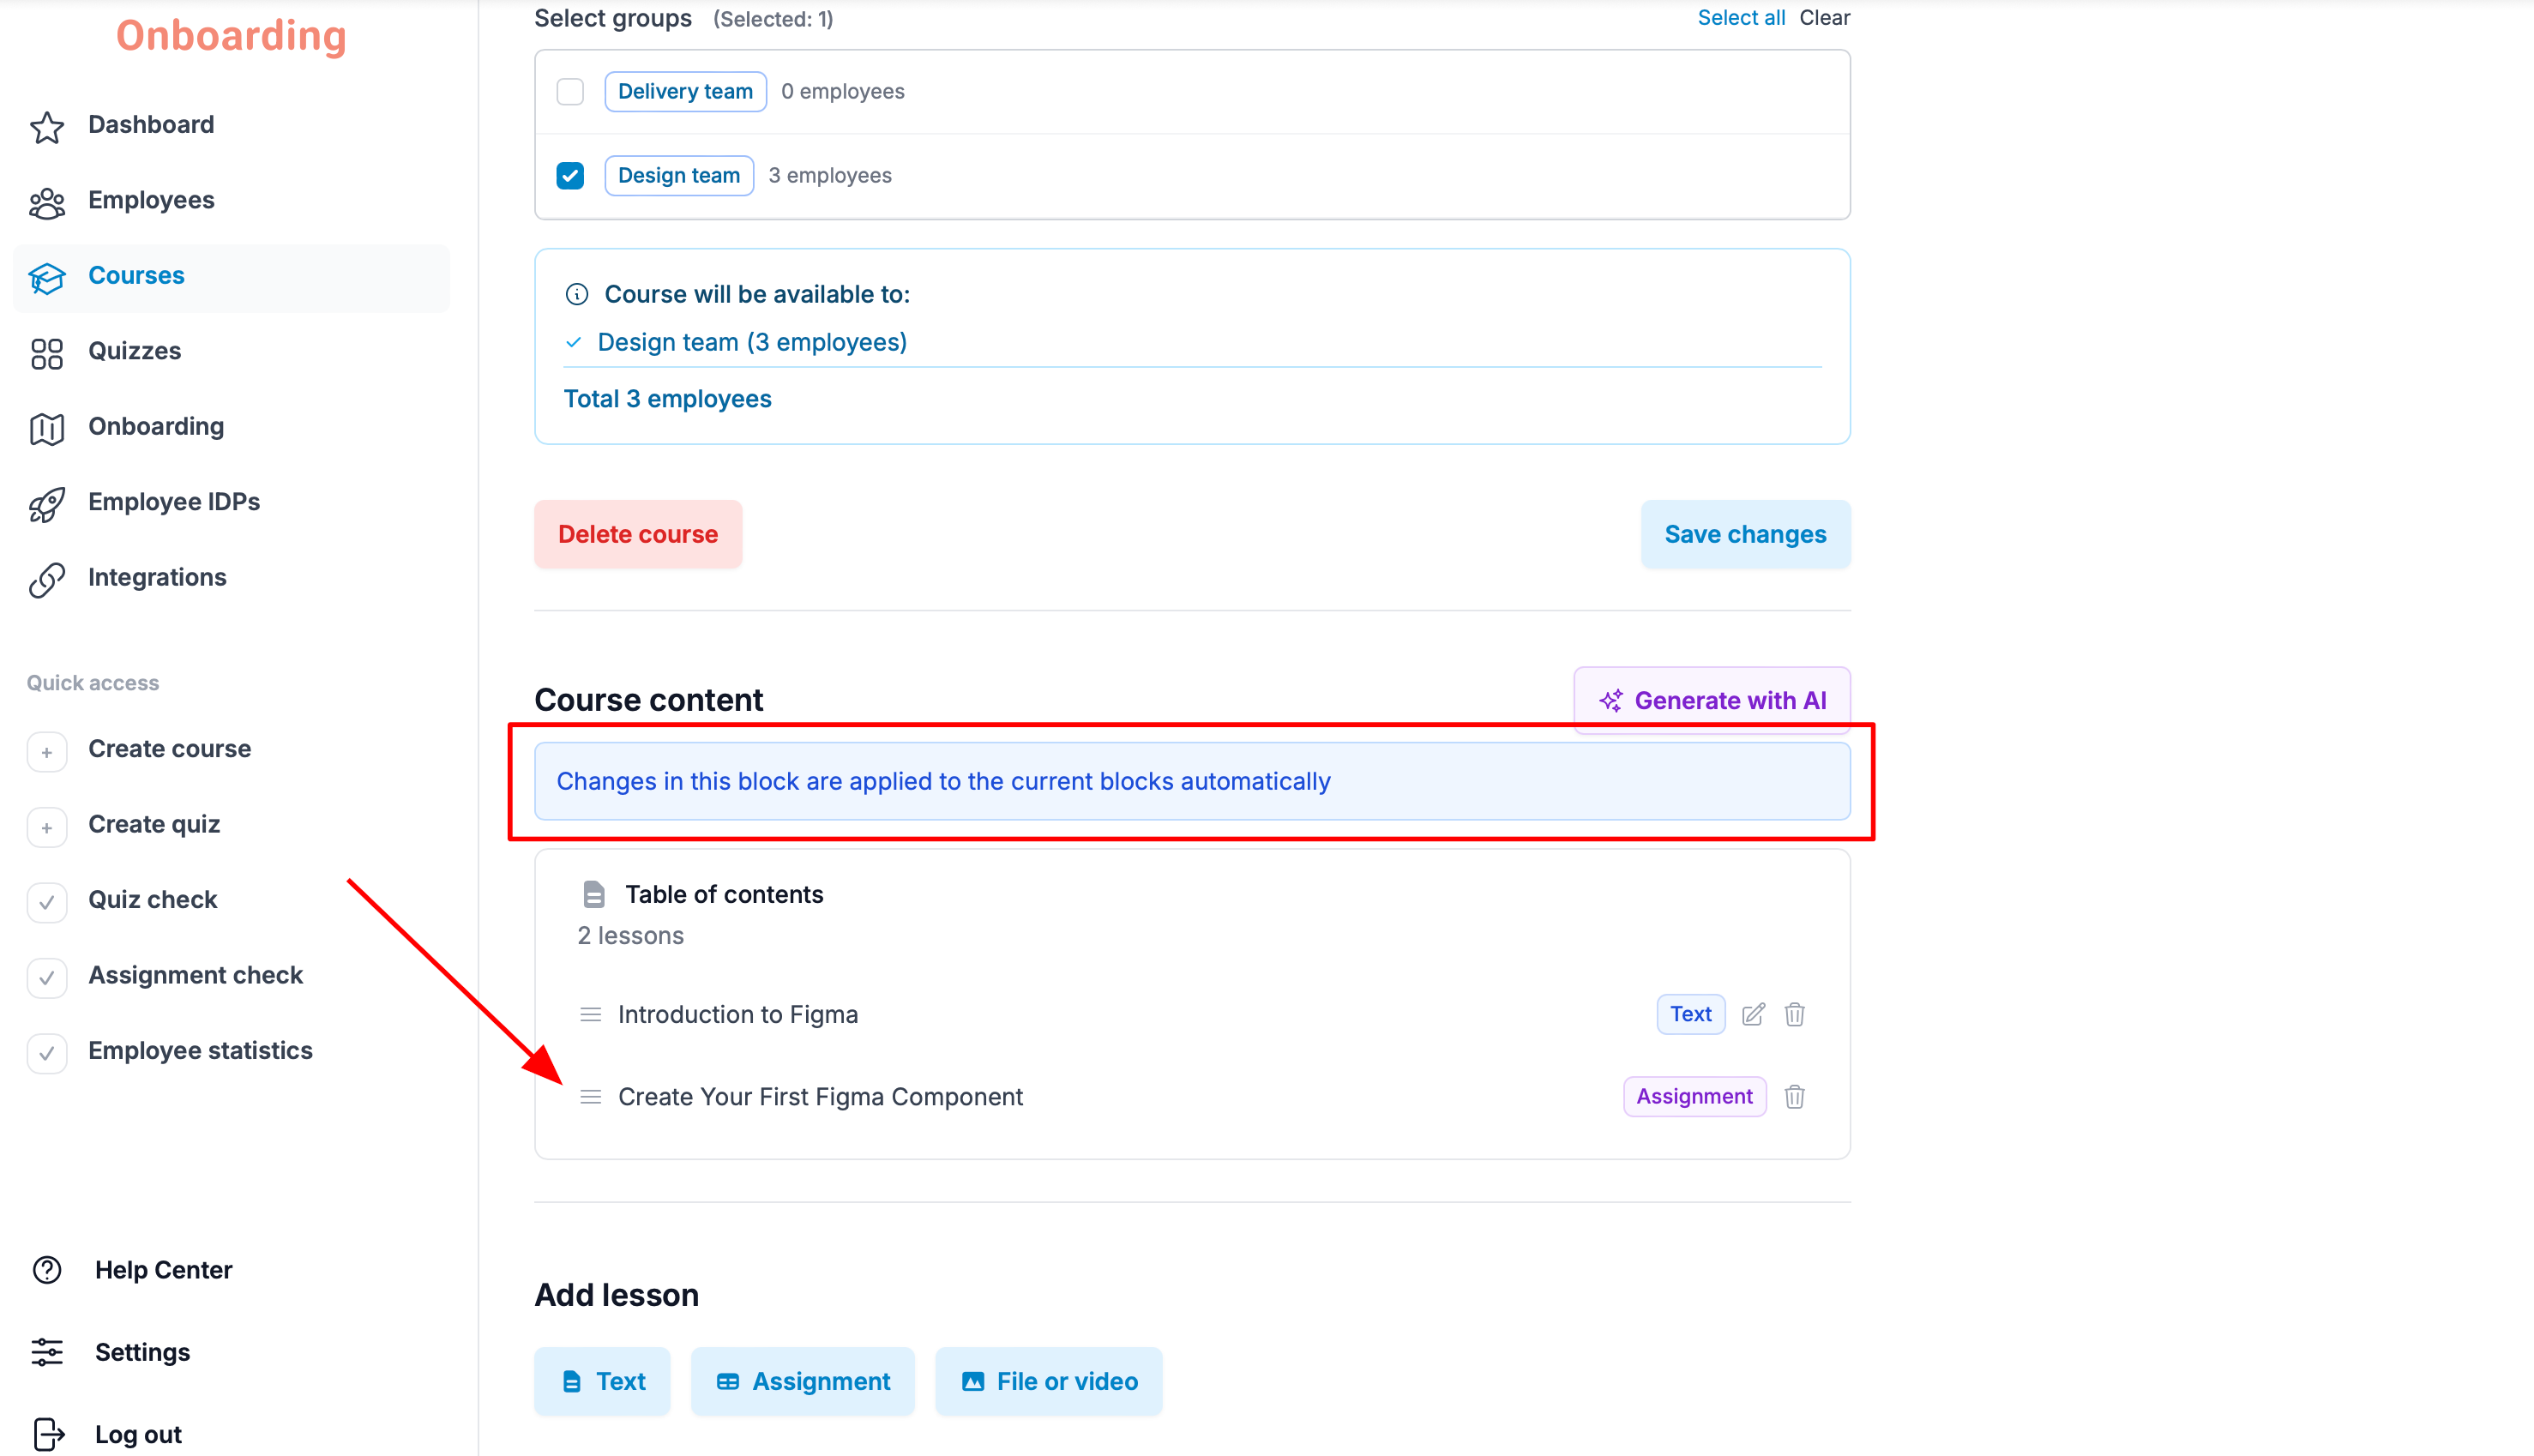
All changes in this block take effect automatically. If you add a new lesson or update the course structure, the changes become immediately visible to every employee with access to the course.
Use assignments to check practical skills, not just theory.
For example:
- for a restaurant employee: «Prepare the dish according to the recipe card and attach a photo of the result»;
- for an administrator: «Fill in the report using the template and attach the finished file»;
- for a warehouse employee: «Receive the goods following the procedure and attach the completed checklist».
The closer an assignment is to real day-to-day work, the easier it is for the employee to put their new knowledge into practice.
Creating a File or video lesson
To add a lesson with a file or video, click the «File or video» button in the «Add lesson» block on the course editing page.
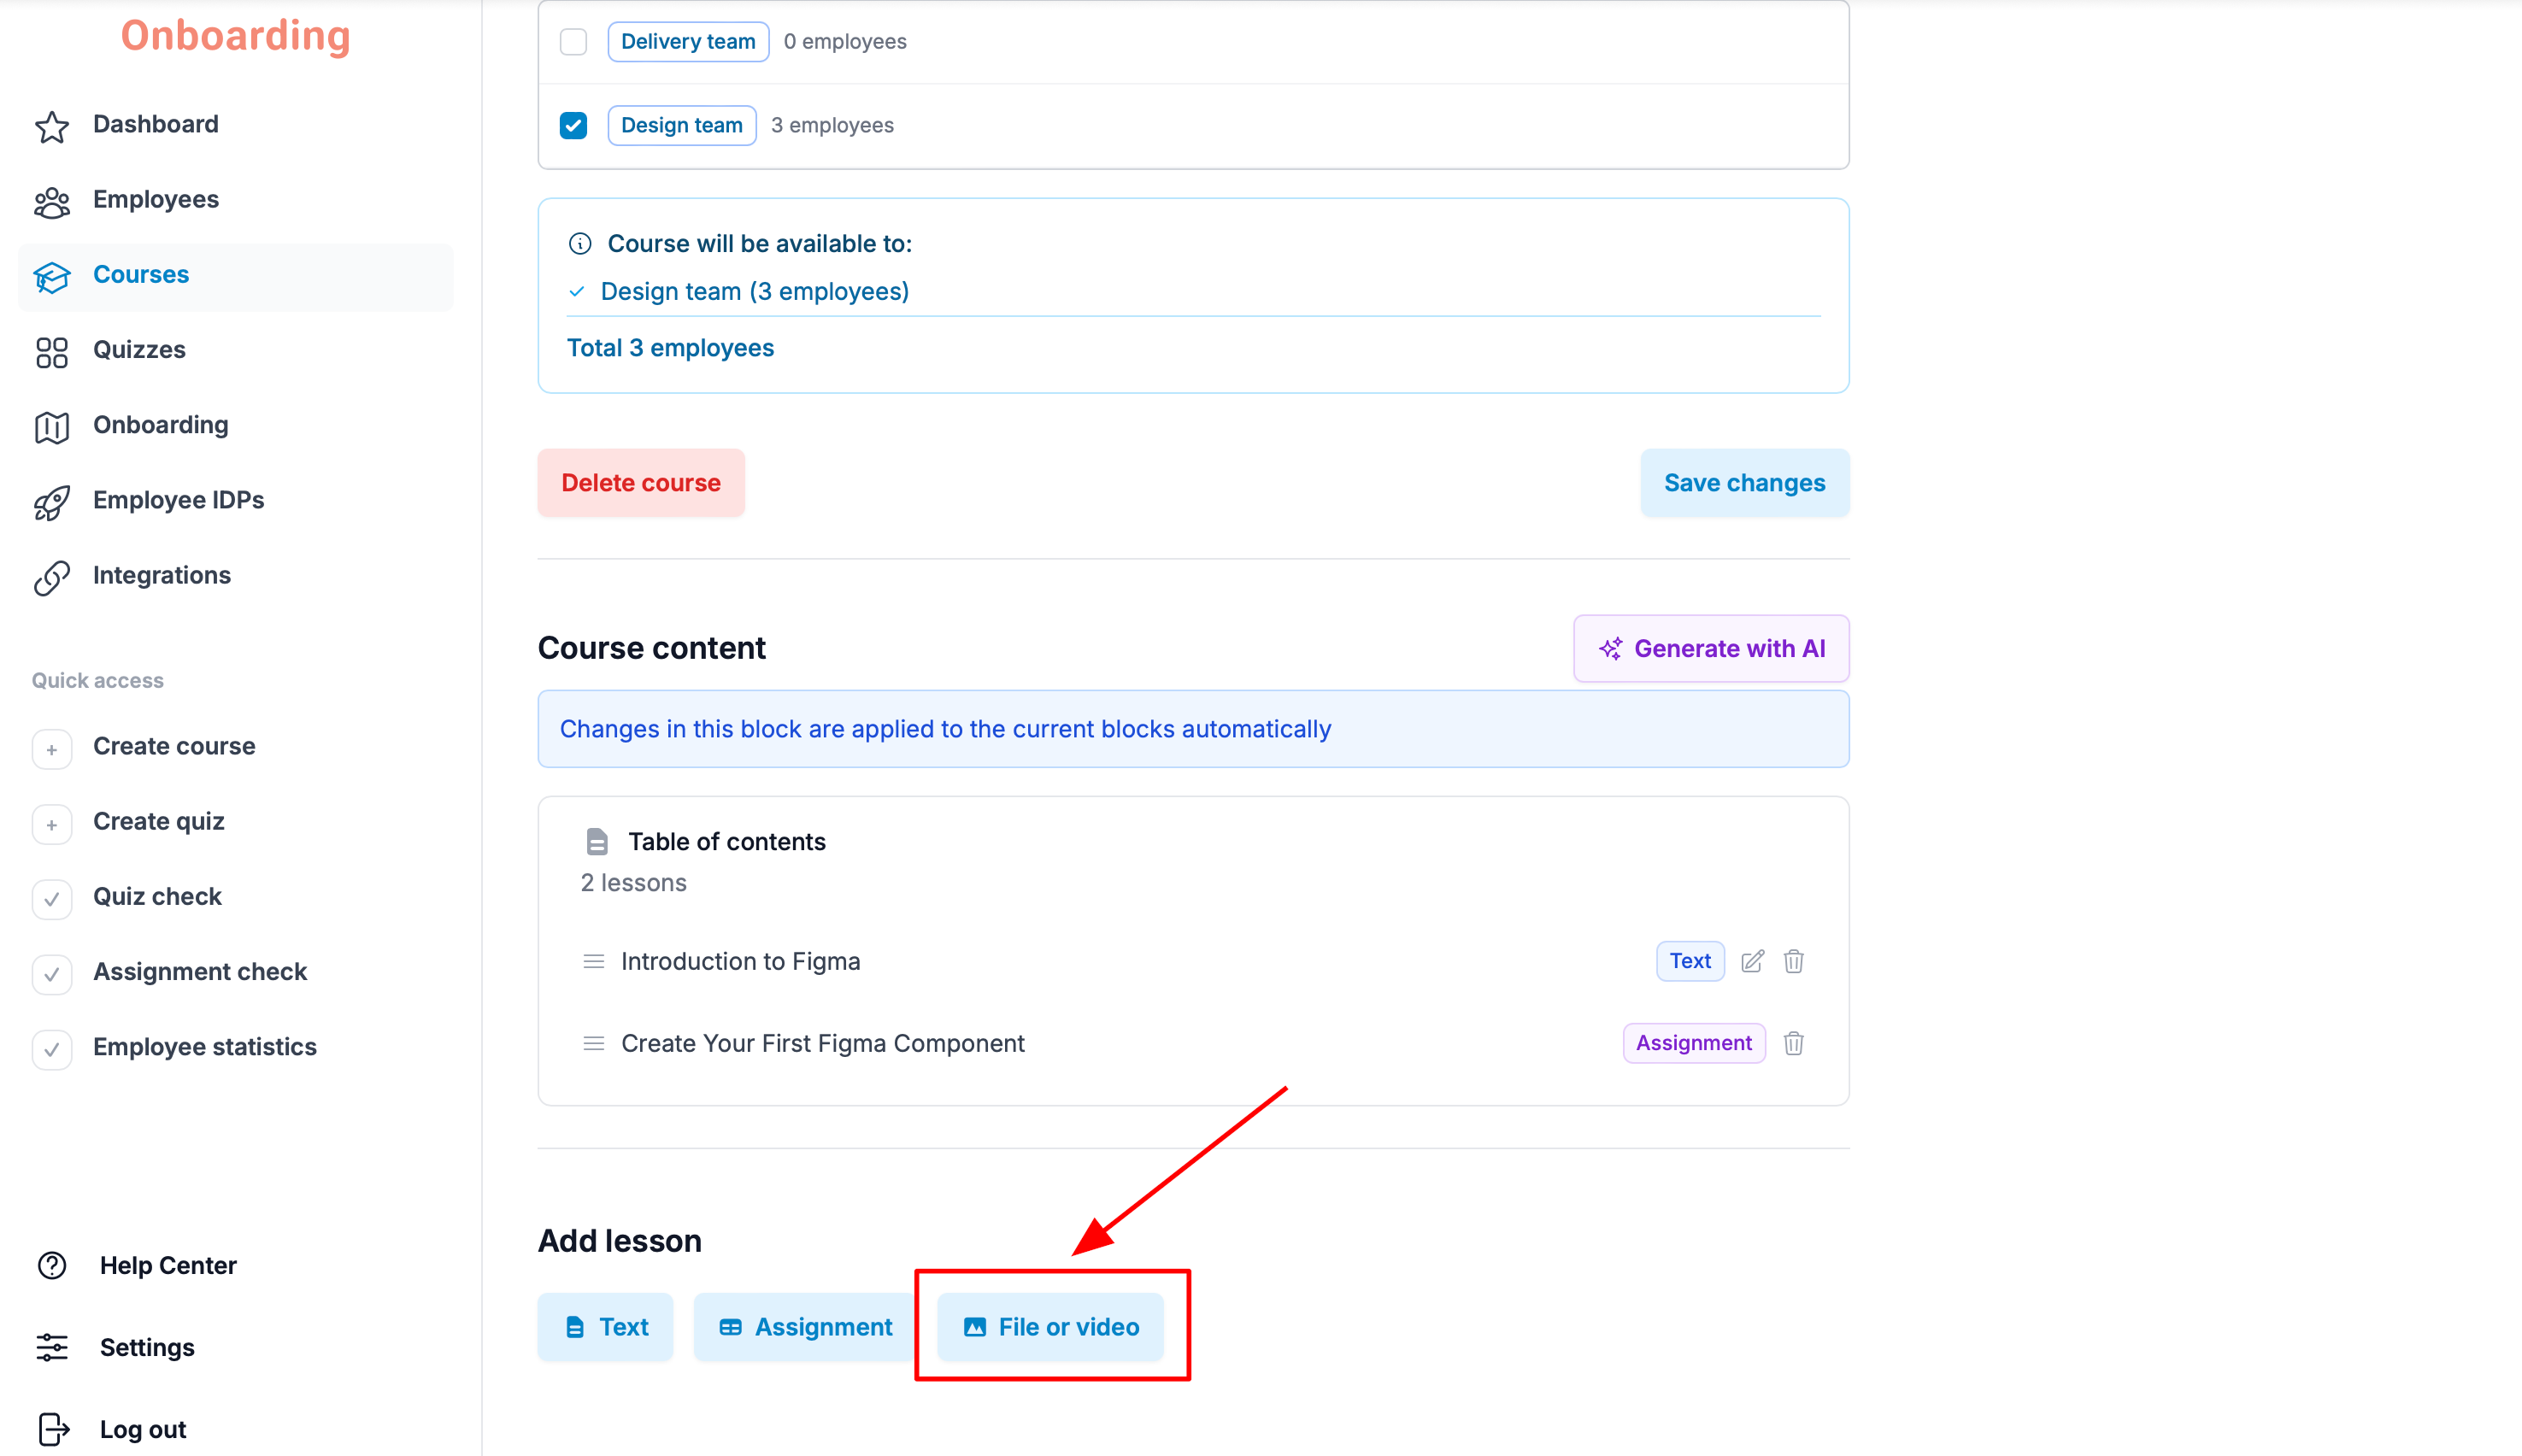
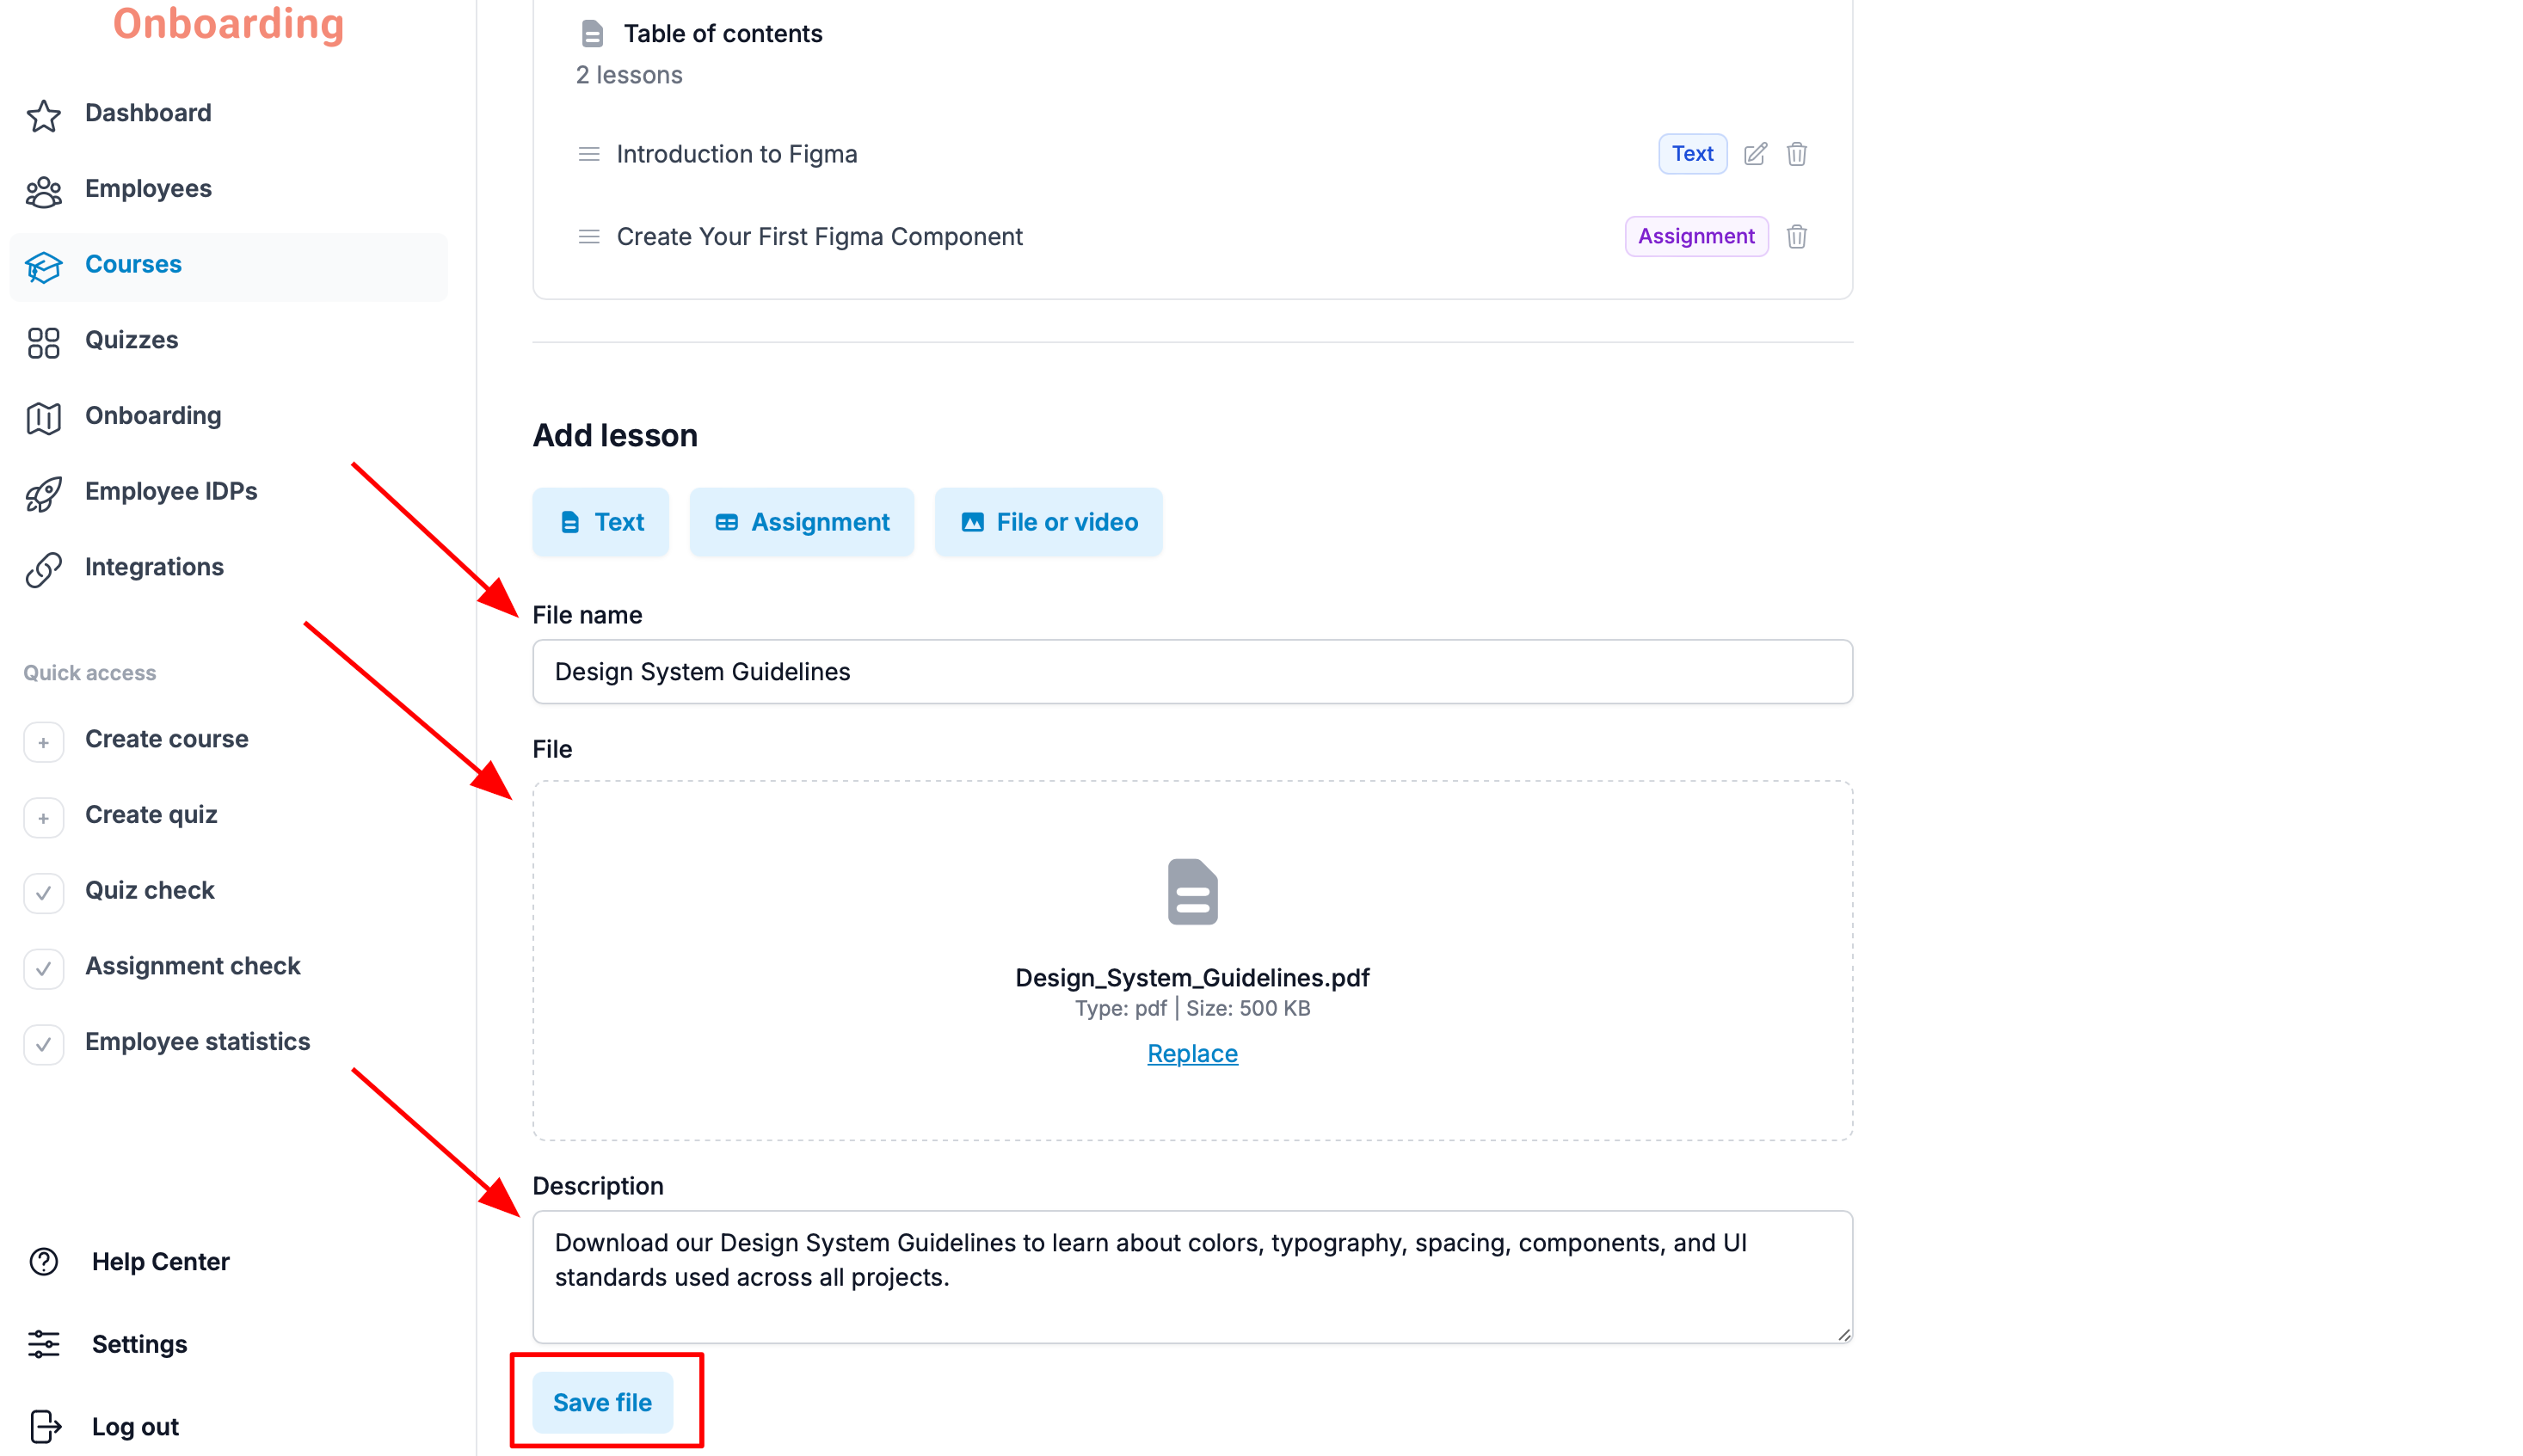
A lesson creation form opens below, with the following fields:
- File name – the lesson name employees will see.
- File – the field for uploading a file or video. Each lesson can hold only one file or one video.
- Description – extra information or instructions for employees on how to work with the material.
Once all the fields are filled in, click «Save file».
The lesson has been uploaded to the «Course content» block and is available to employees as part of the course 🎉
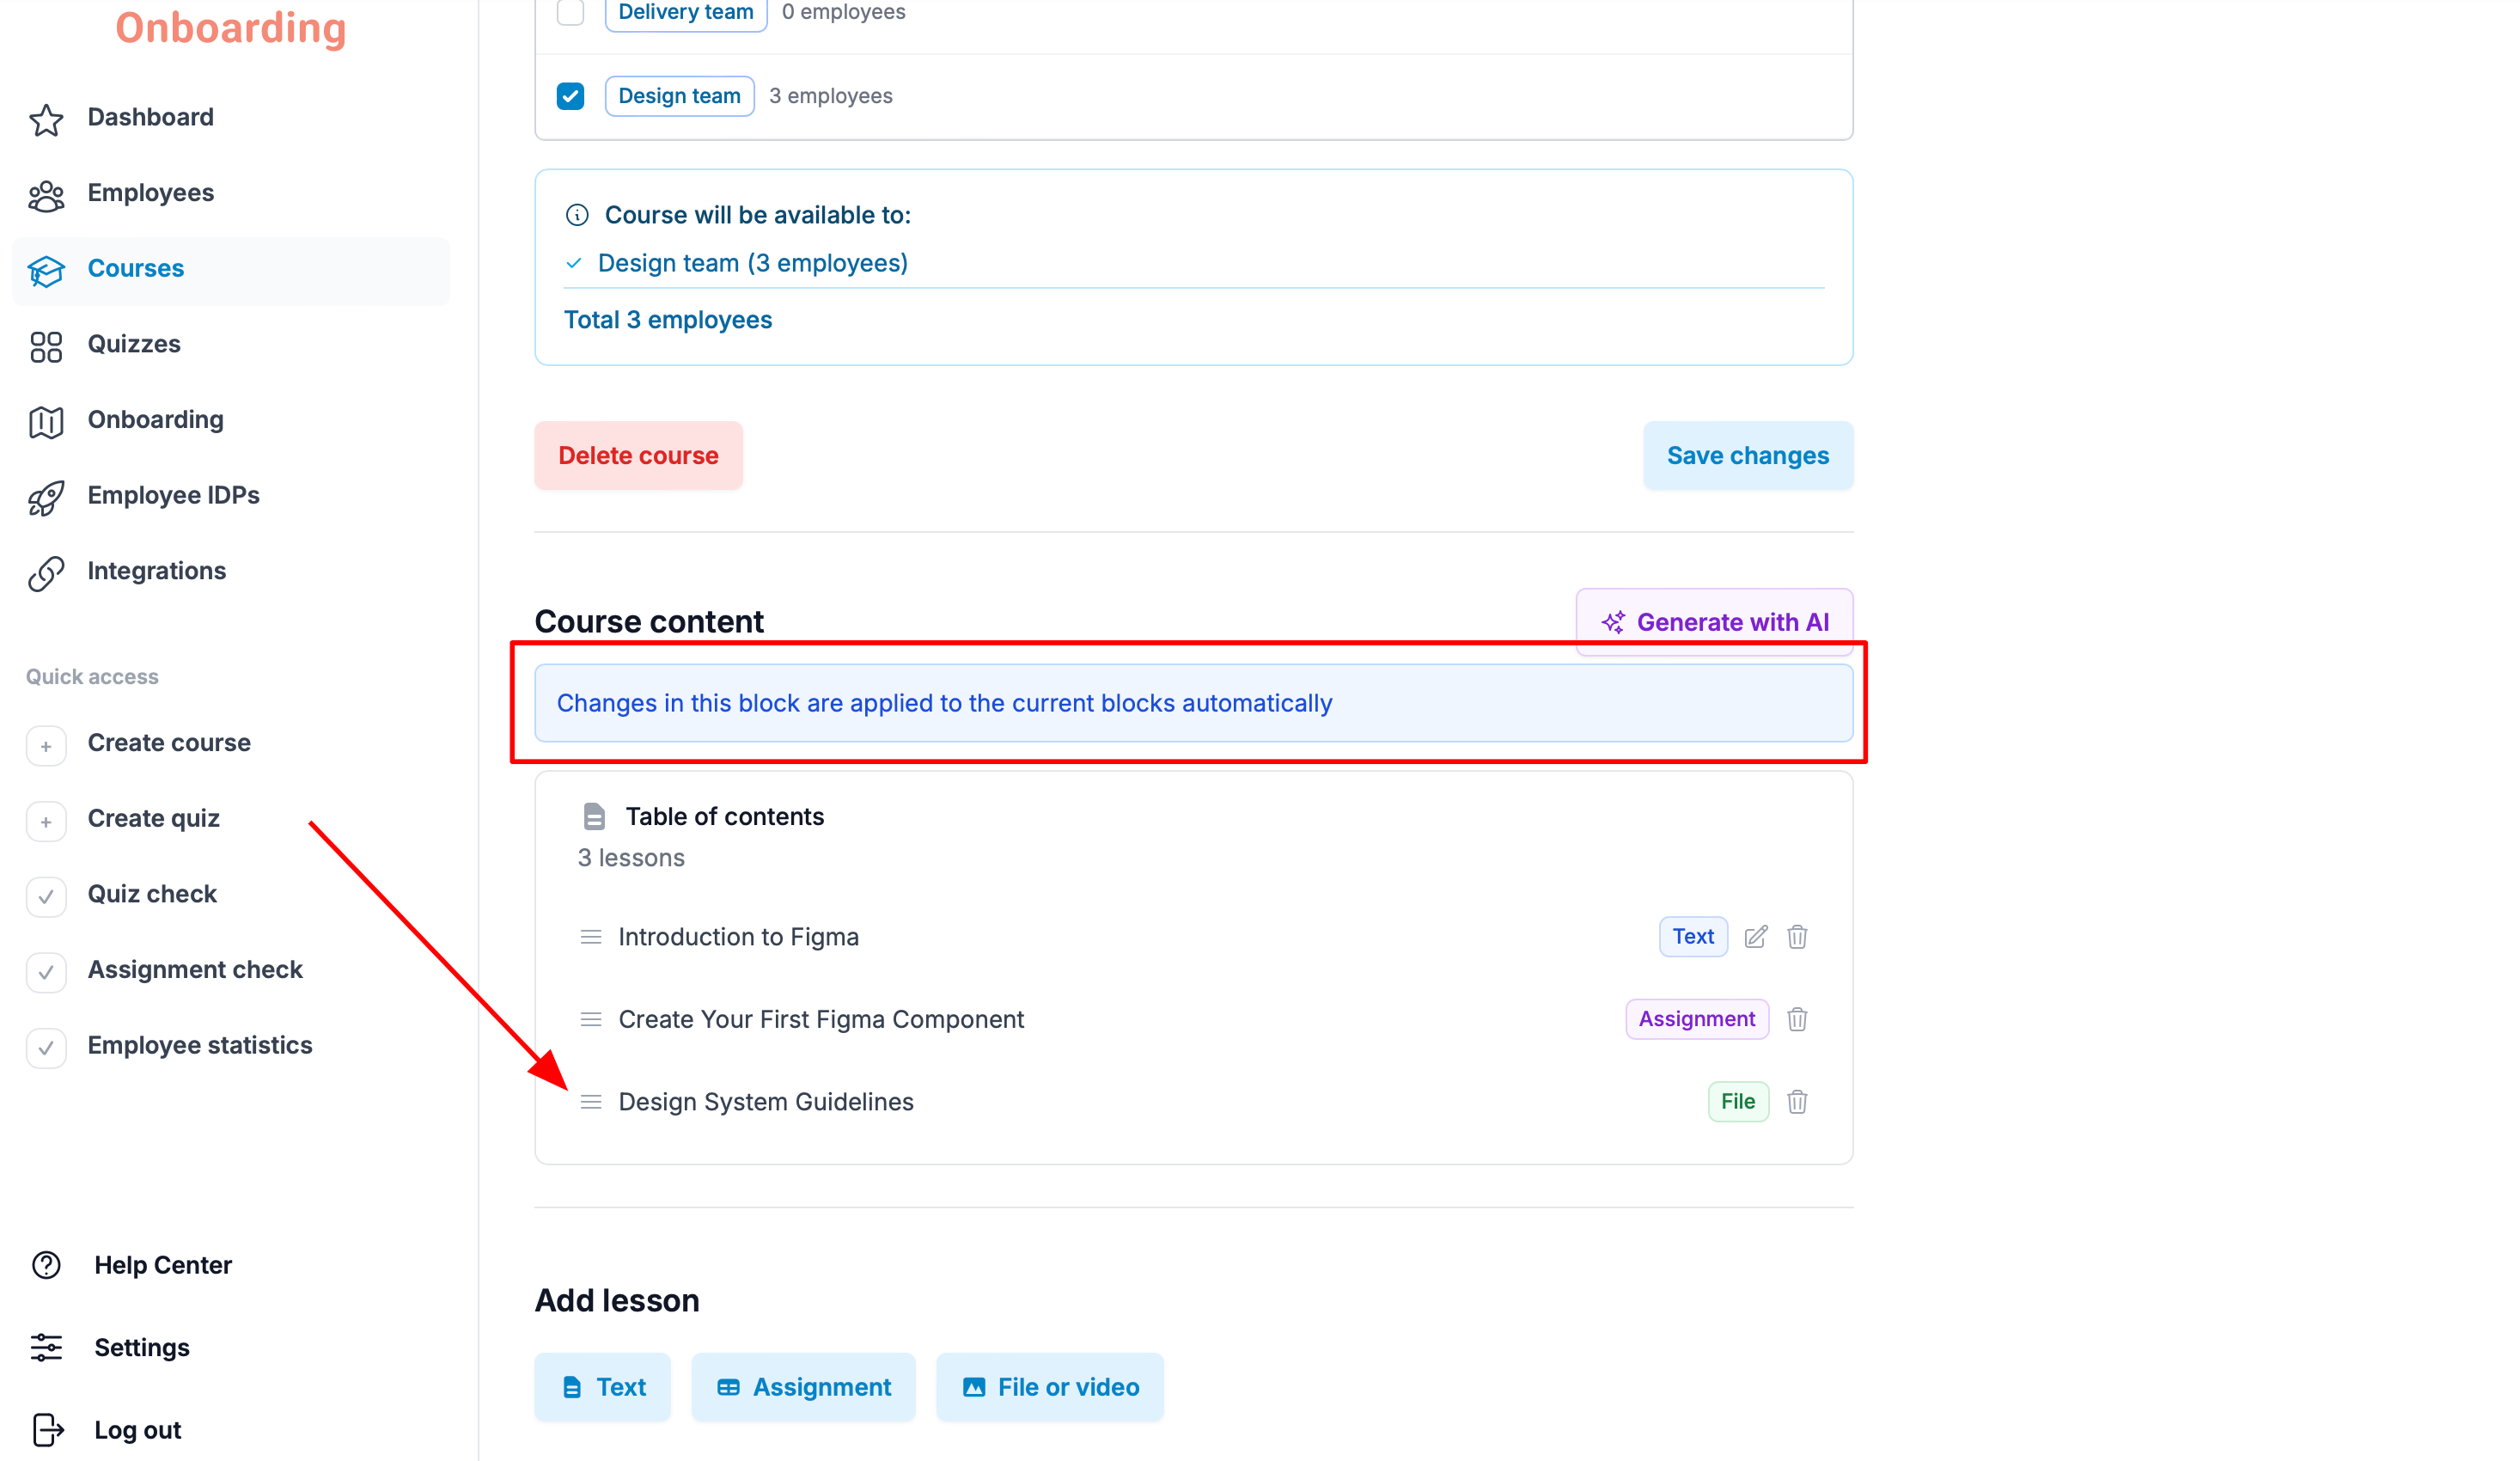
All changes in this block take effect automatically. If you add a new lesson or update the course structure, the changes become immediately visible to every employee with access to the course.
There are no restrictions on file formats. The maximum size of a single file is 100 MB.
While taking a course, employees interact with the materials like this:
- video and audio files play right on the platform in the built-in player;
- PDF files open directly on the platform, no download needed;
- images and archives are available for download.
If you need to add several files or videos to a course, create a separate lesson for each one. There's no limit on the number of such lessons.
Publishing a course
Once you've added all the materials and finished setting up the course, click «Save changes». The button sits above the «Course content» block.
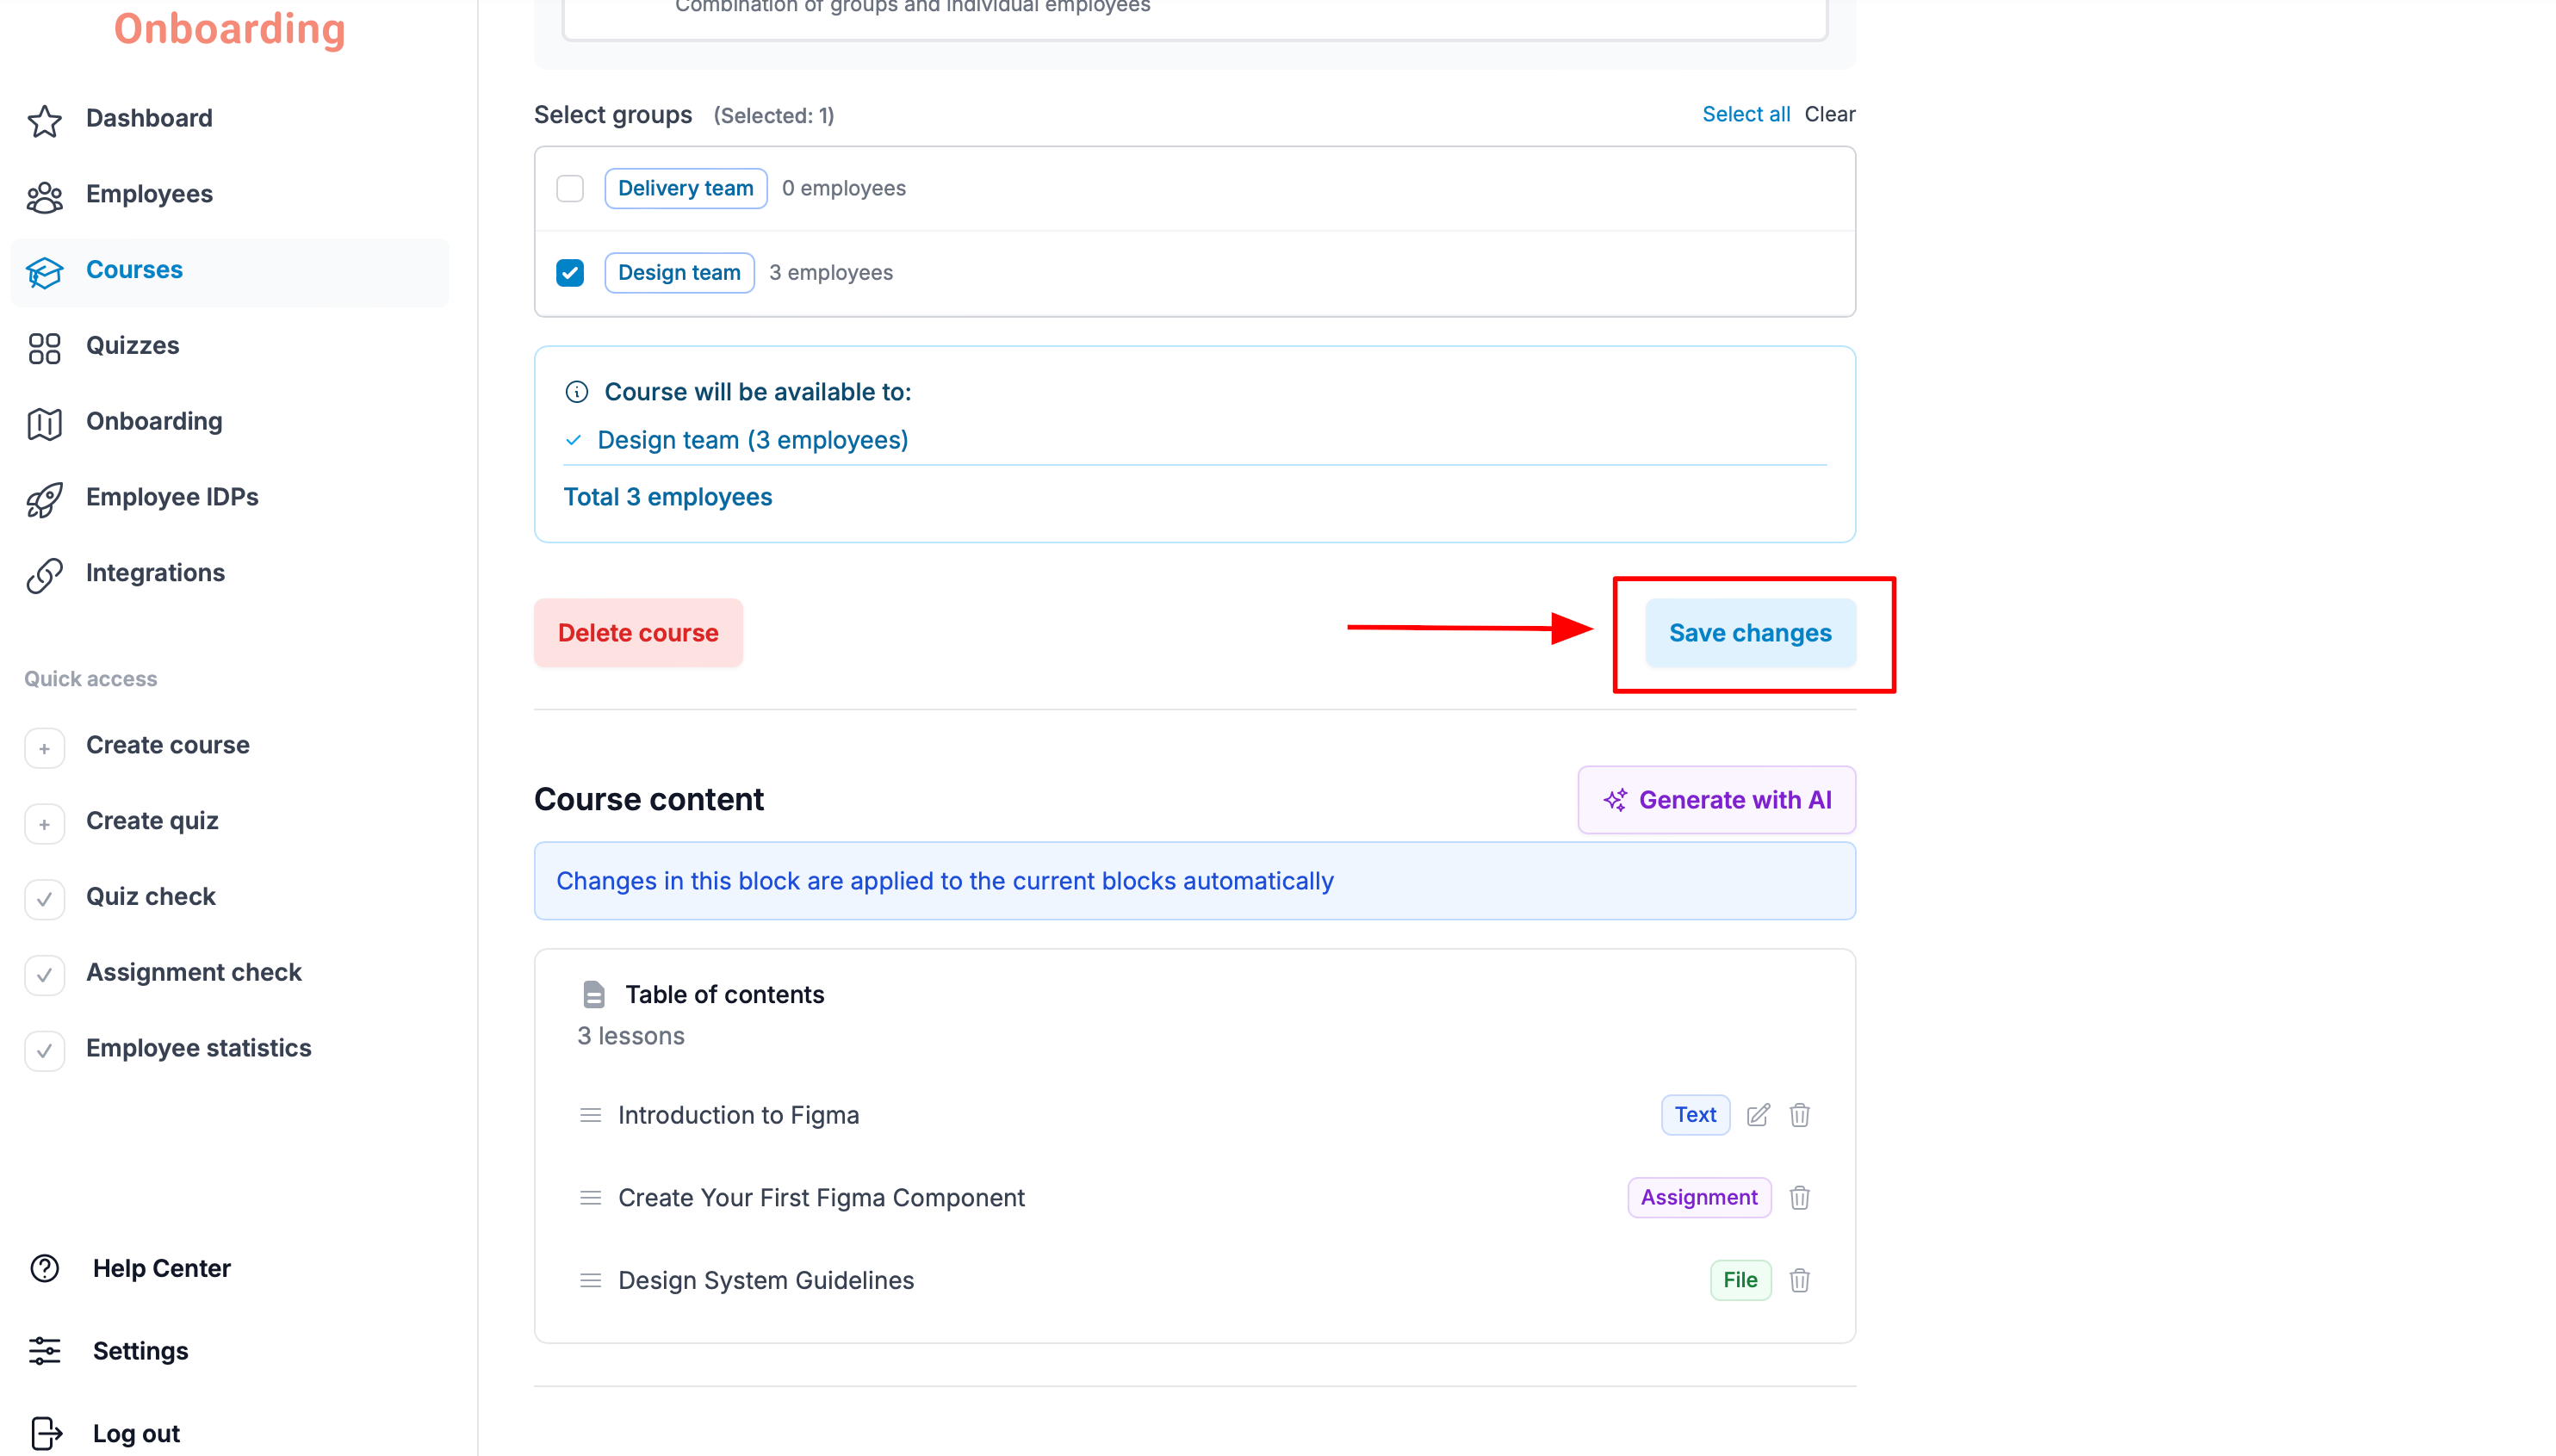
The course is published 🎉
You're back on the course list. The course is now open to all the employees or groups it was assigned to.
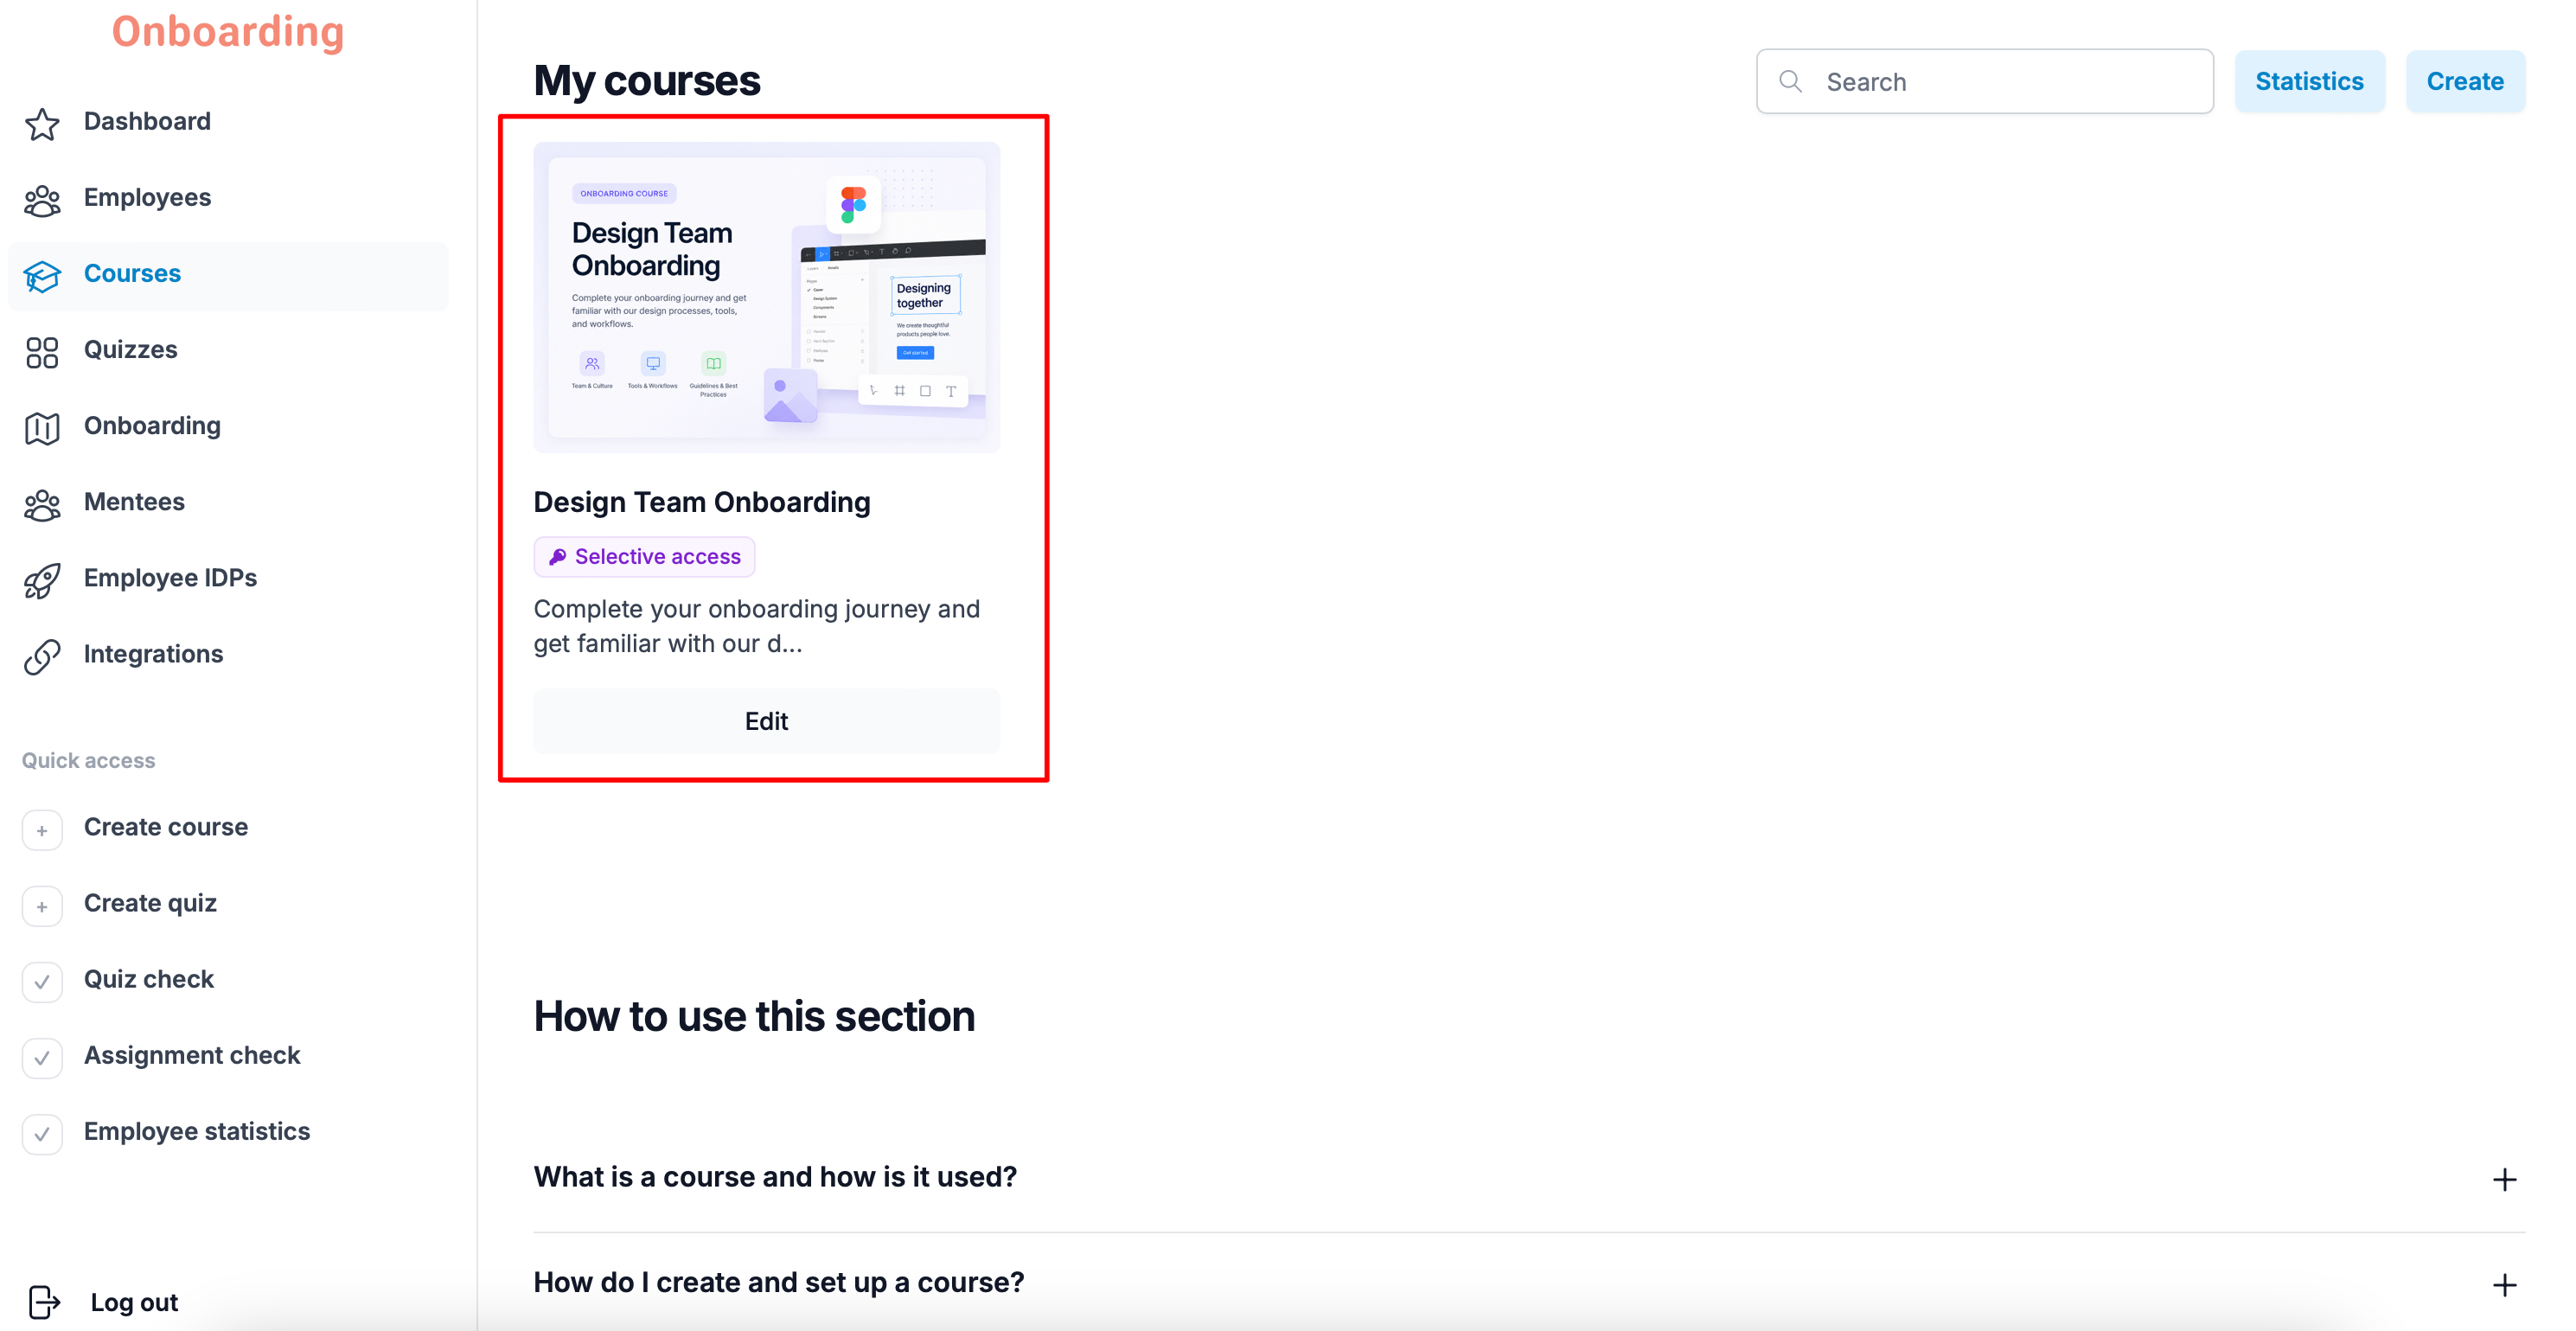
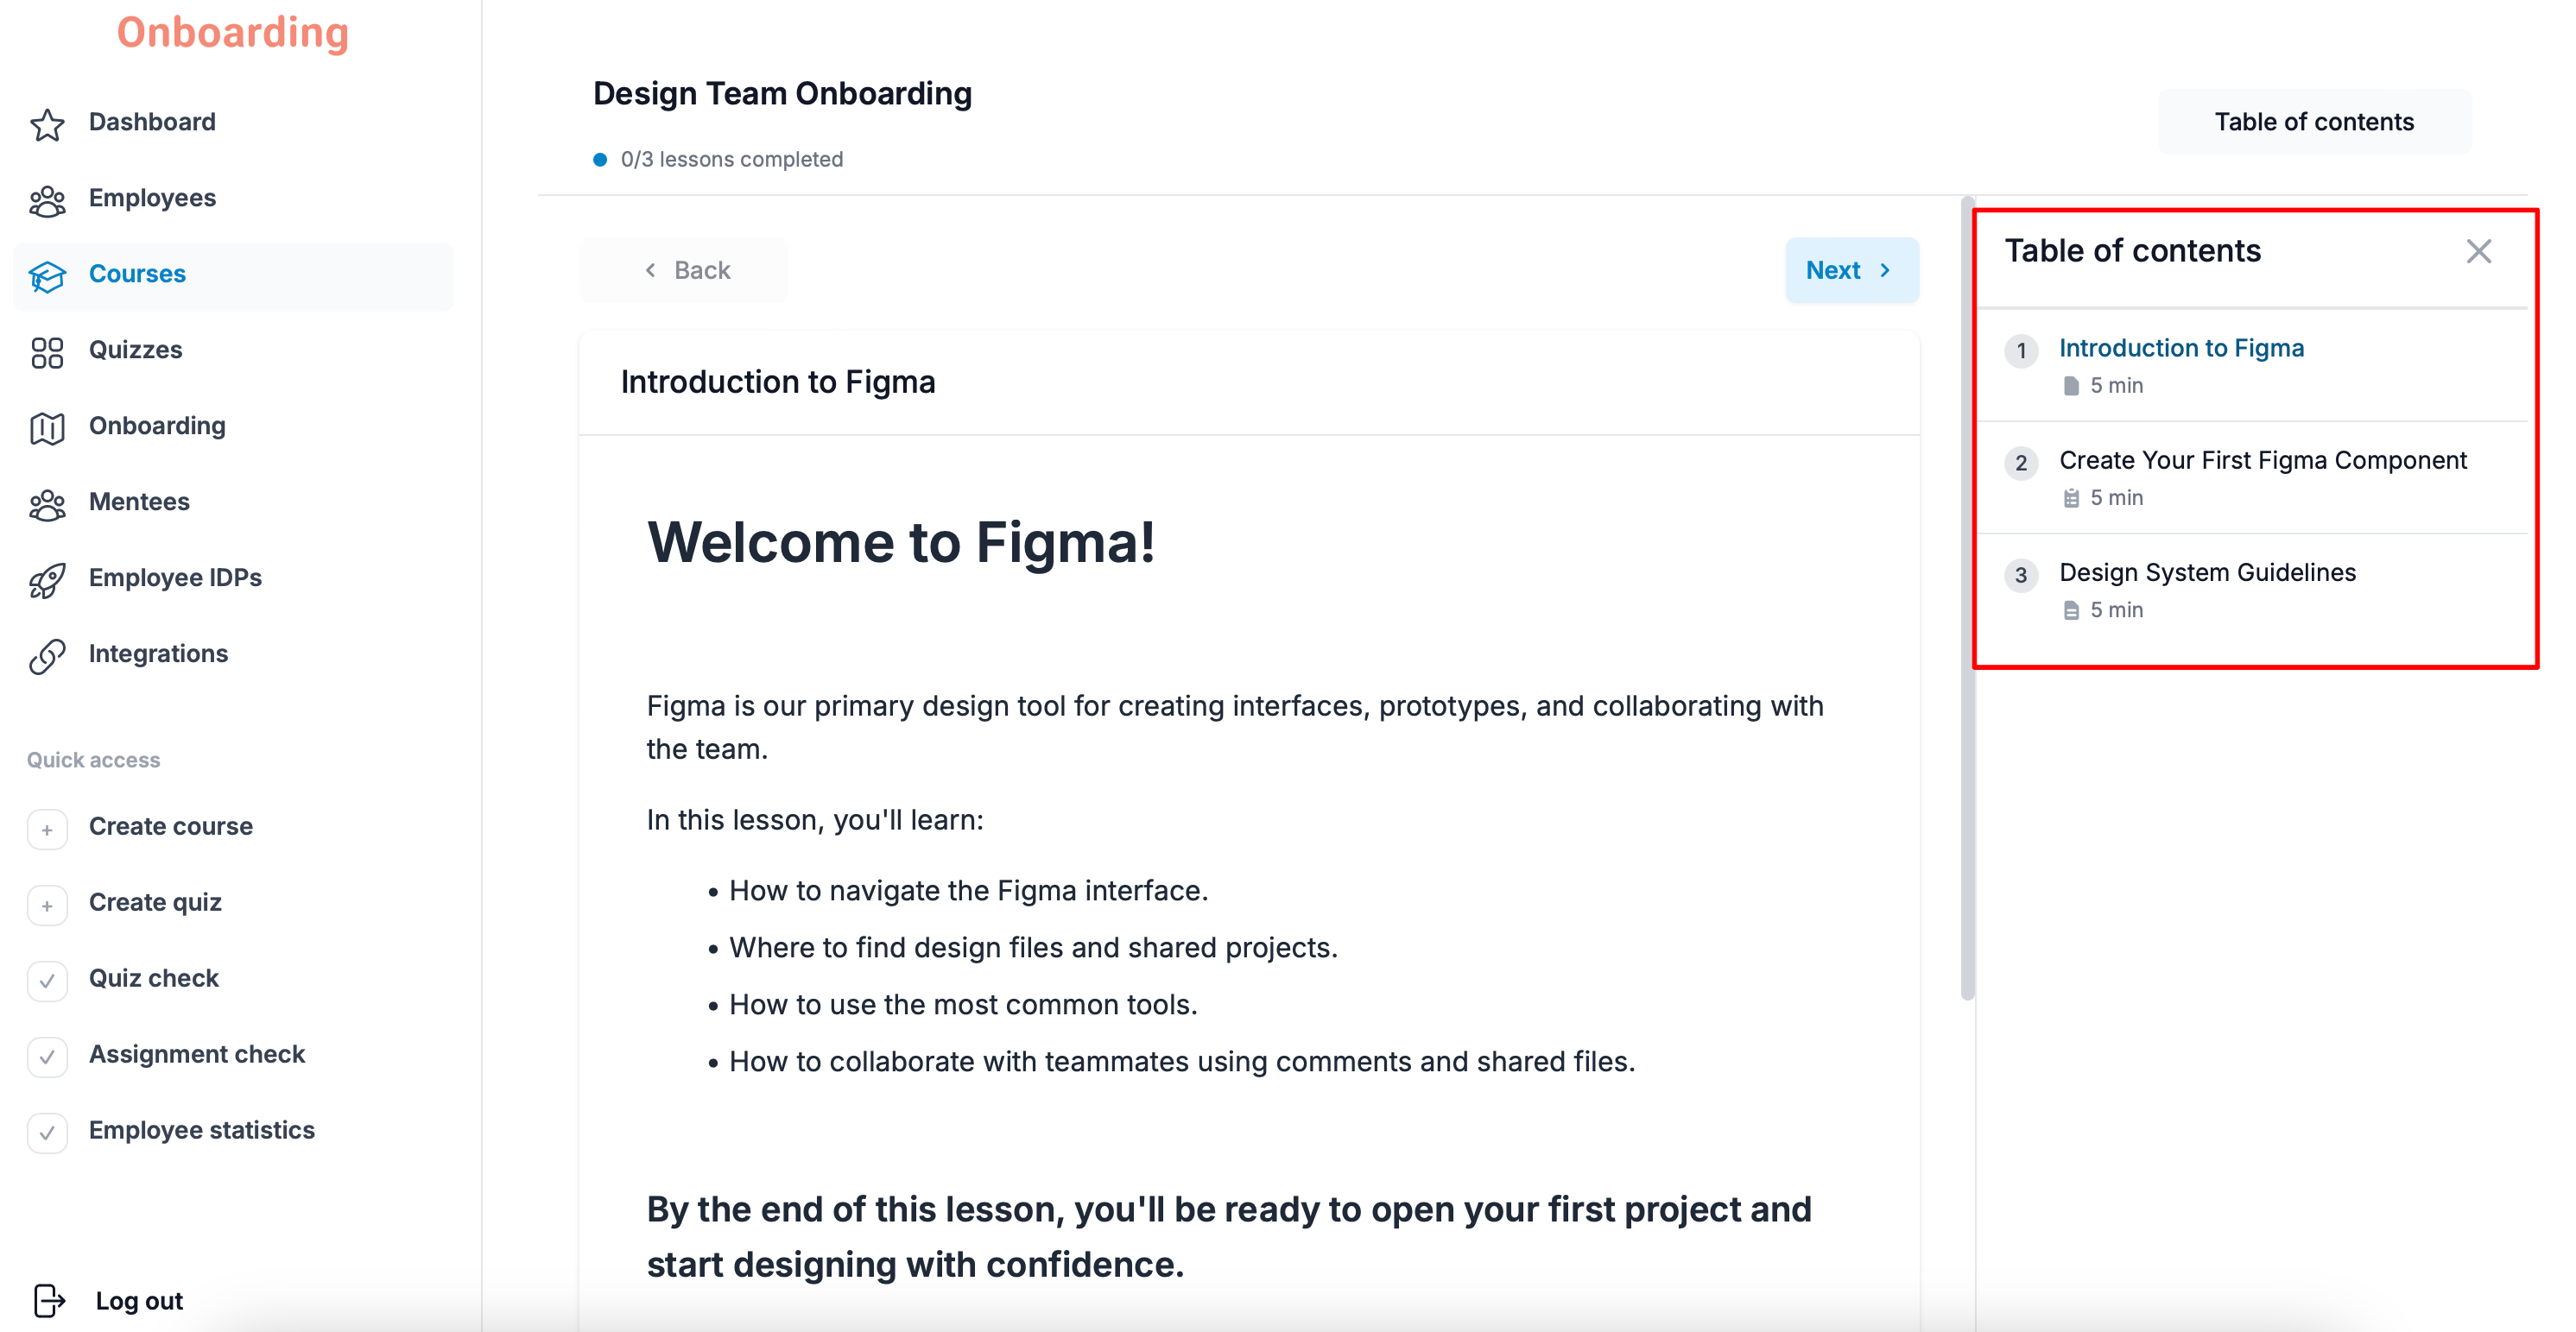
You can open the course you've just created and see exactly how it looks to employees on the platform. This helps you make sure the materials are in the right order and the training looks the way you intended.
AI Course Assistant
The AI Course Assistant allows you to create courses automatically using artificial intelligence.
This feature is useful if you don't have ready-made training materials or need to quickly prepare a course for your employees.
How It Works
To create a course, simply:
- describe the course you want AI to generate;
- optionally upload materials that AI will use during content generation;
- choose the number of lessons.
AI will analyze your description and all uploaded materials, then automatically generate structured text lessons in the specified quantity.
Once the generation is complete, you can review all generated lessons and check their content.
You can also add an assignment or a quiz to the course to check how well employees have understood the material.
Creating a Course with AI
To create a course using AI:
- Go to the «Courses» section.
- Create a new course or open an existing one.
- In the «Course content» block, click «Generate with AI».
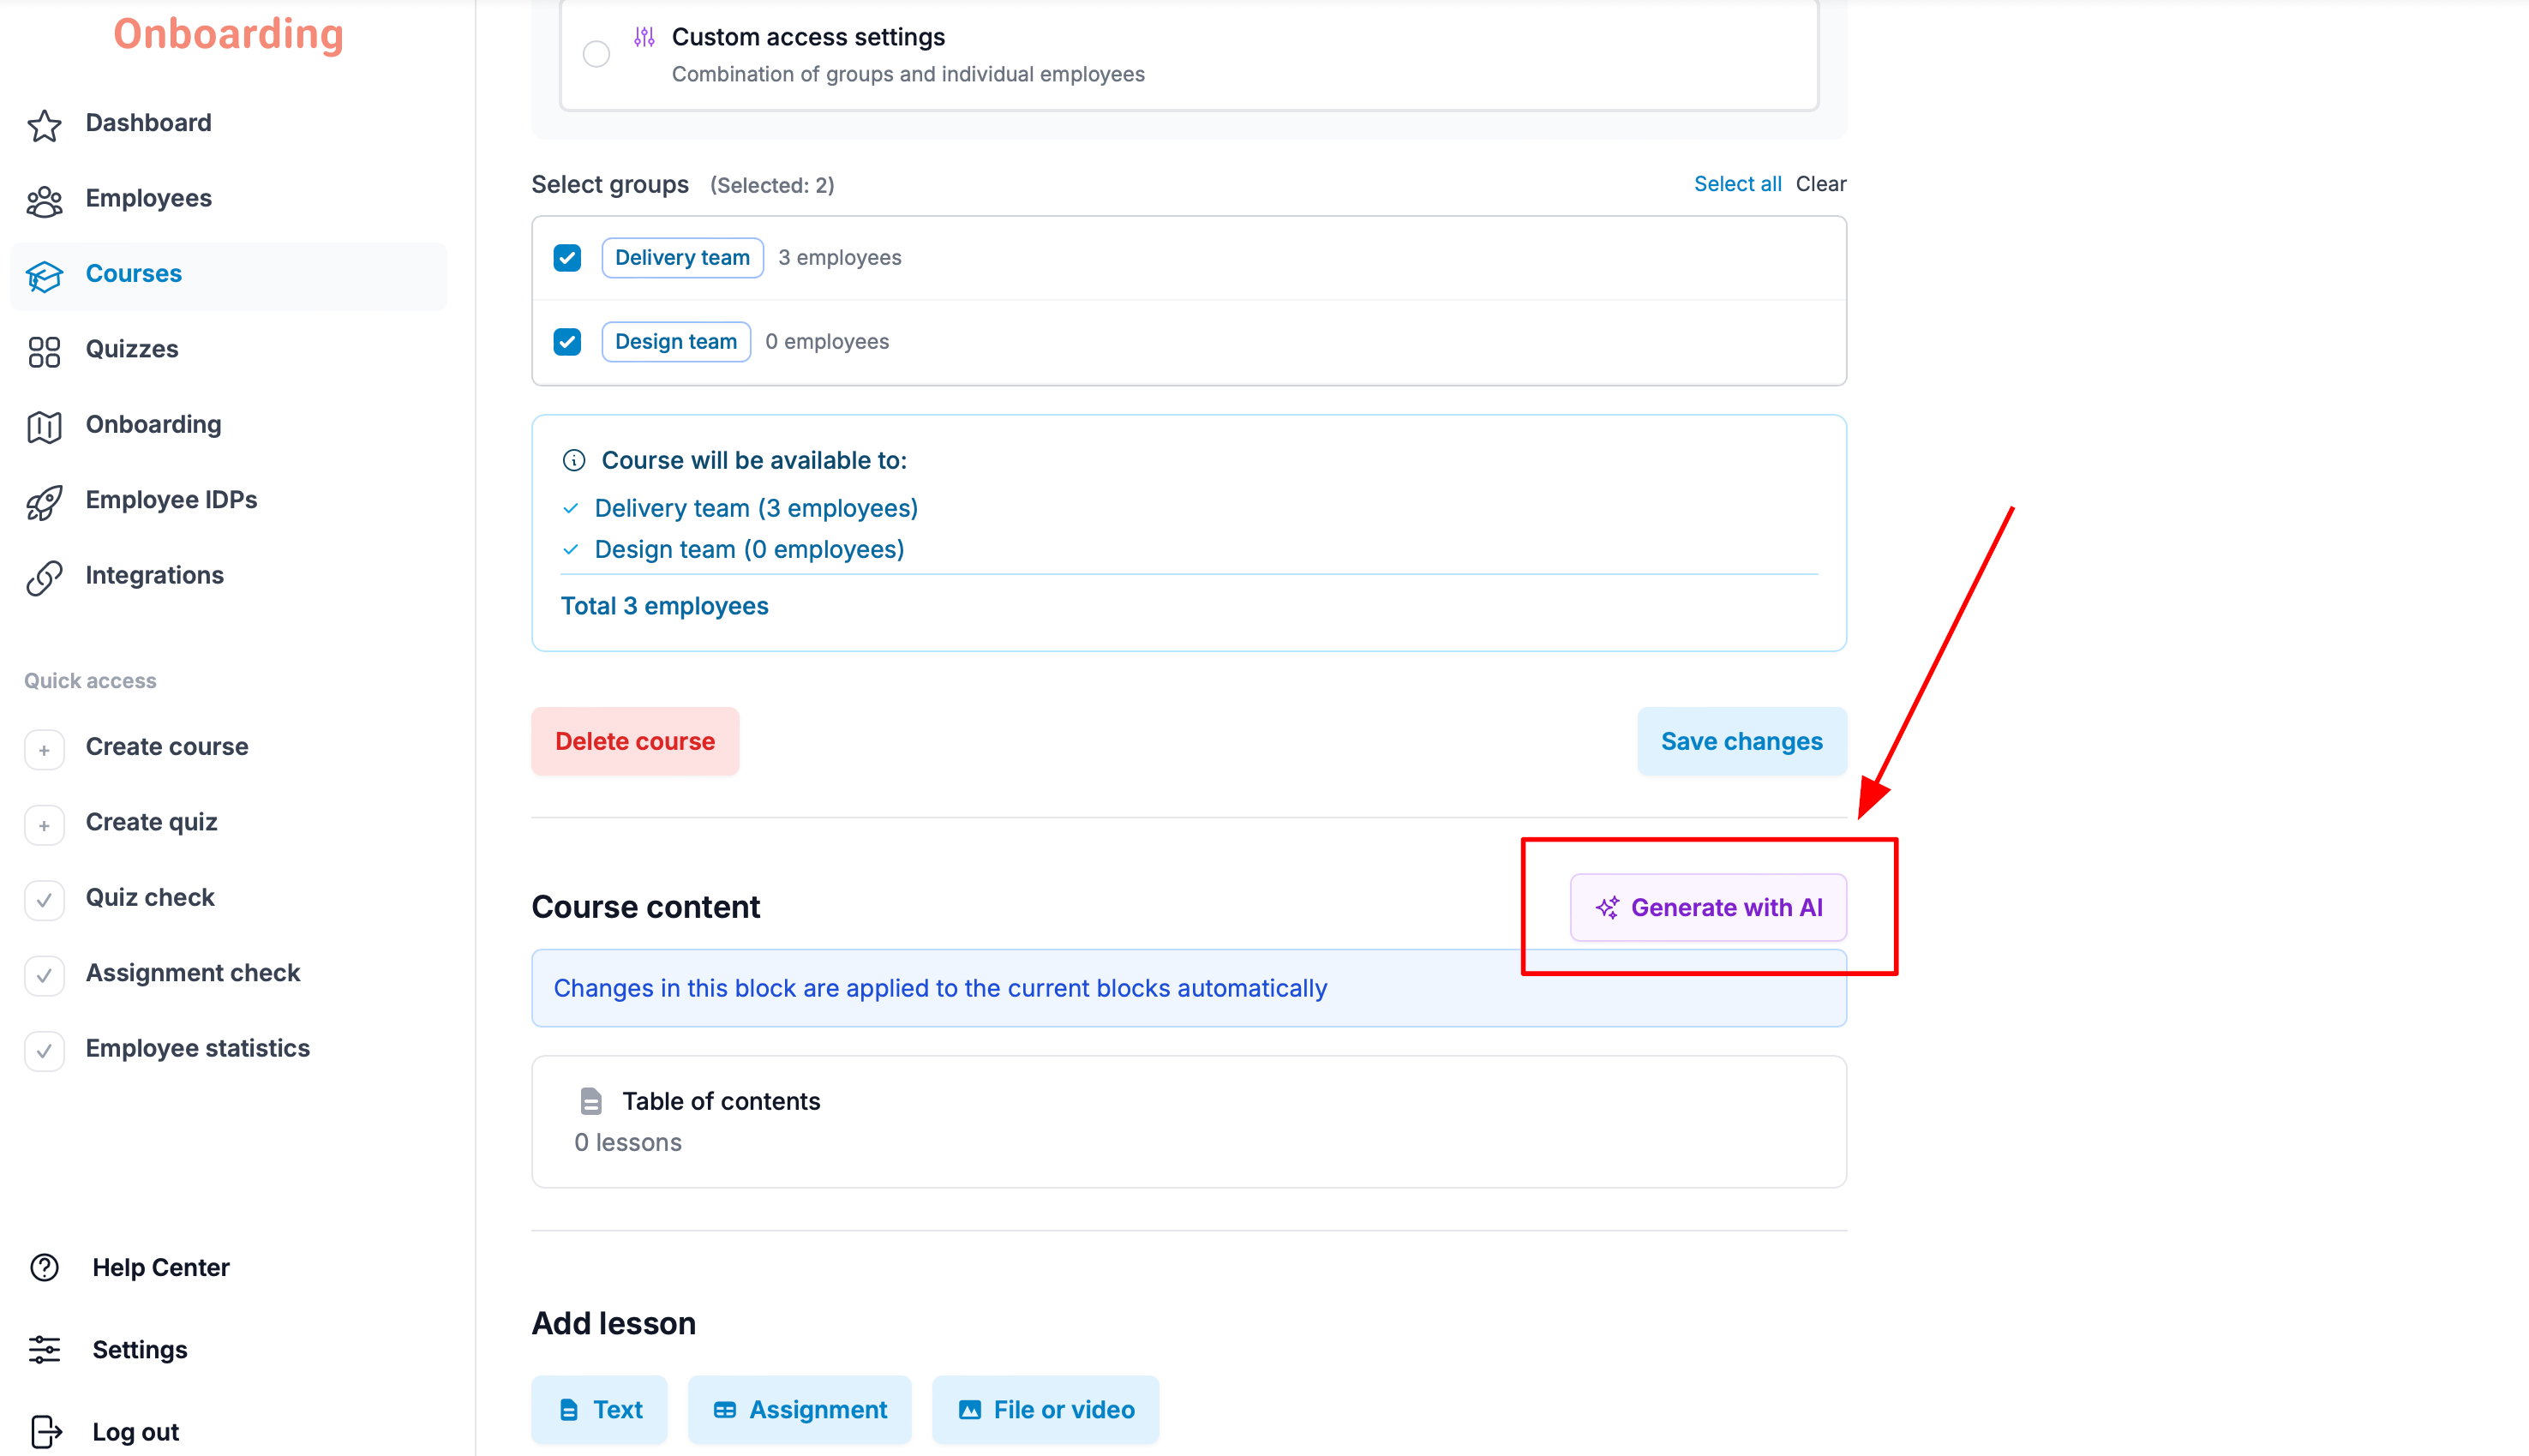
In the window that opens, complete the following fields:
- Describe what to generate (Prompt) — describe the course you want AI to generate. If needed, include additional instructions that AI should consider when creating the course.
- Materials (Optional) — upload documents, presentations, or other materials that AI will use to generate the course.
- 1 lesson or Multiple lessons — choose how many lessons AI should generate. If you select multiple lessons, specify the required number.
- Content Language — select the language in which the course will be generated.
- Course Content — choose whether to add the generated lessons to the existing course content or replace the existing content.
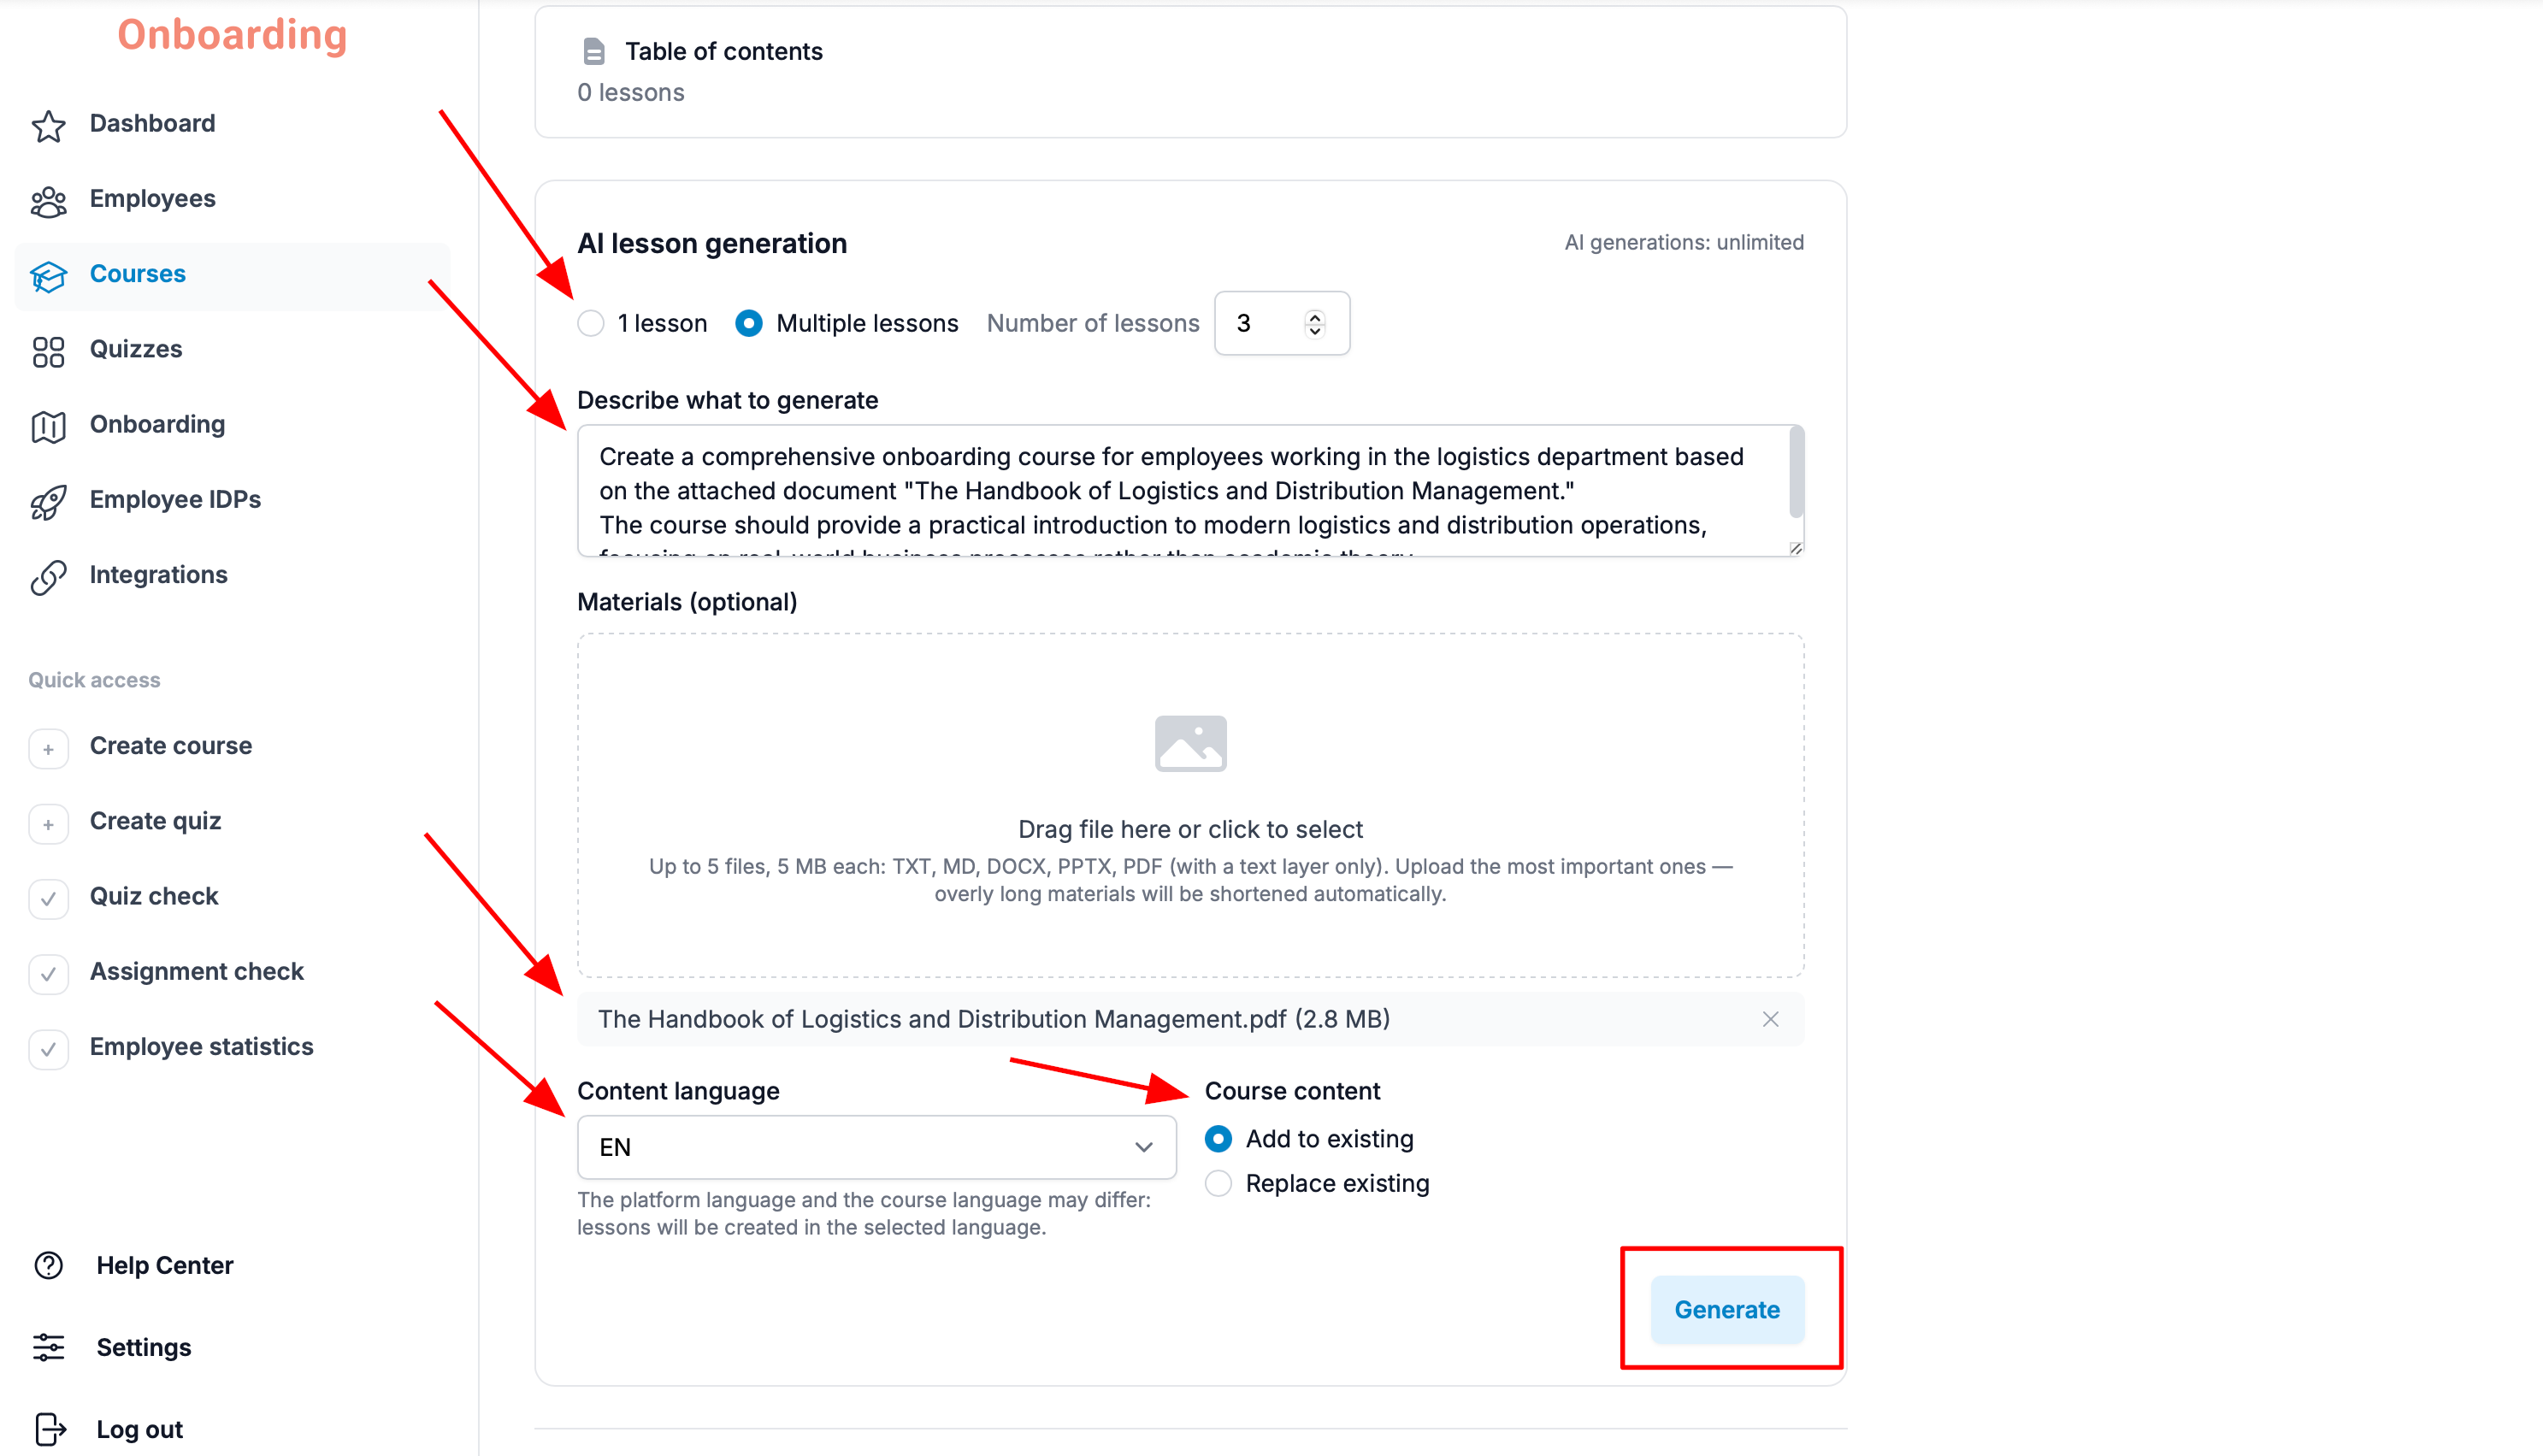
After completing all fields, click «Generate».
Course generation may take up to 2 minutes, depending on the number of lessons.
The course has been successfully created and is ready to use 🎉
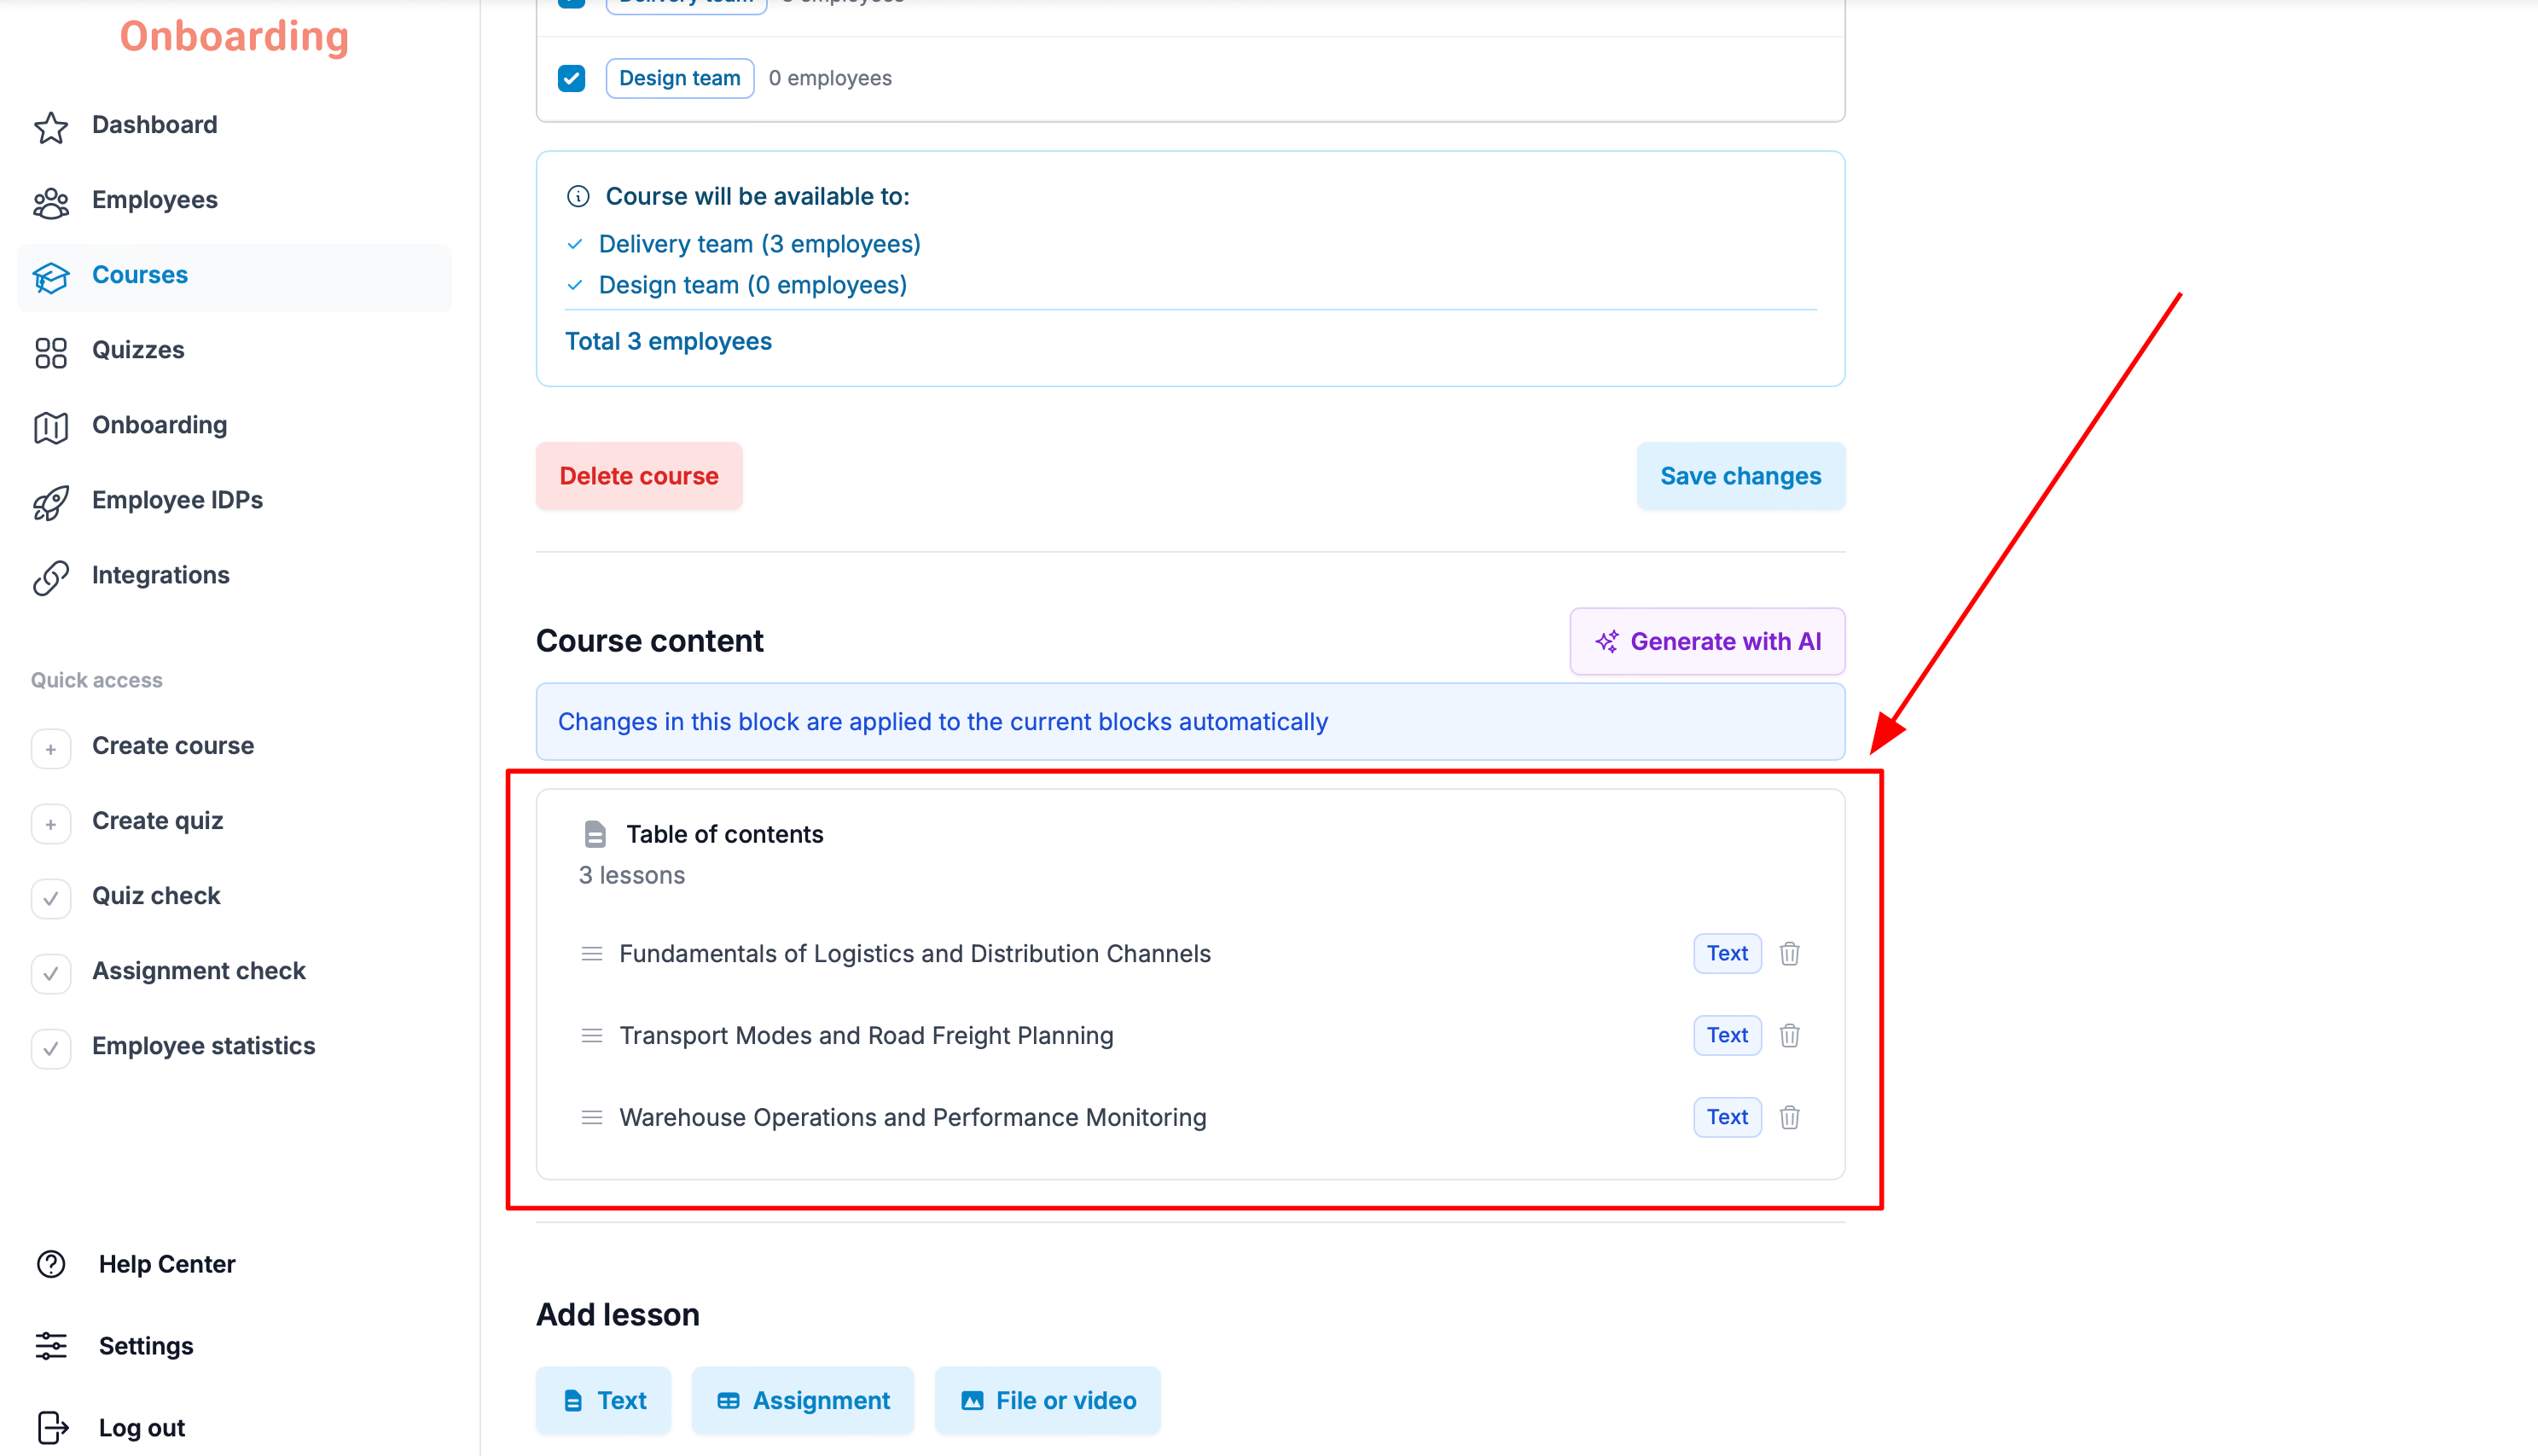
The quality of the generated course depends directly on the description and materials you provide. The more detailed your prompt and the more relevant information you upload, the more accurate the generated course will be.
All changes in this section are applied automatically. However, before publishing the course, be sure to review all generated content carefully. AI can occasionally produce inaccuracies or errors.
At this stage, courses created by the AI Content Assistant cannot be edited. If you find an error, refine your prompt and generate the course again, or delete the affected lesson and recreate it manually.
After you have verified that all course materials are correct, click «Save changes».
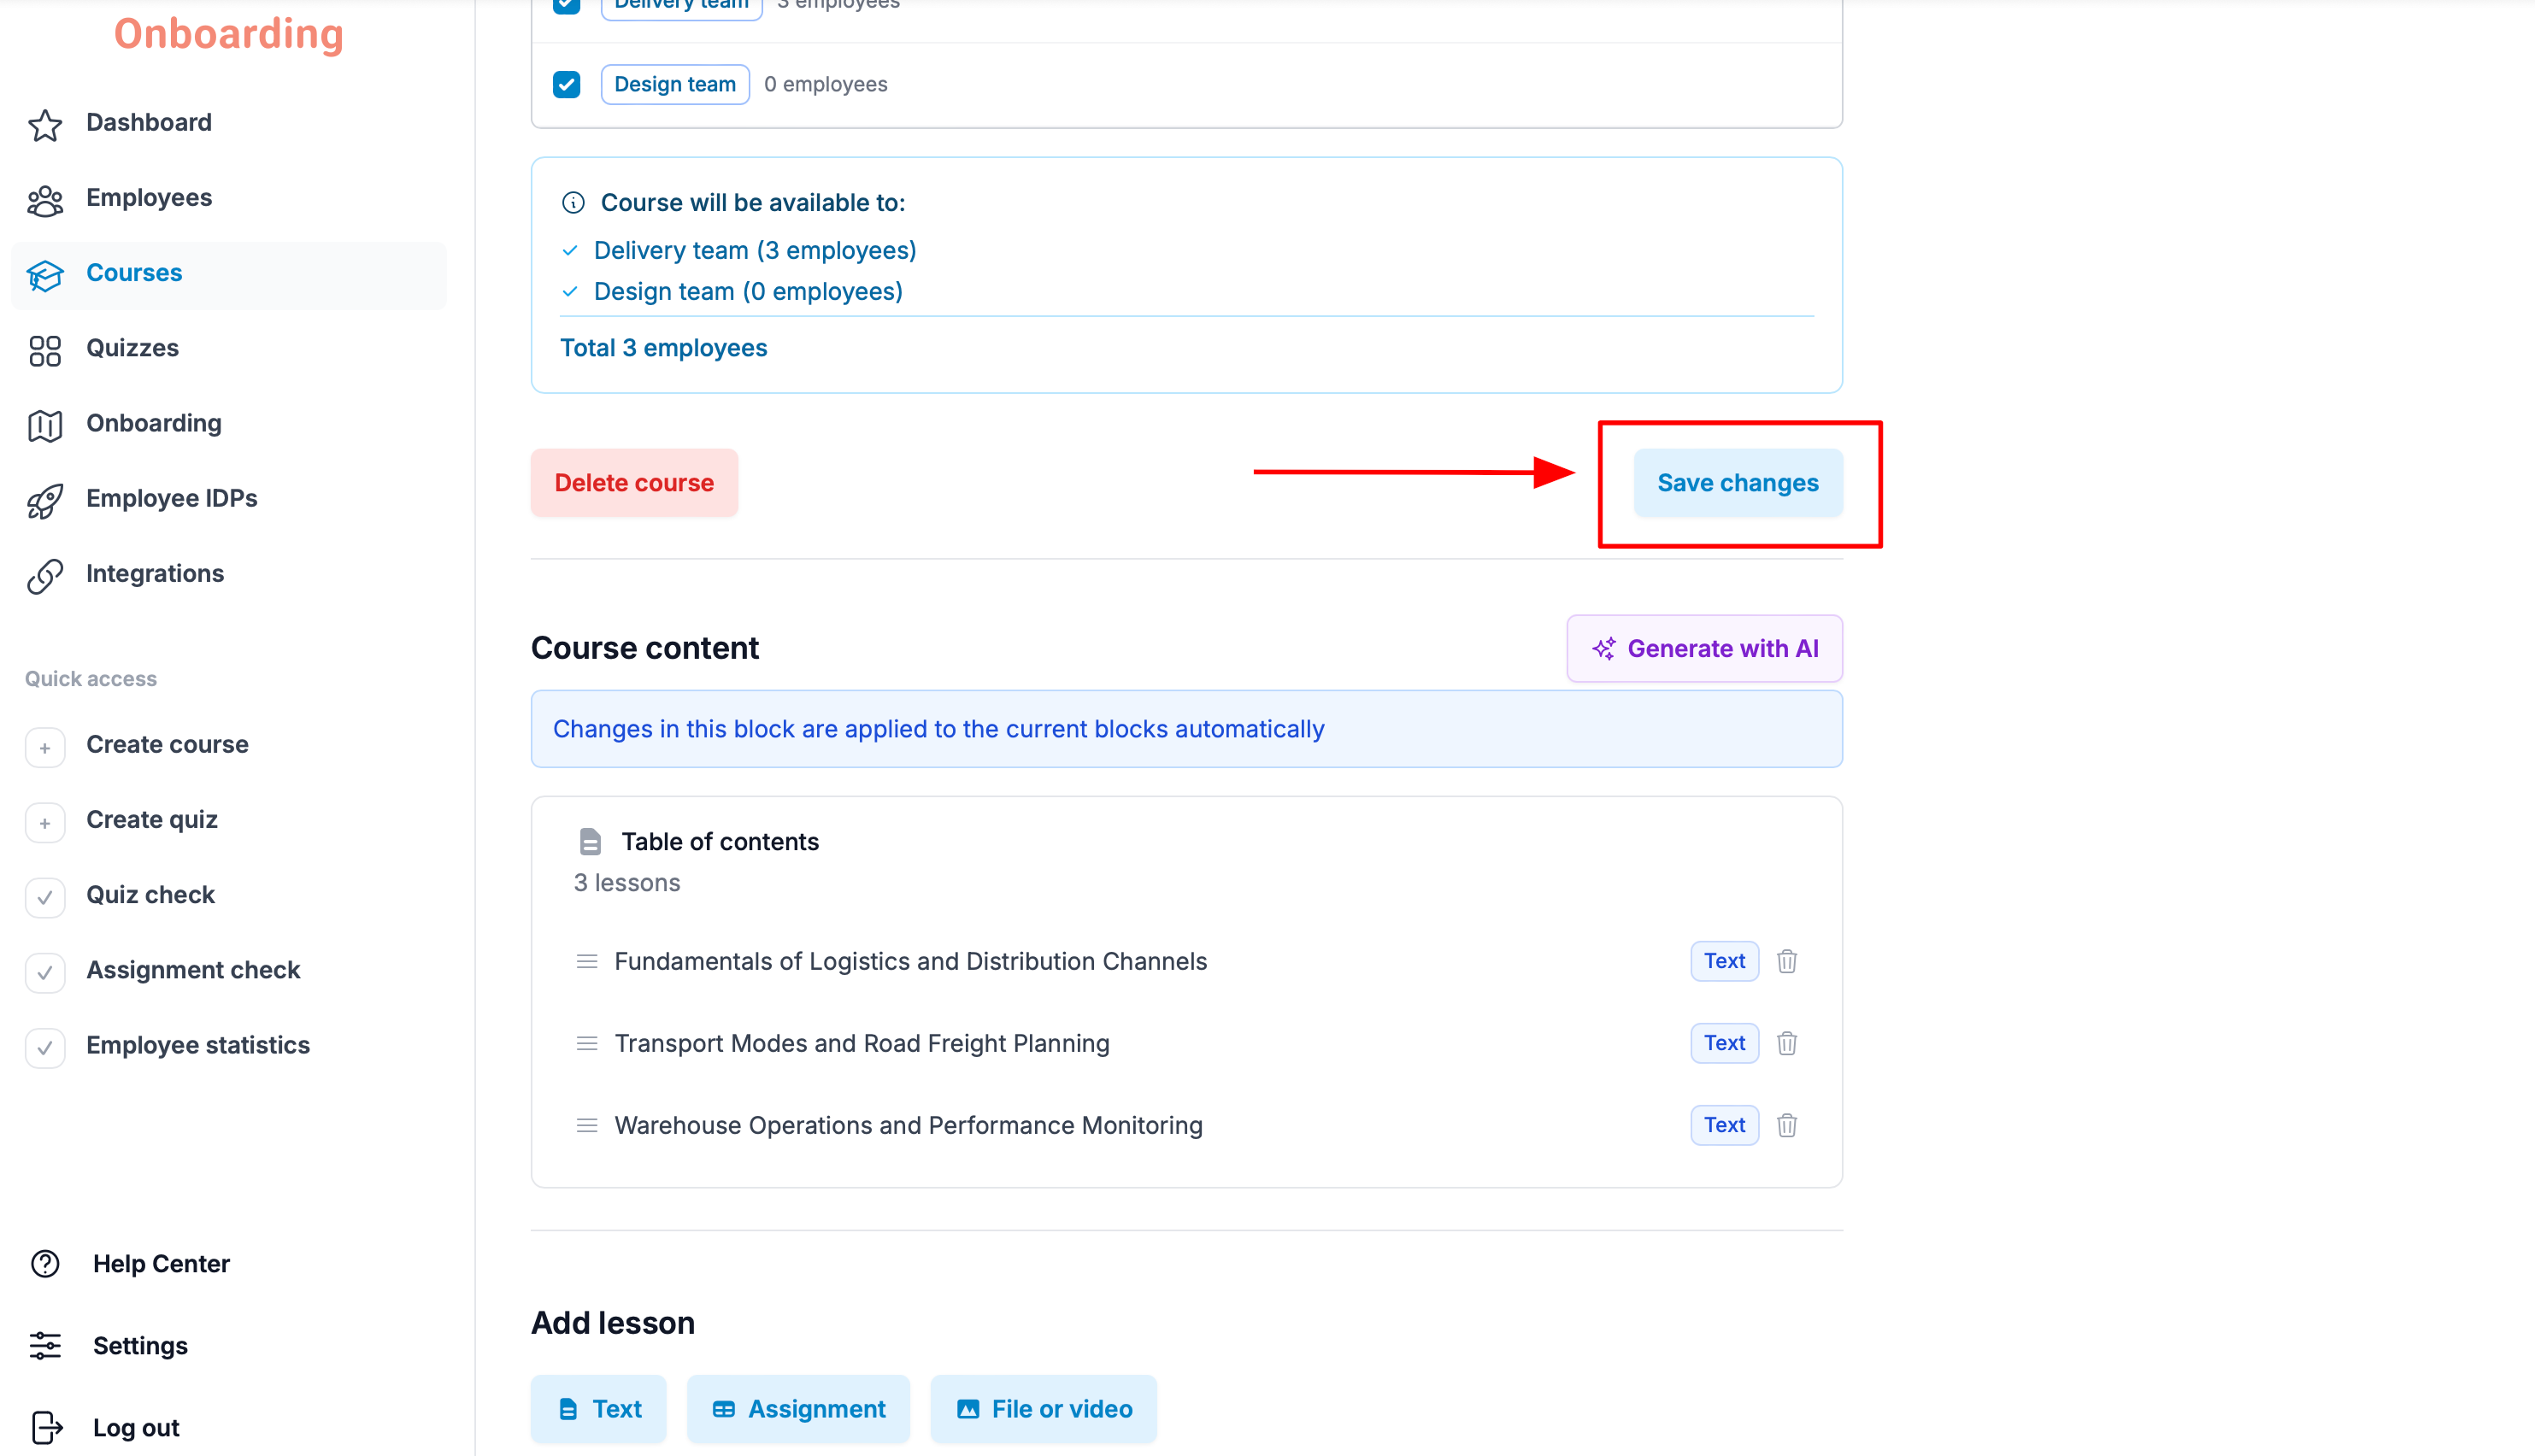
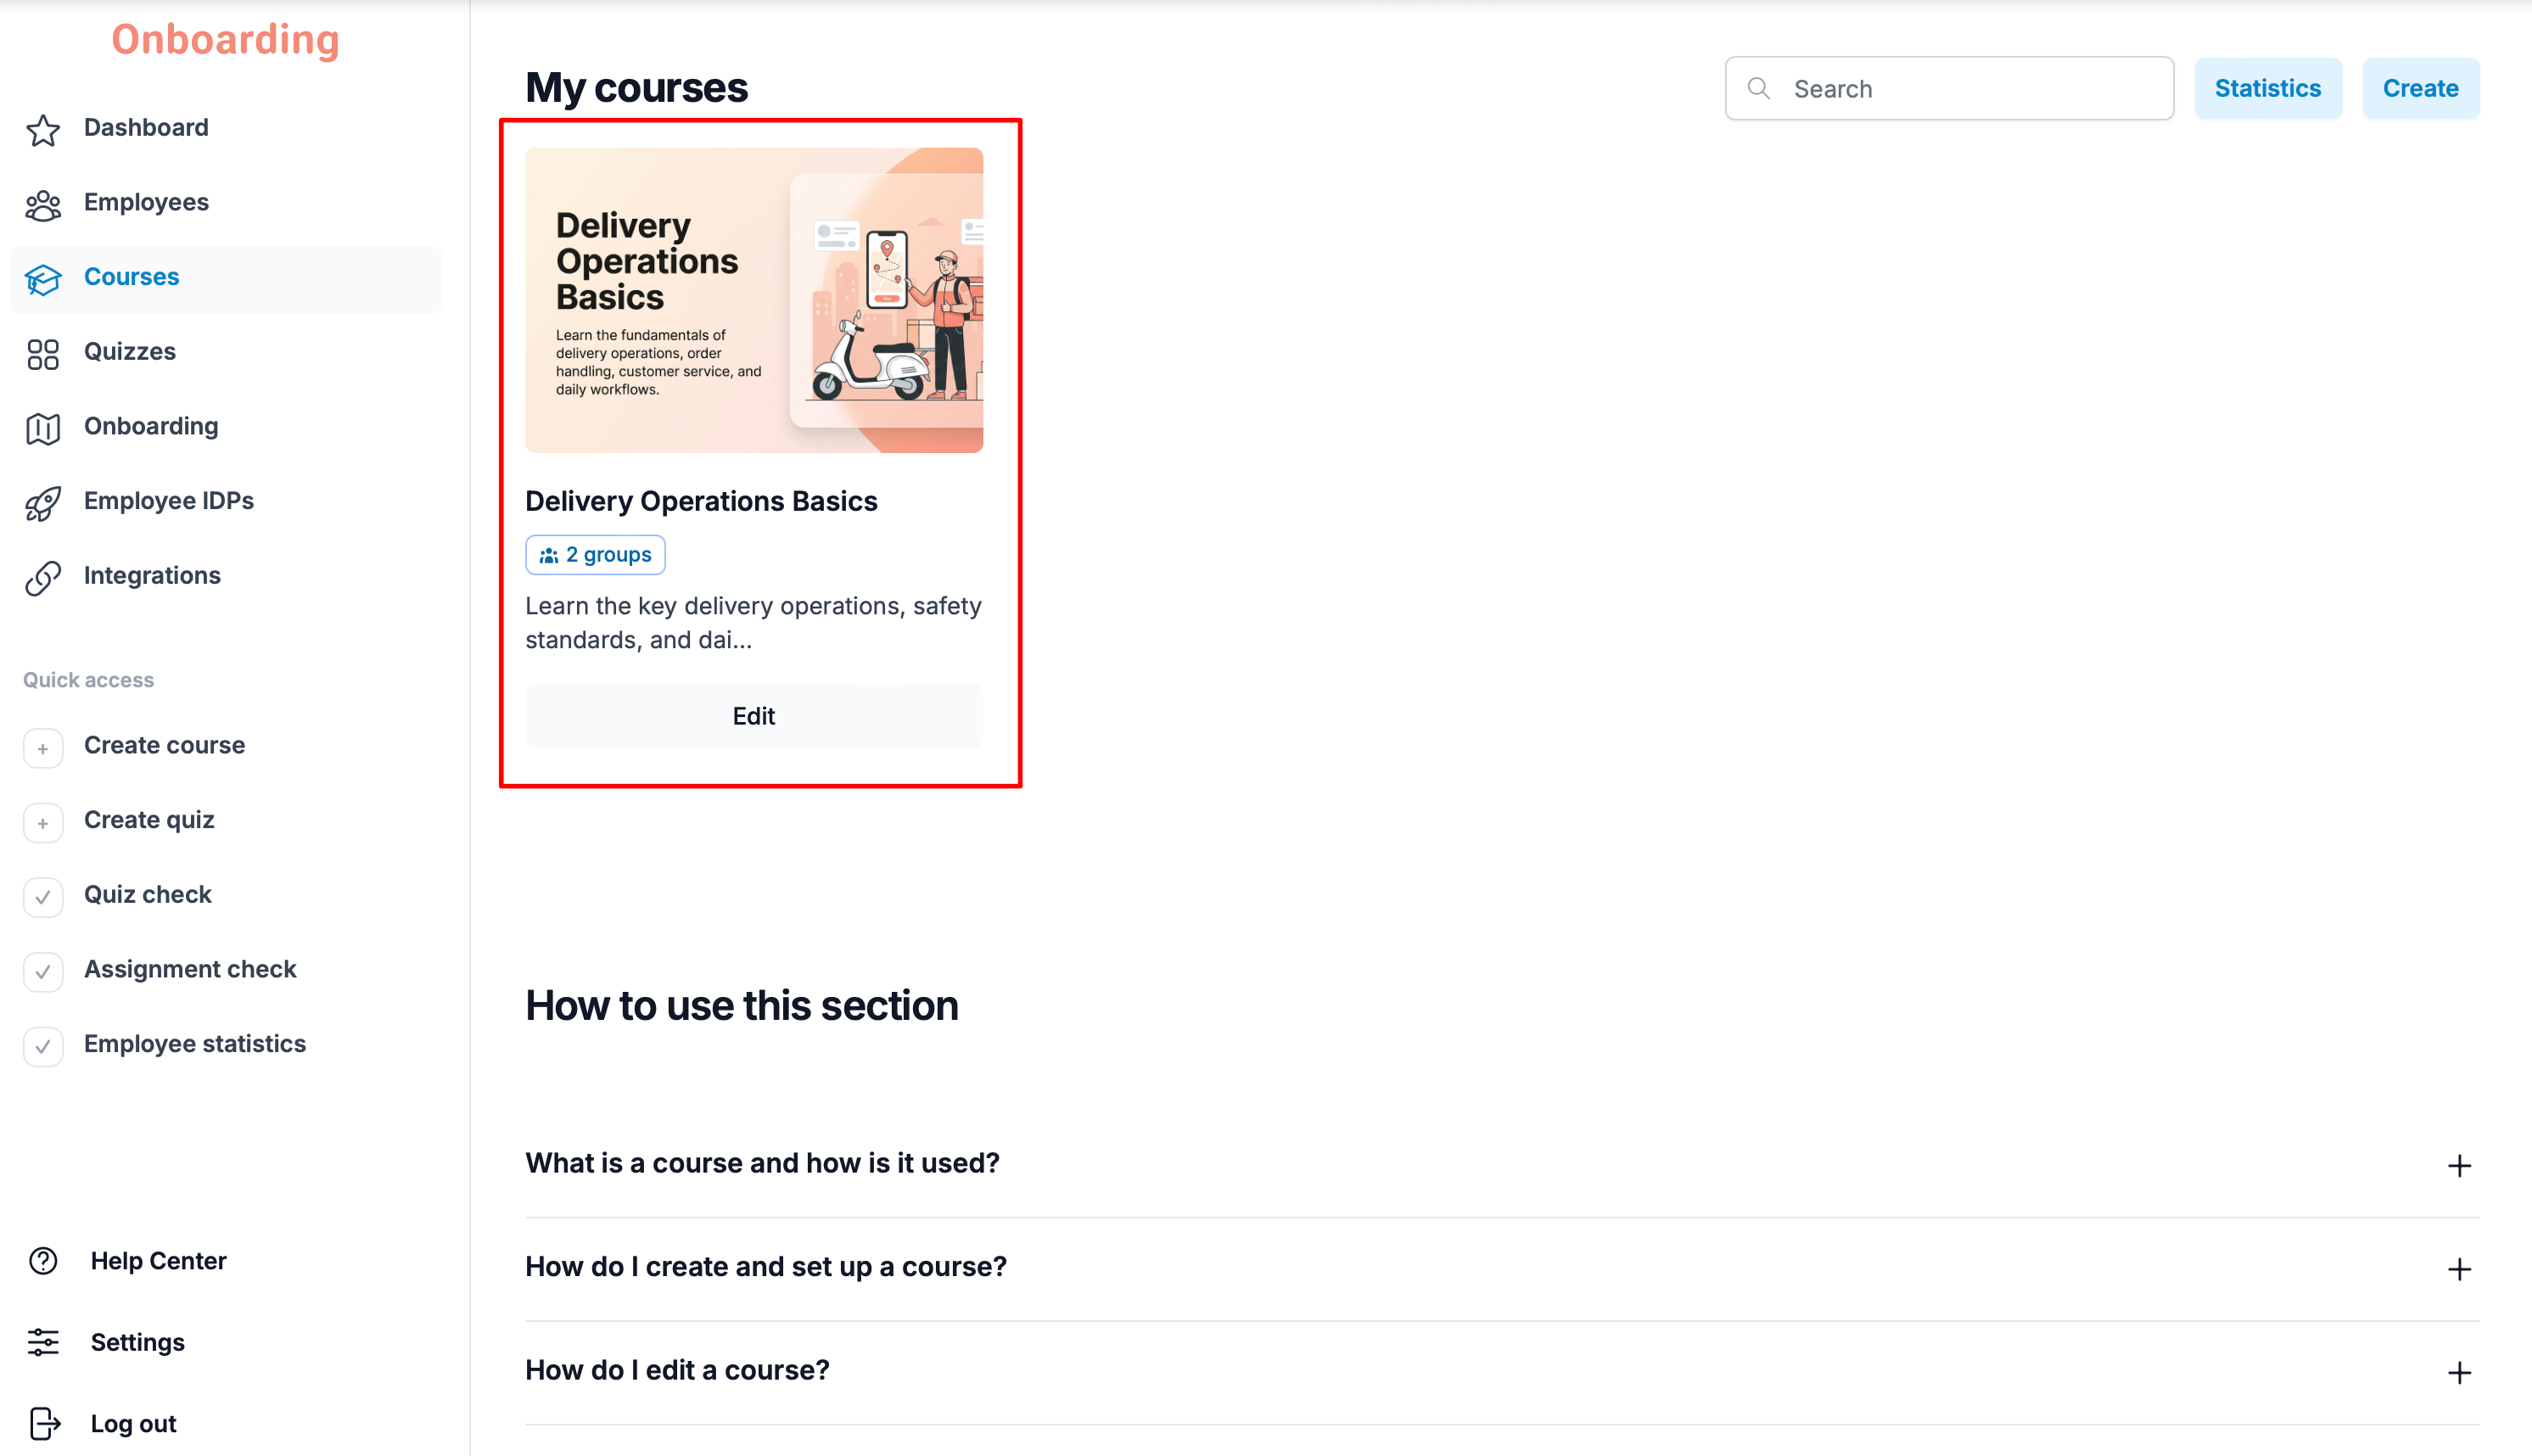
The course is published 🎉
You're back on the course list. The course is now open to all the employees or groups it was assigned to.
Editing Courses and Lessons
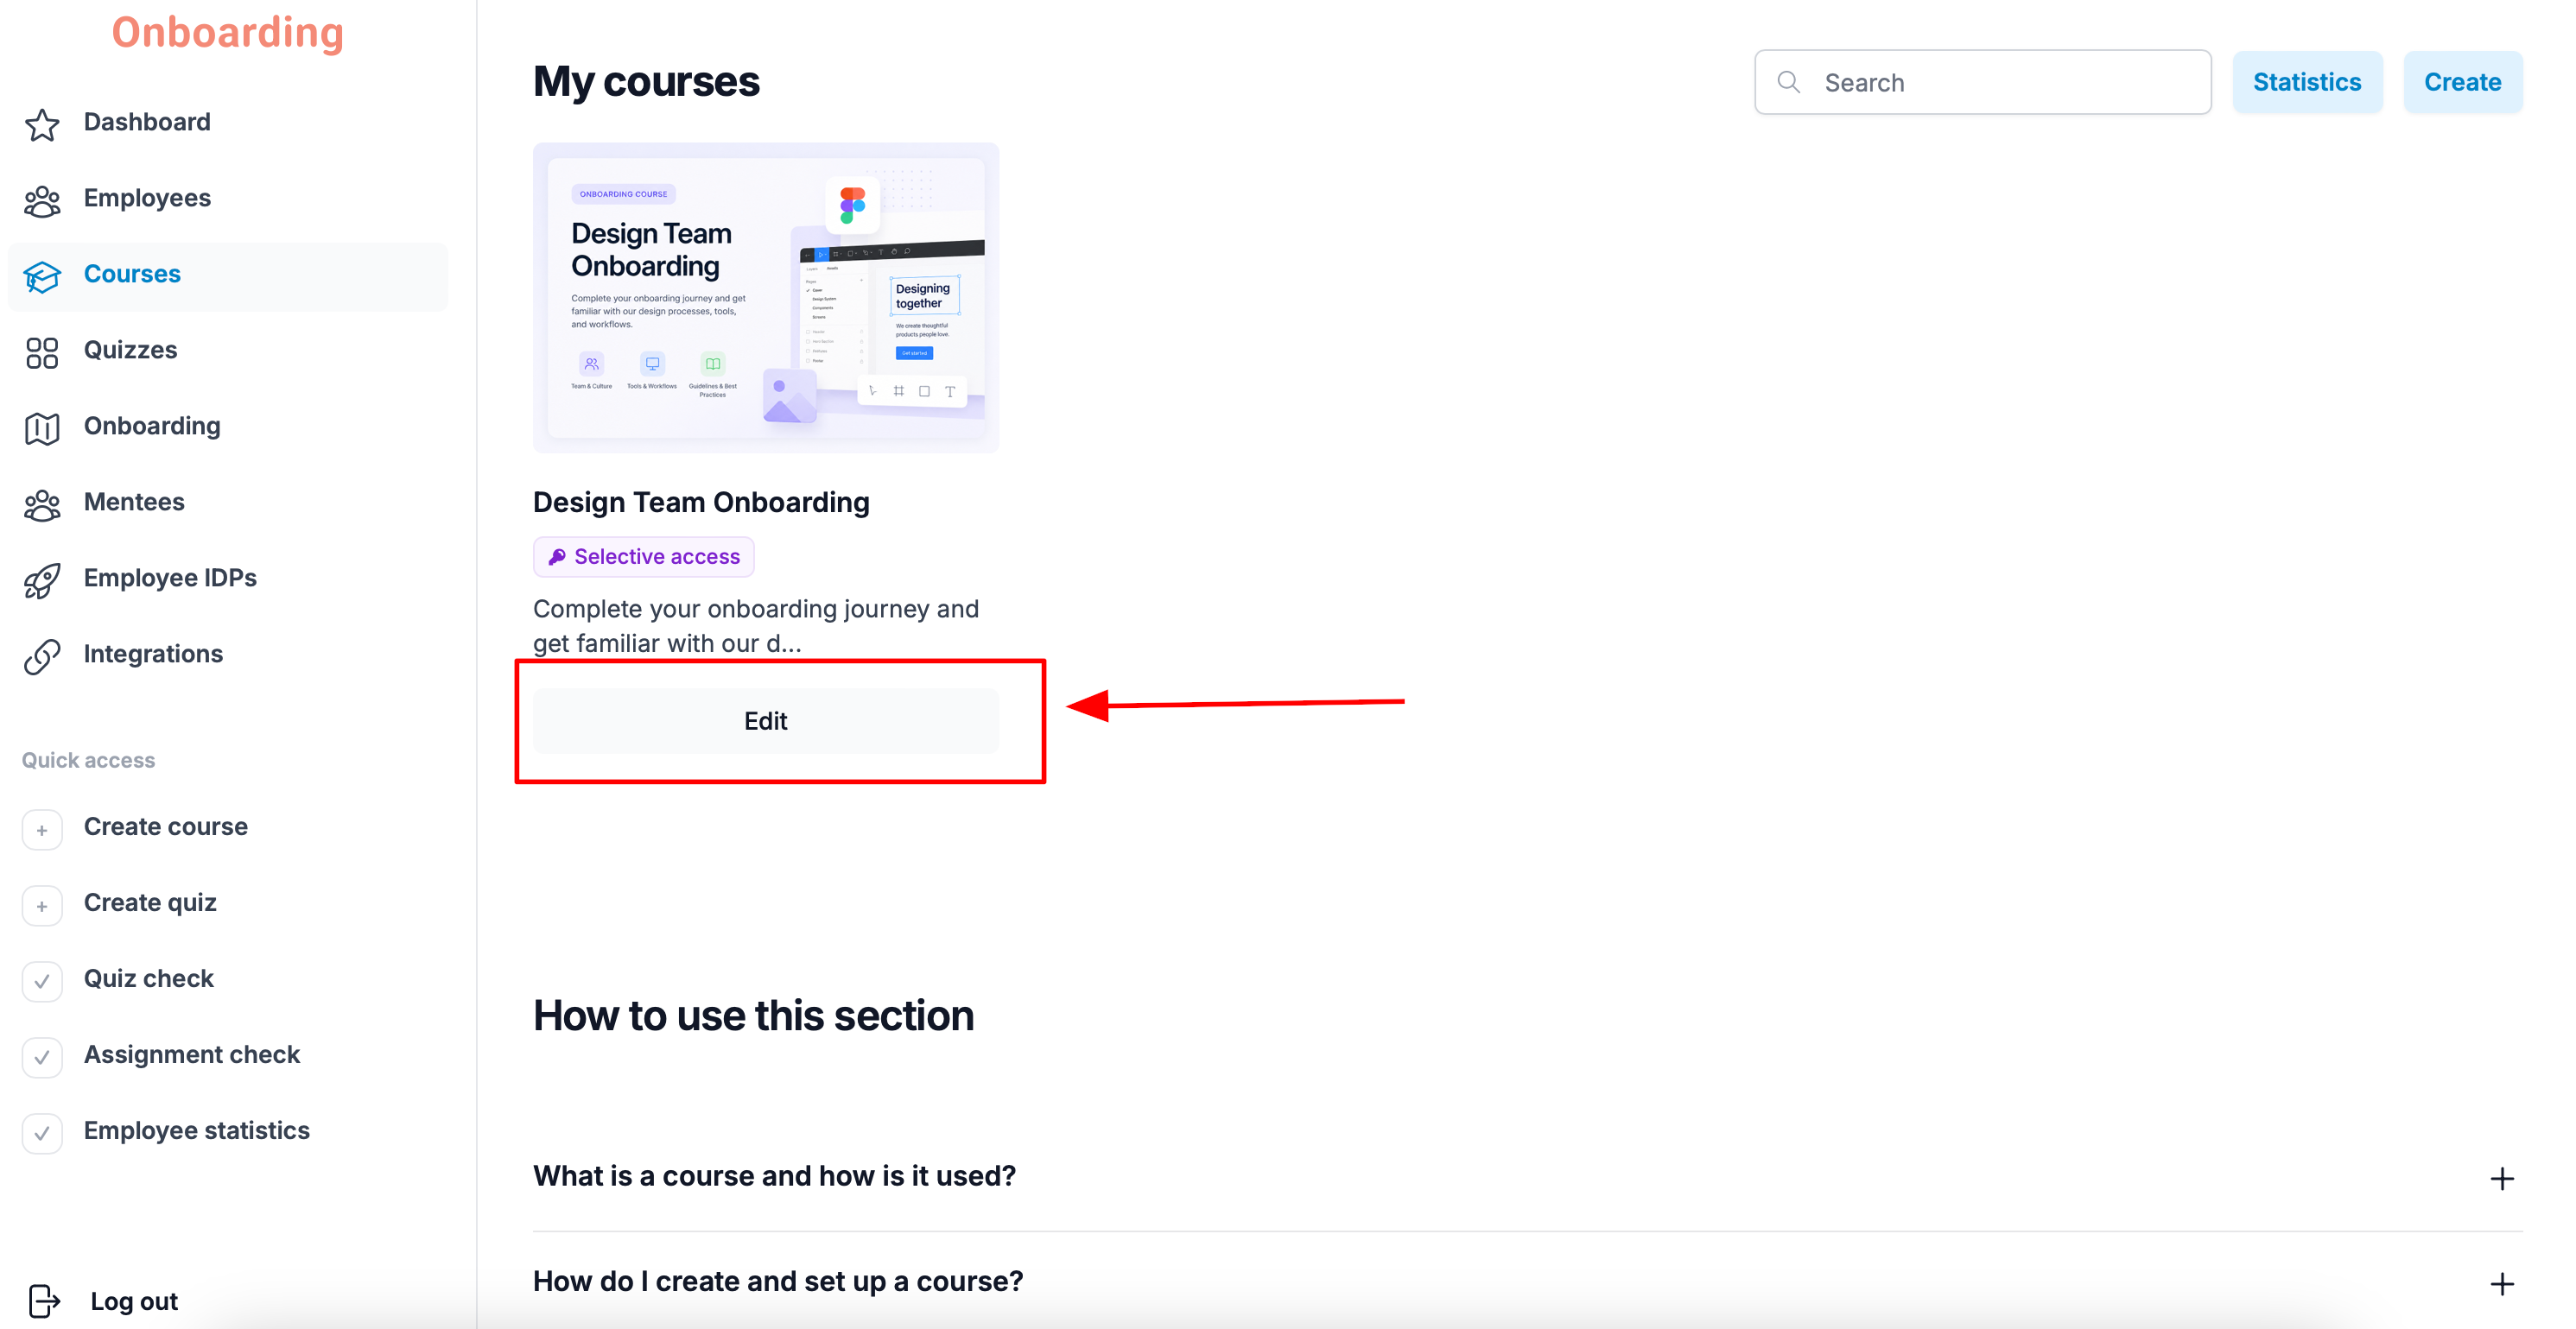
To edit an existing course, open the «Courses» section, pick the course you need, and click «Edit».
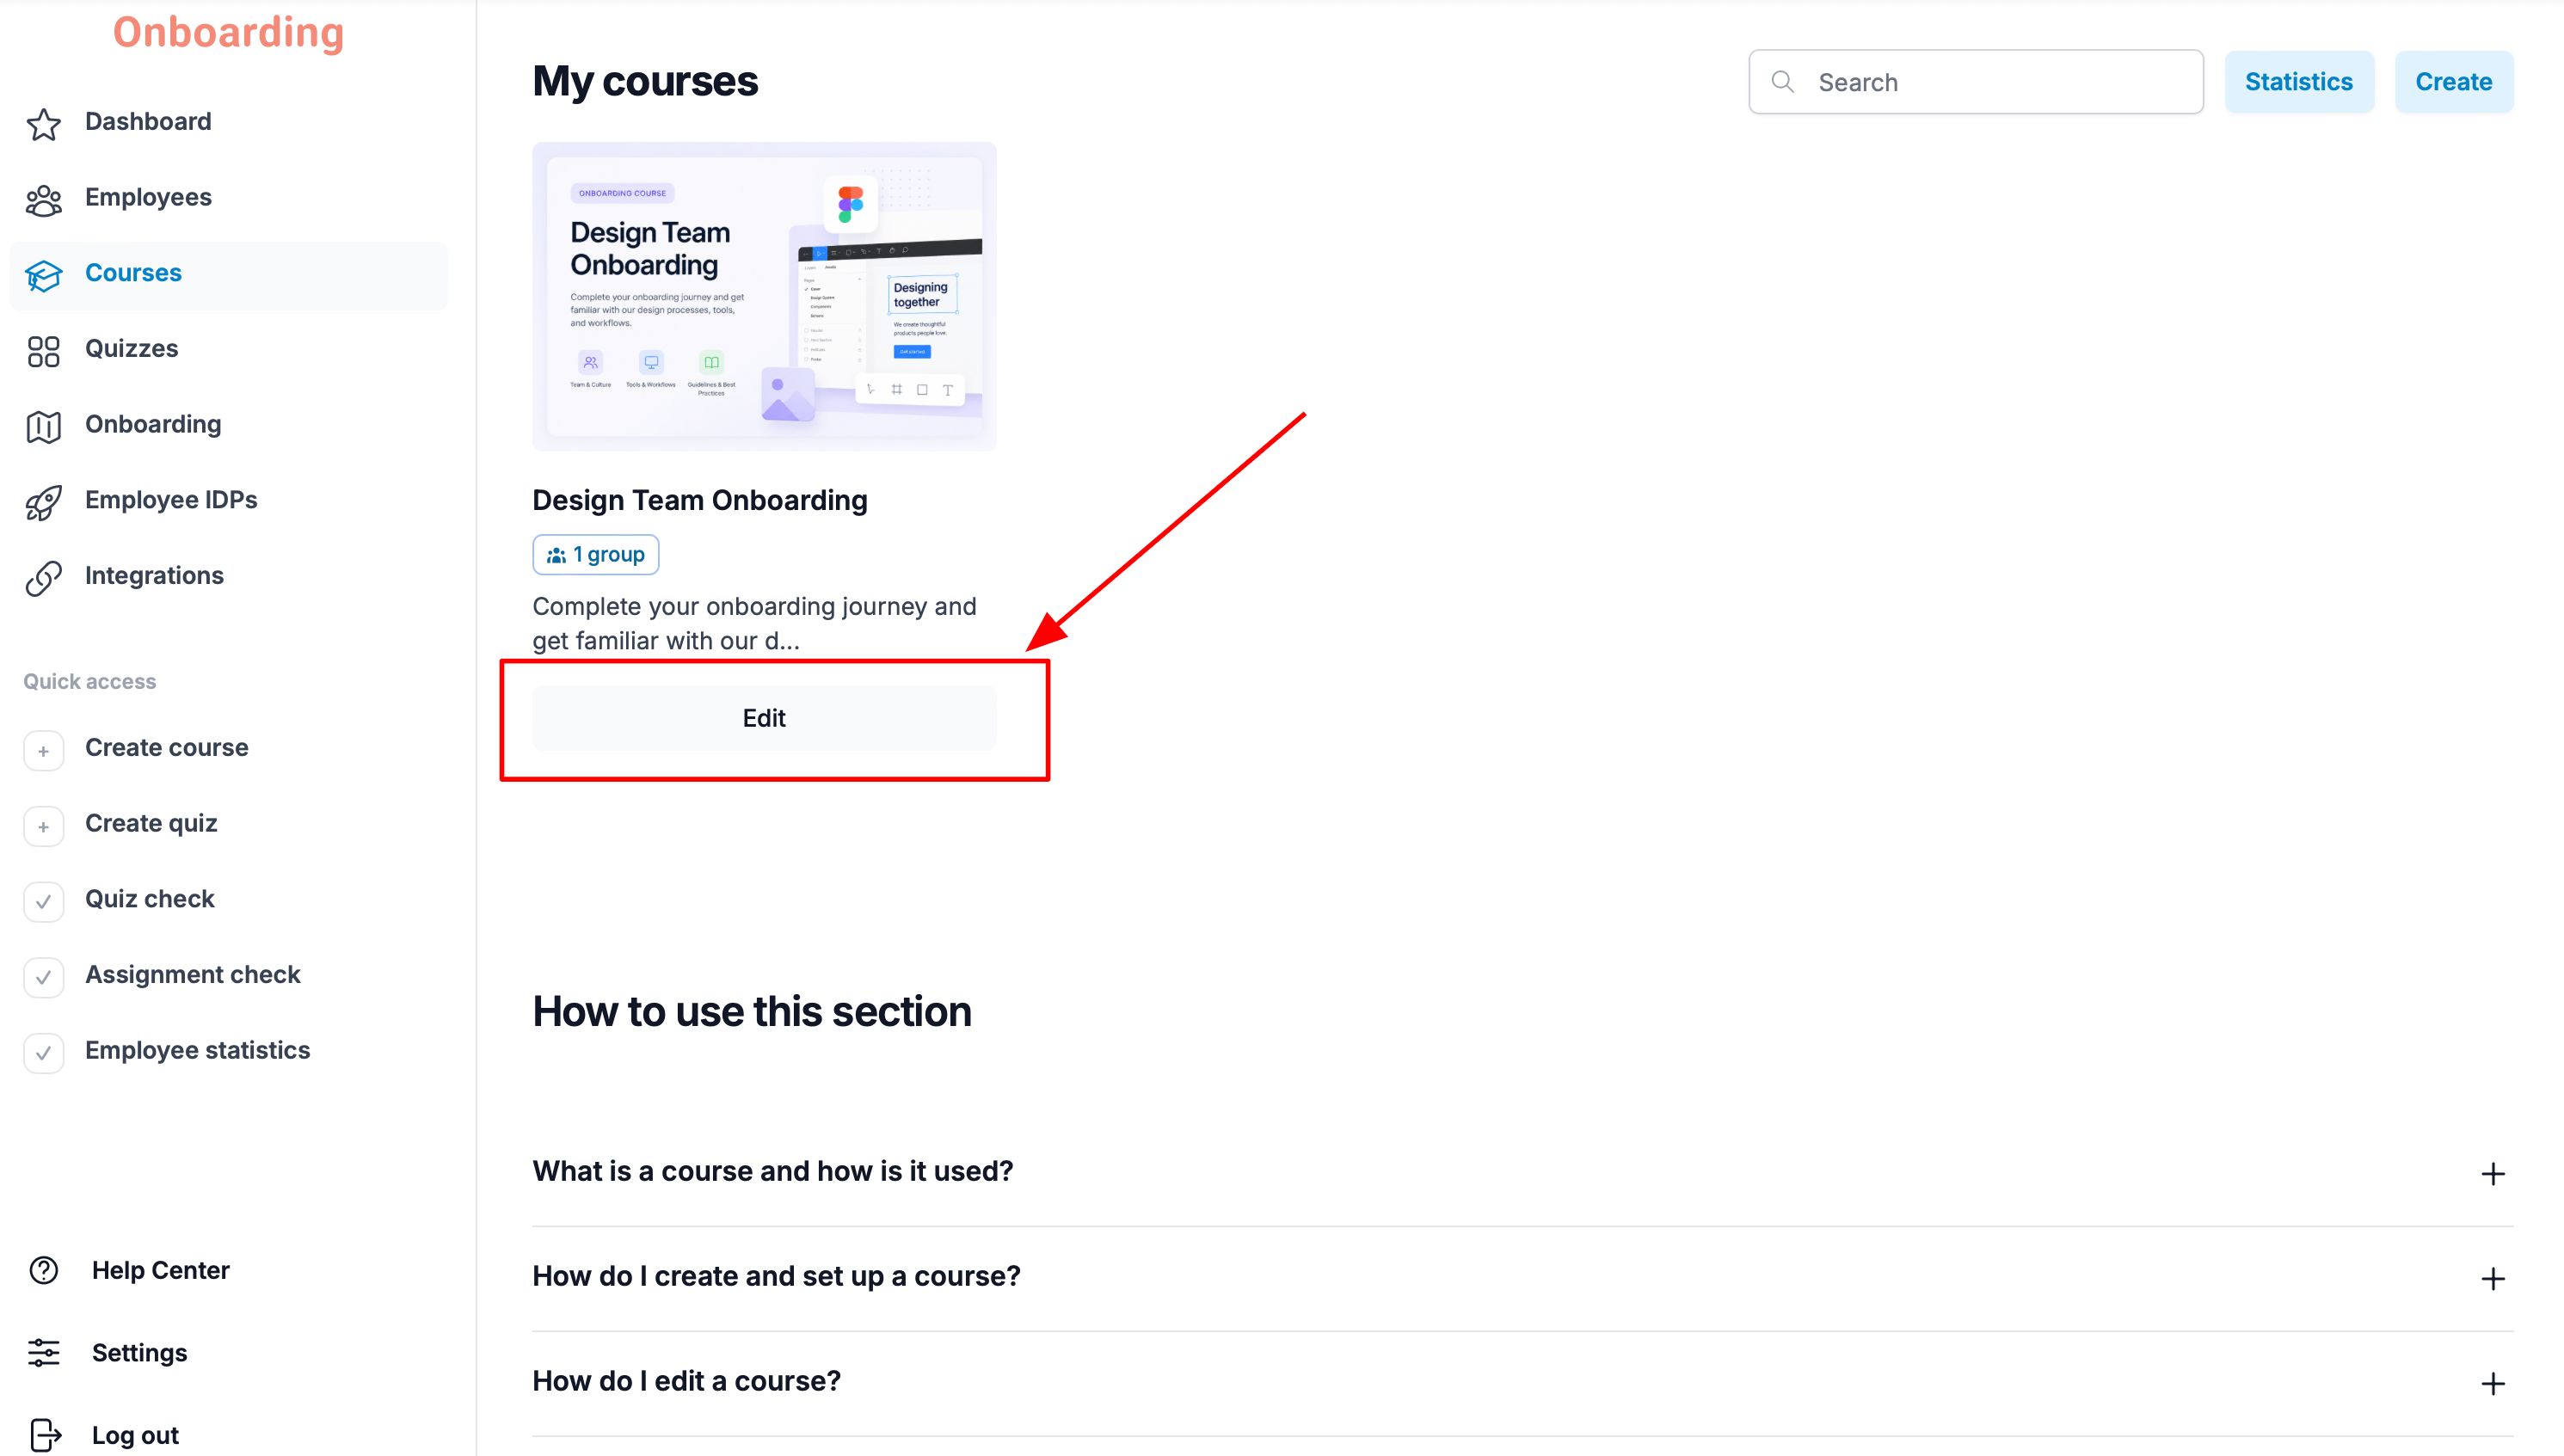
The course editor opens, where you can change both the basic settings and the course content.
Changing course settings
In the basic settings you can change:
- the course name;
- the course cover;
- the course description;
- course access for groups or individual employees.
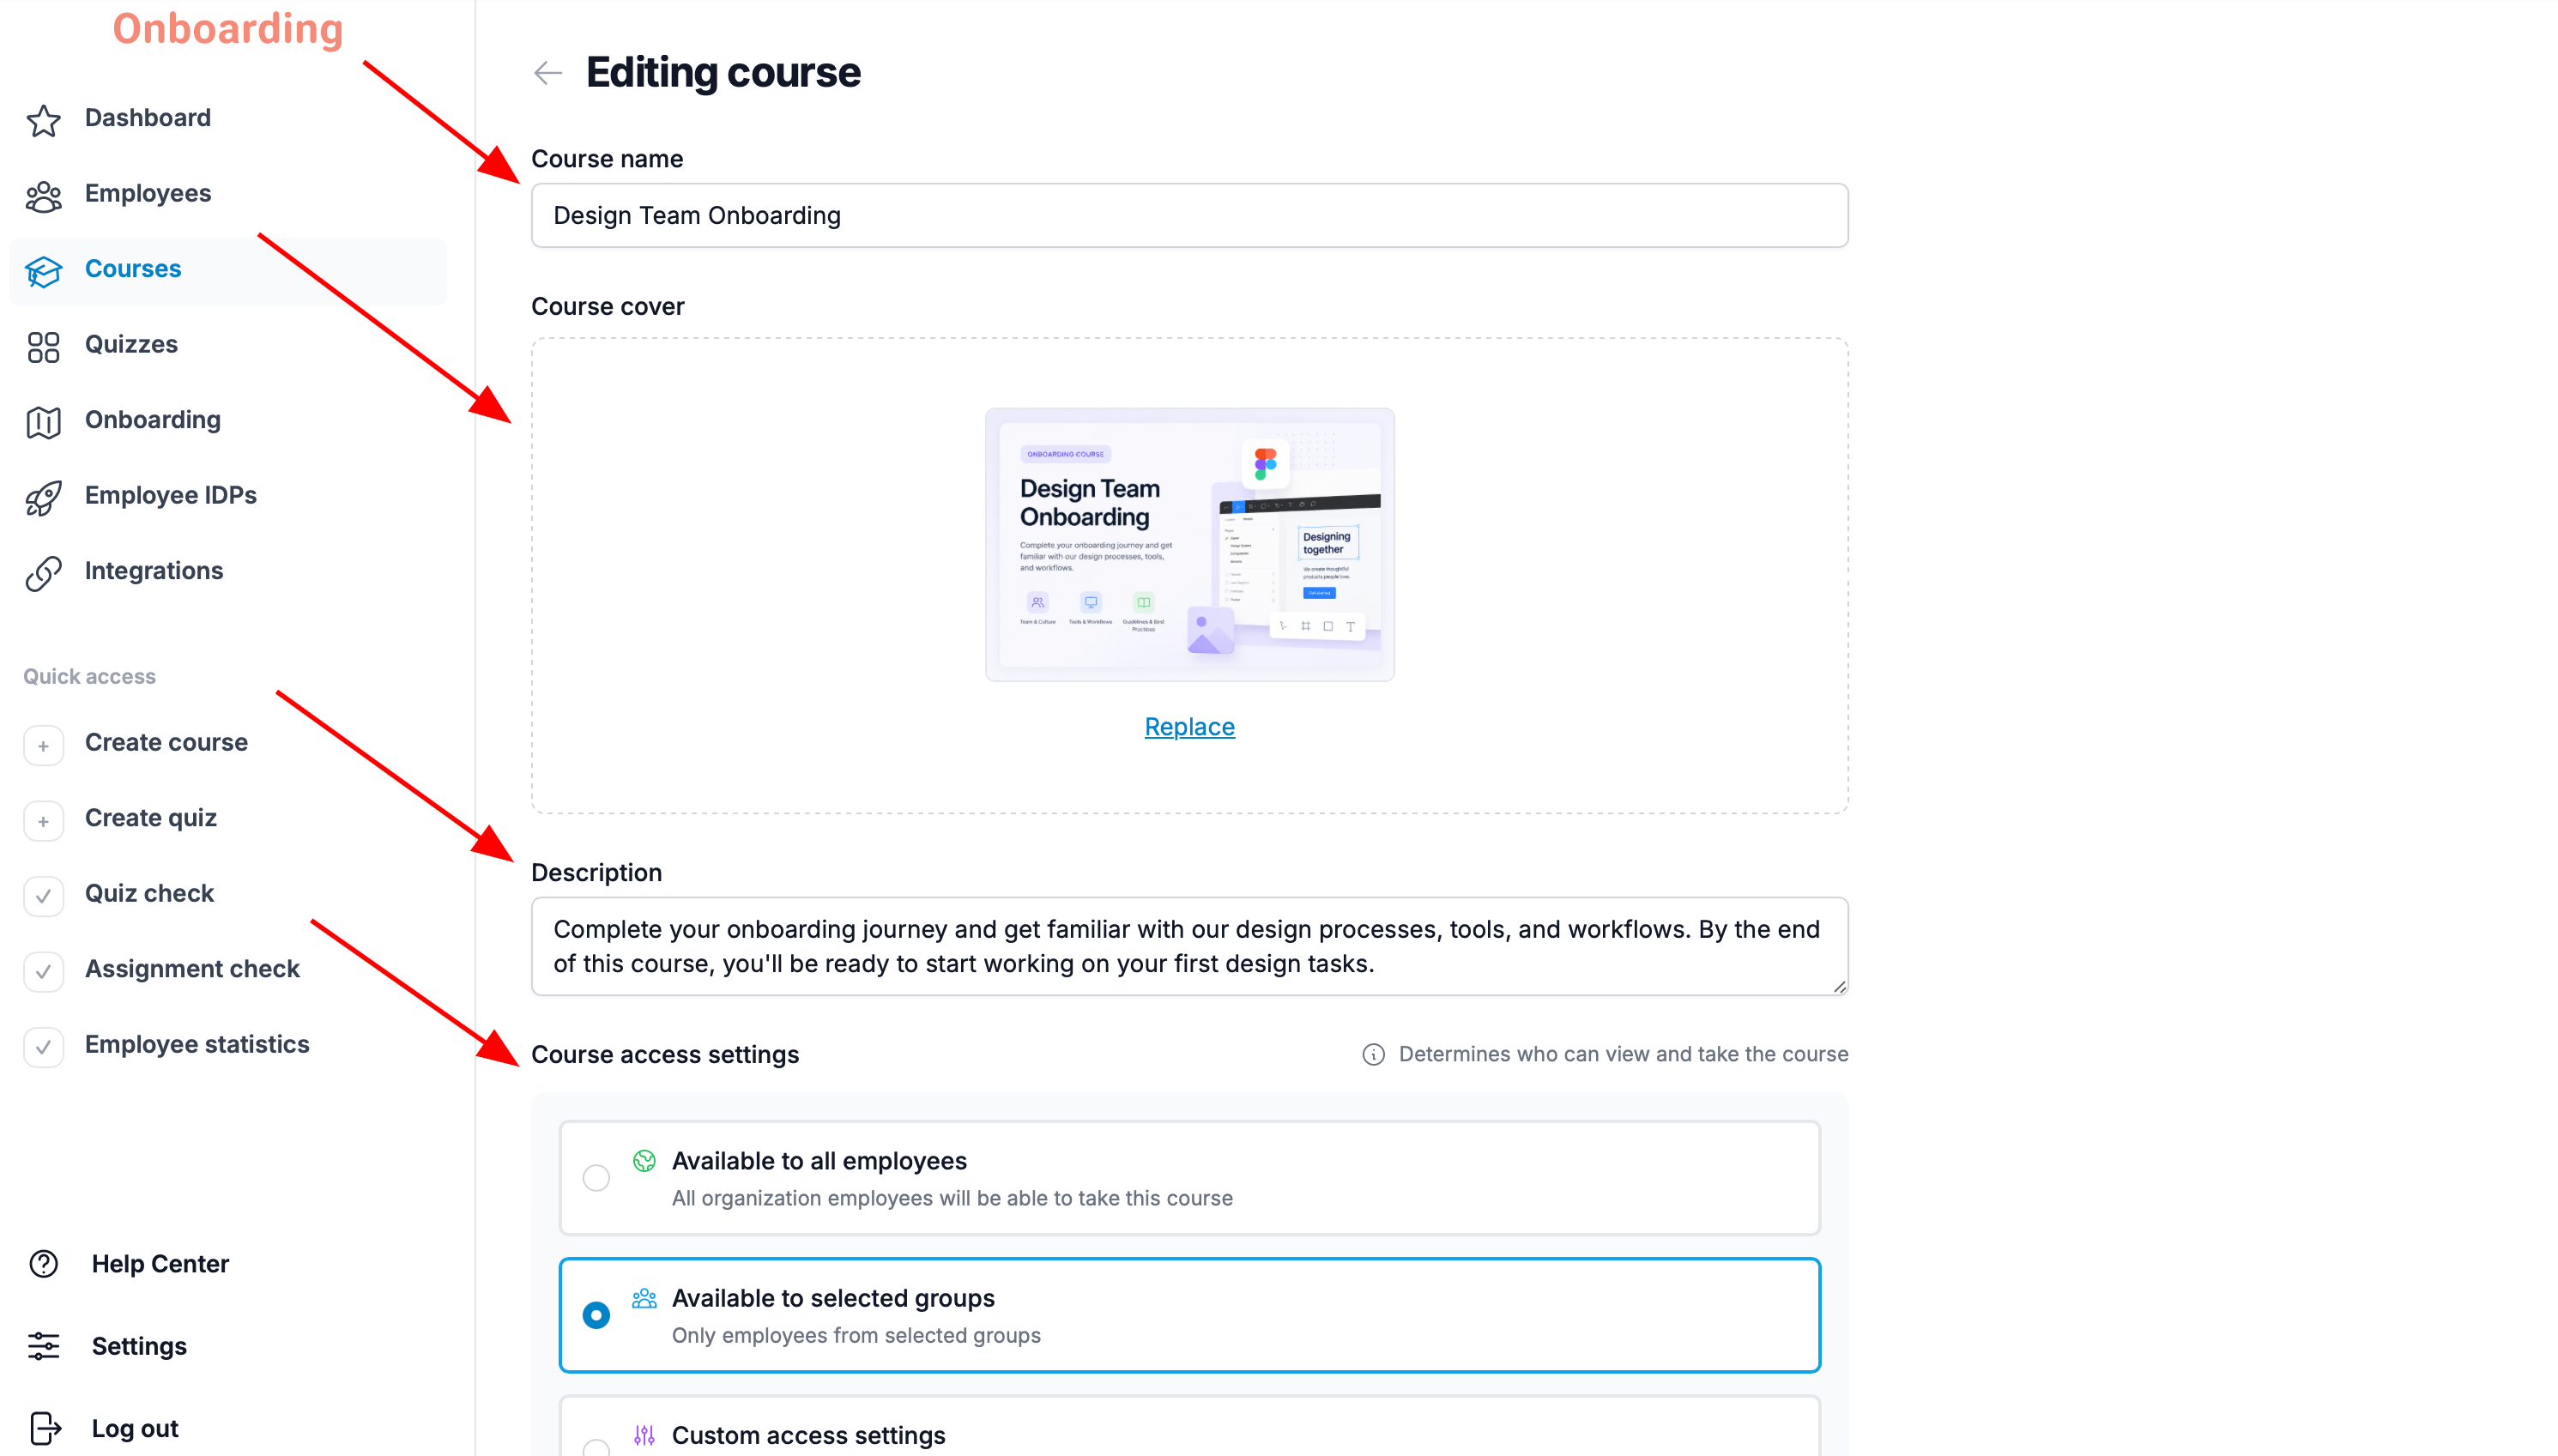
Editing lessons
In the «Course content» block you can:
- reorder lessons;
- delete a lesson;
- add a new Text, Assignment, File, or Video lesson;
- generate additional lessons with AI;
- edit a Text lesson.
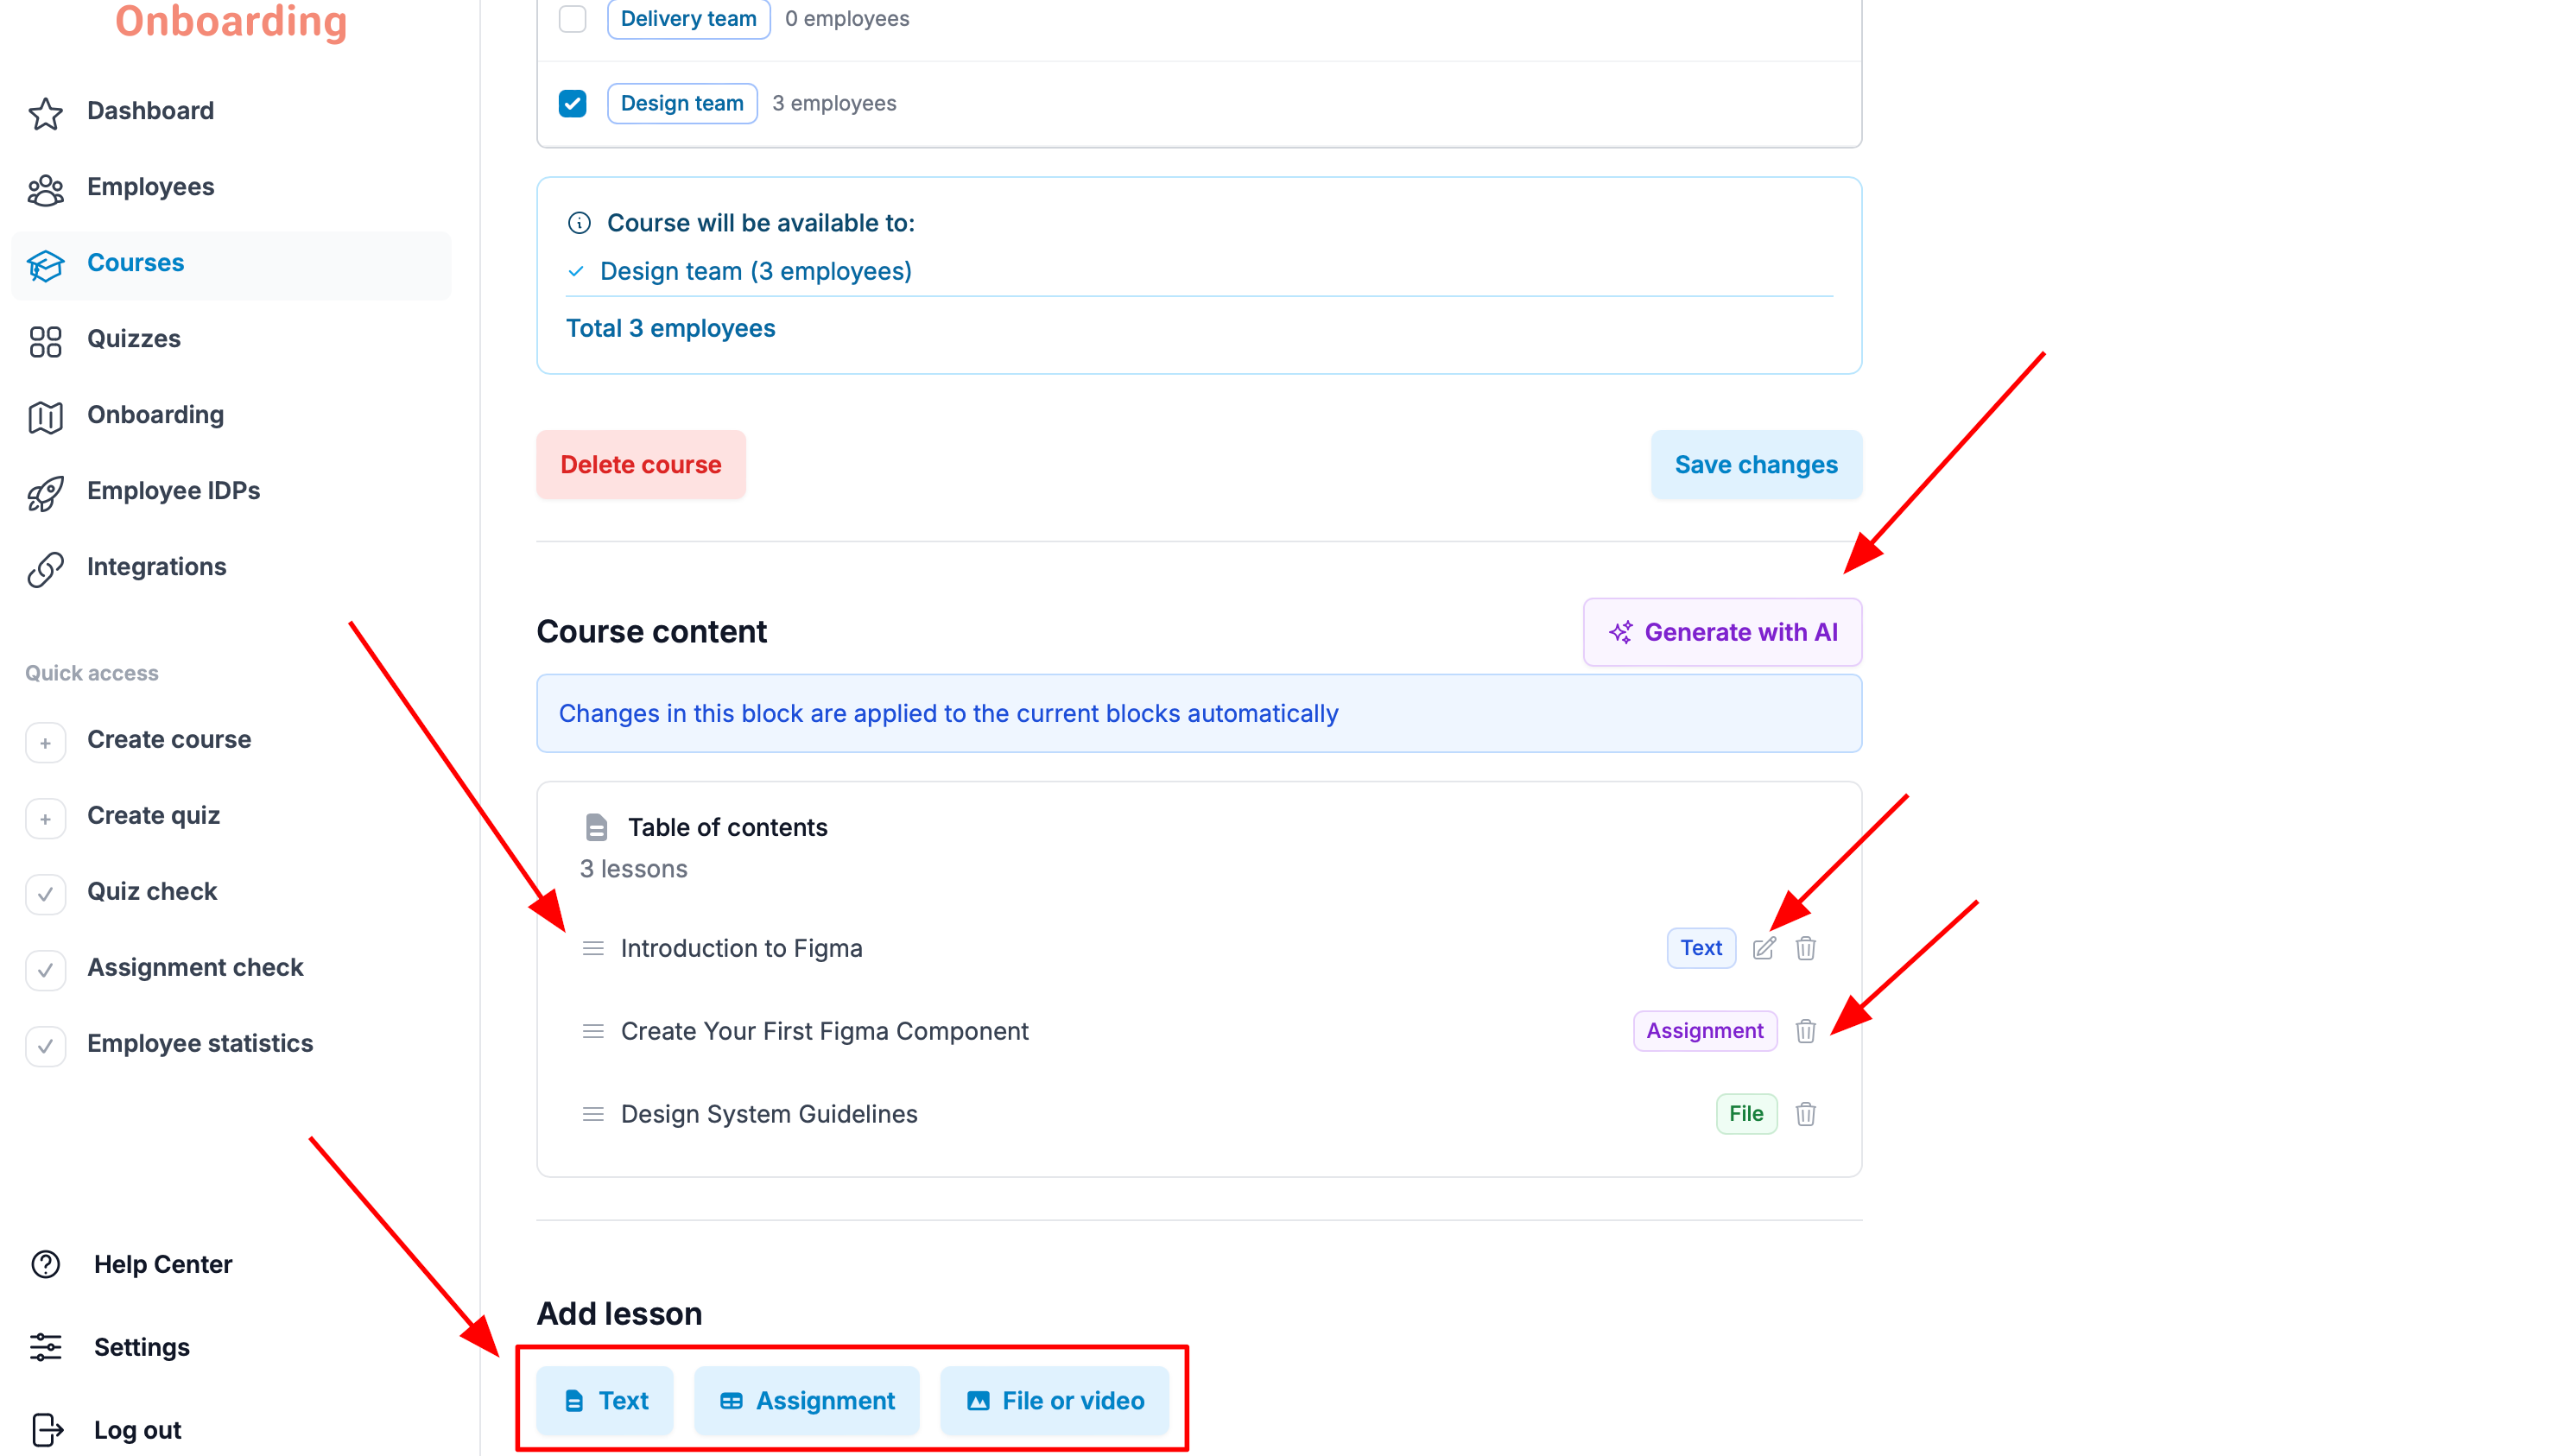
To edit a Text lesson, click the Edit icon next to the lesson you want to update.
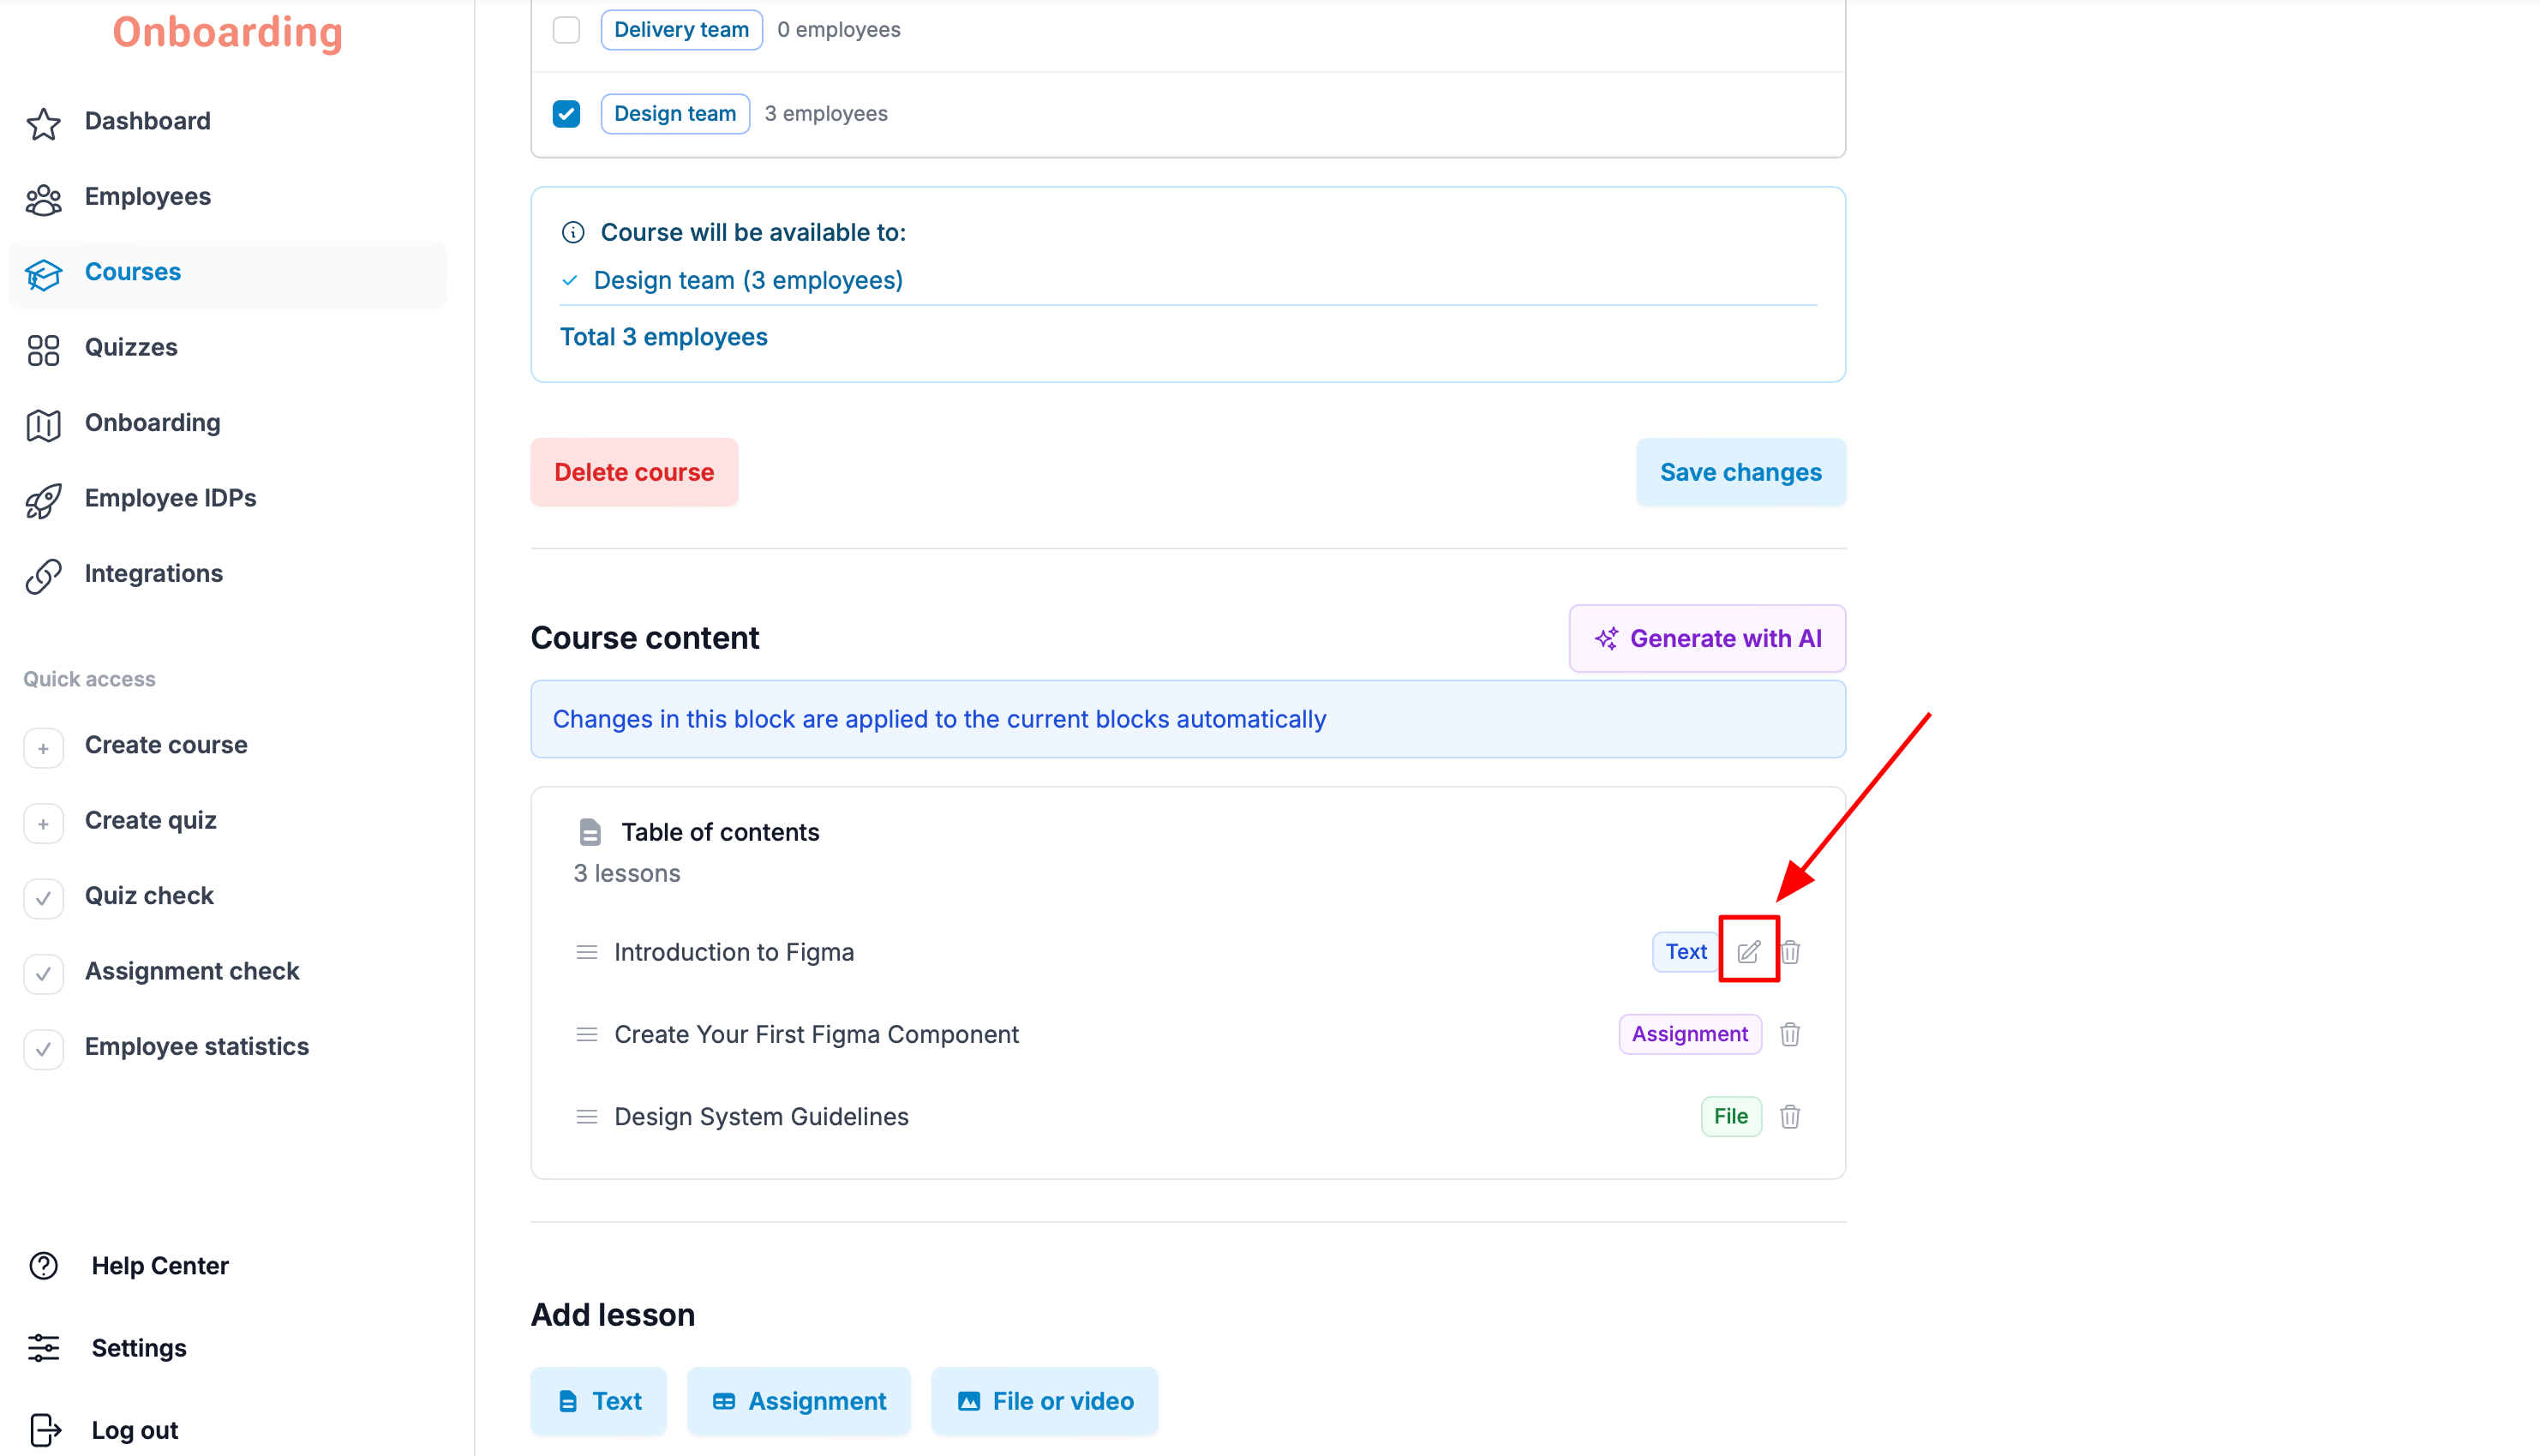
The editing window will open. Make the necessary changes to the lesson content.
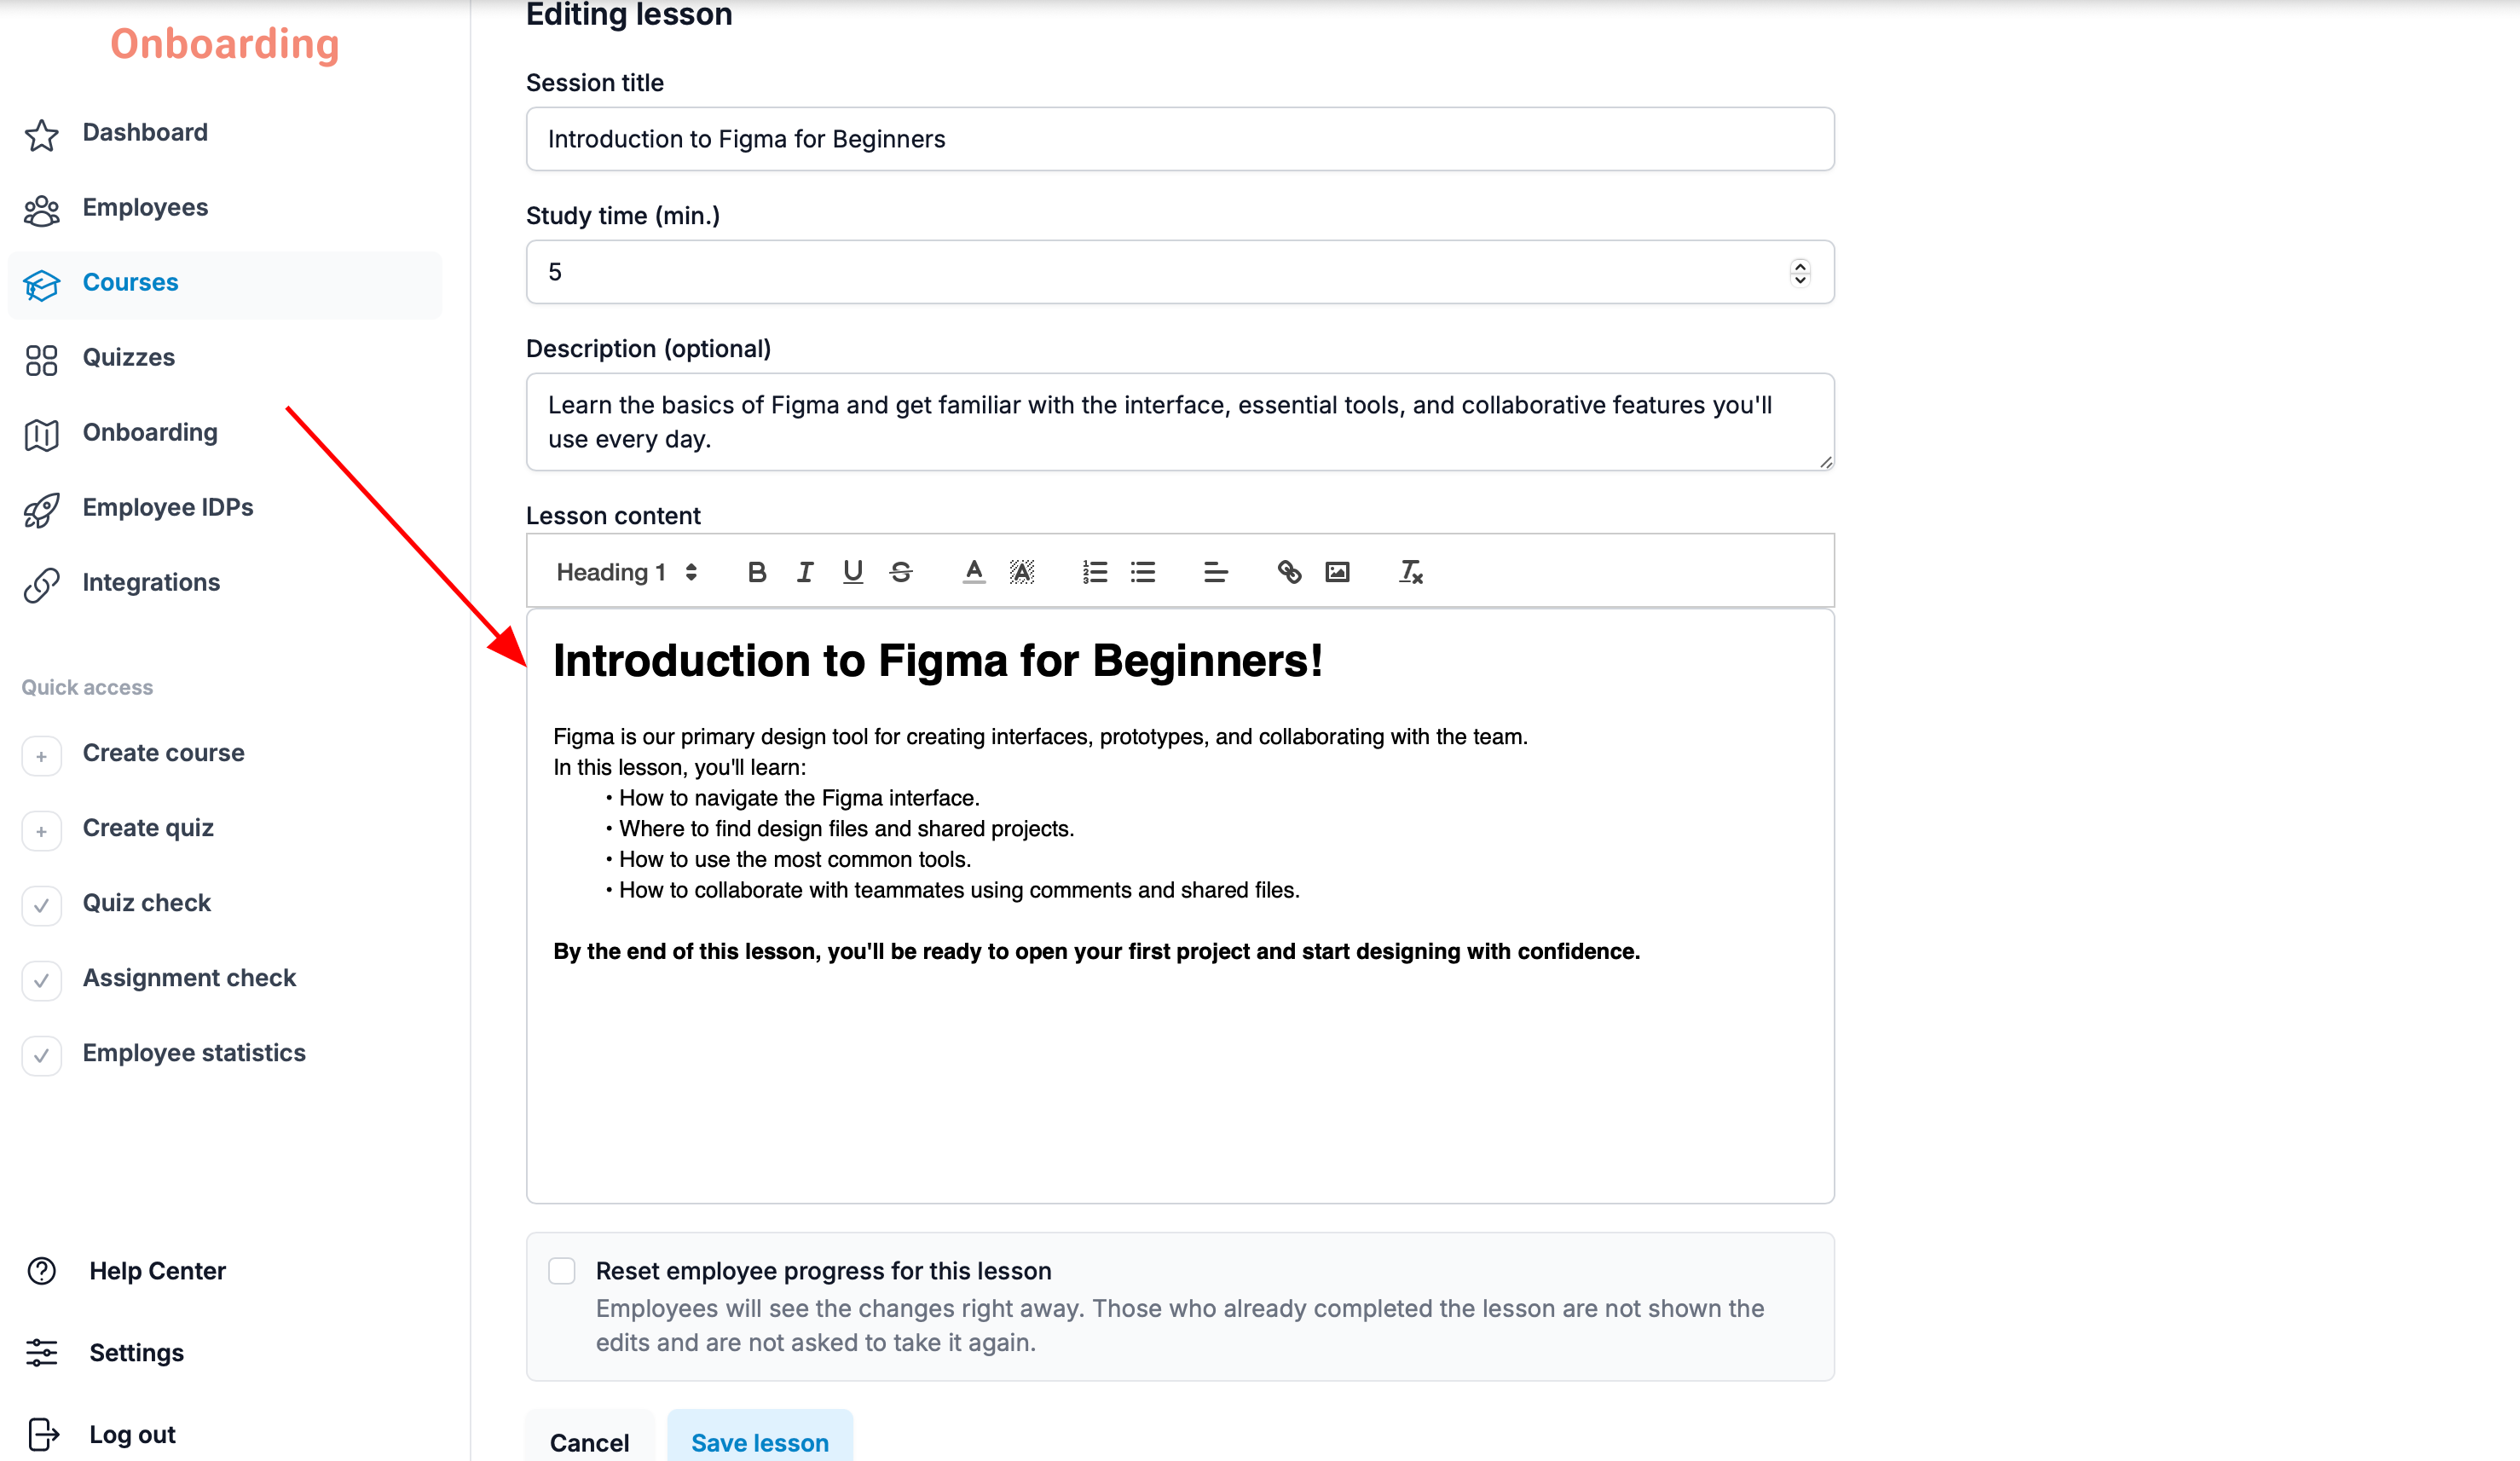
Below the editing field, you'll find the «Reset employee progress for this lesson» checkbox.
By default, the checkbox is turned off.
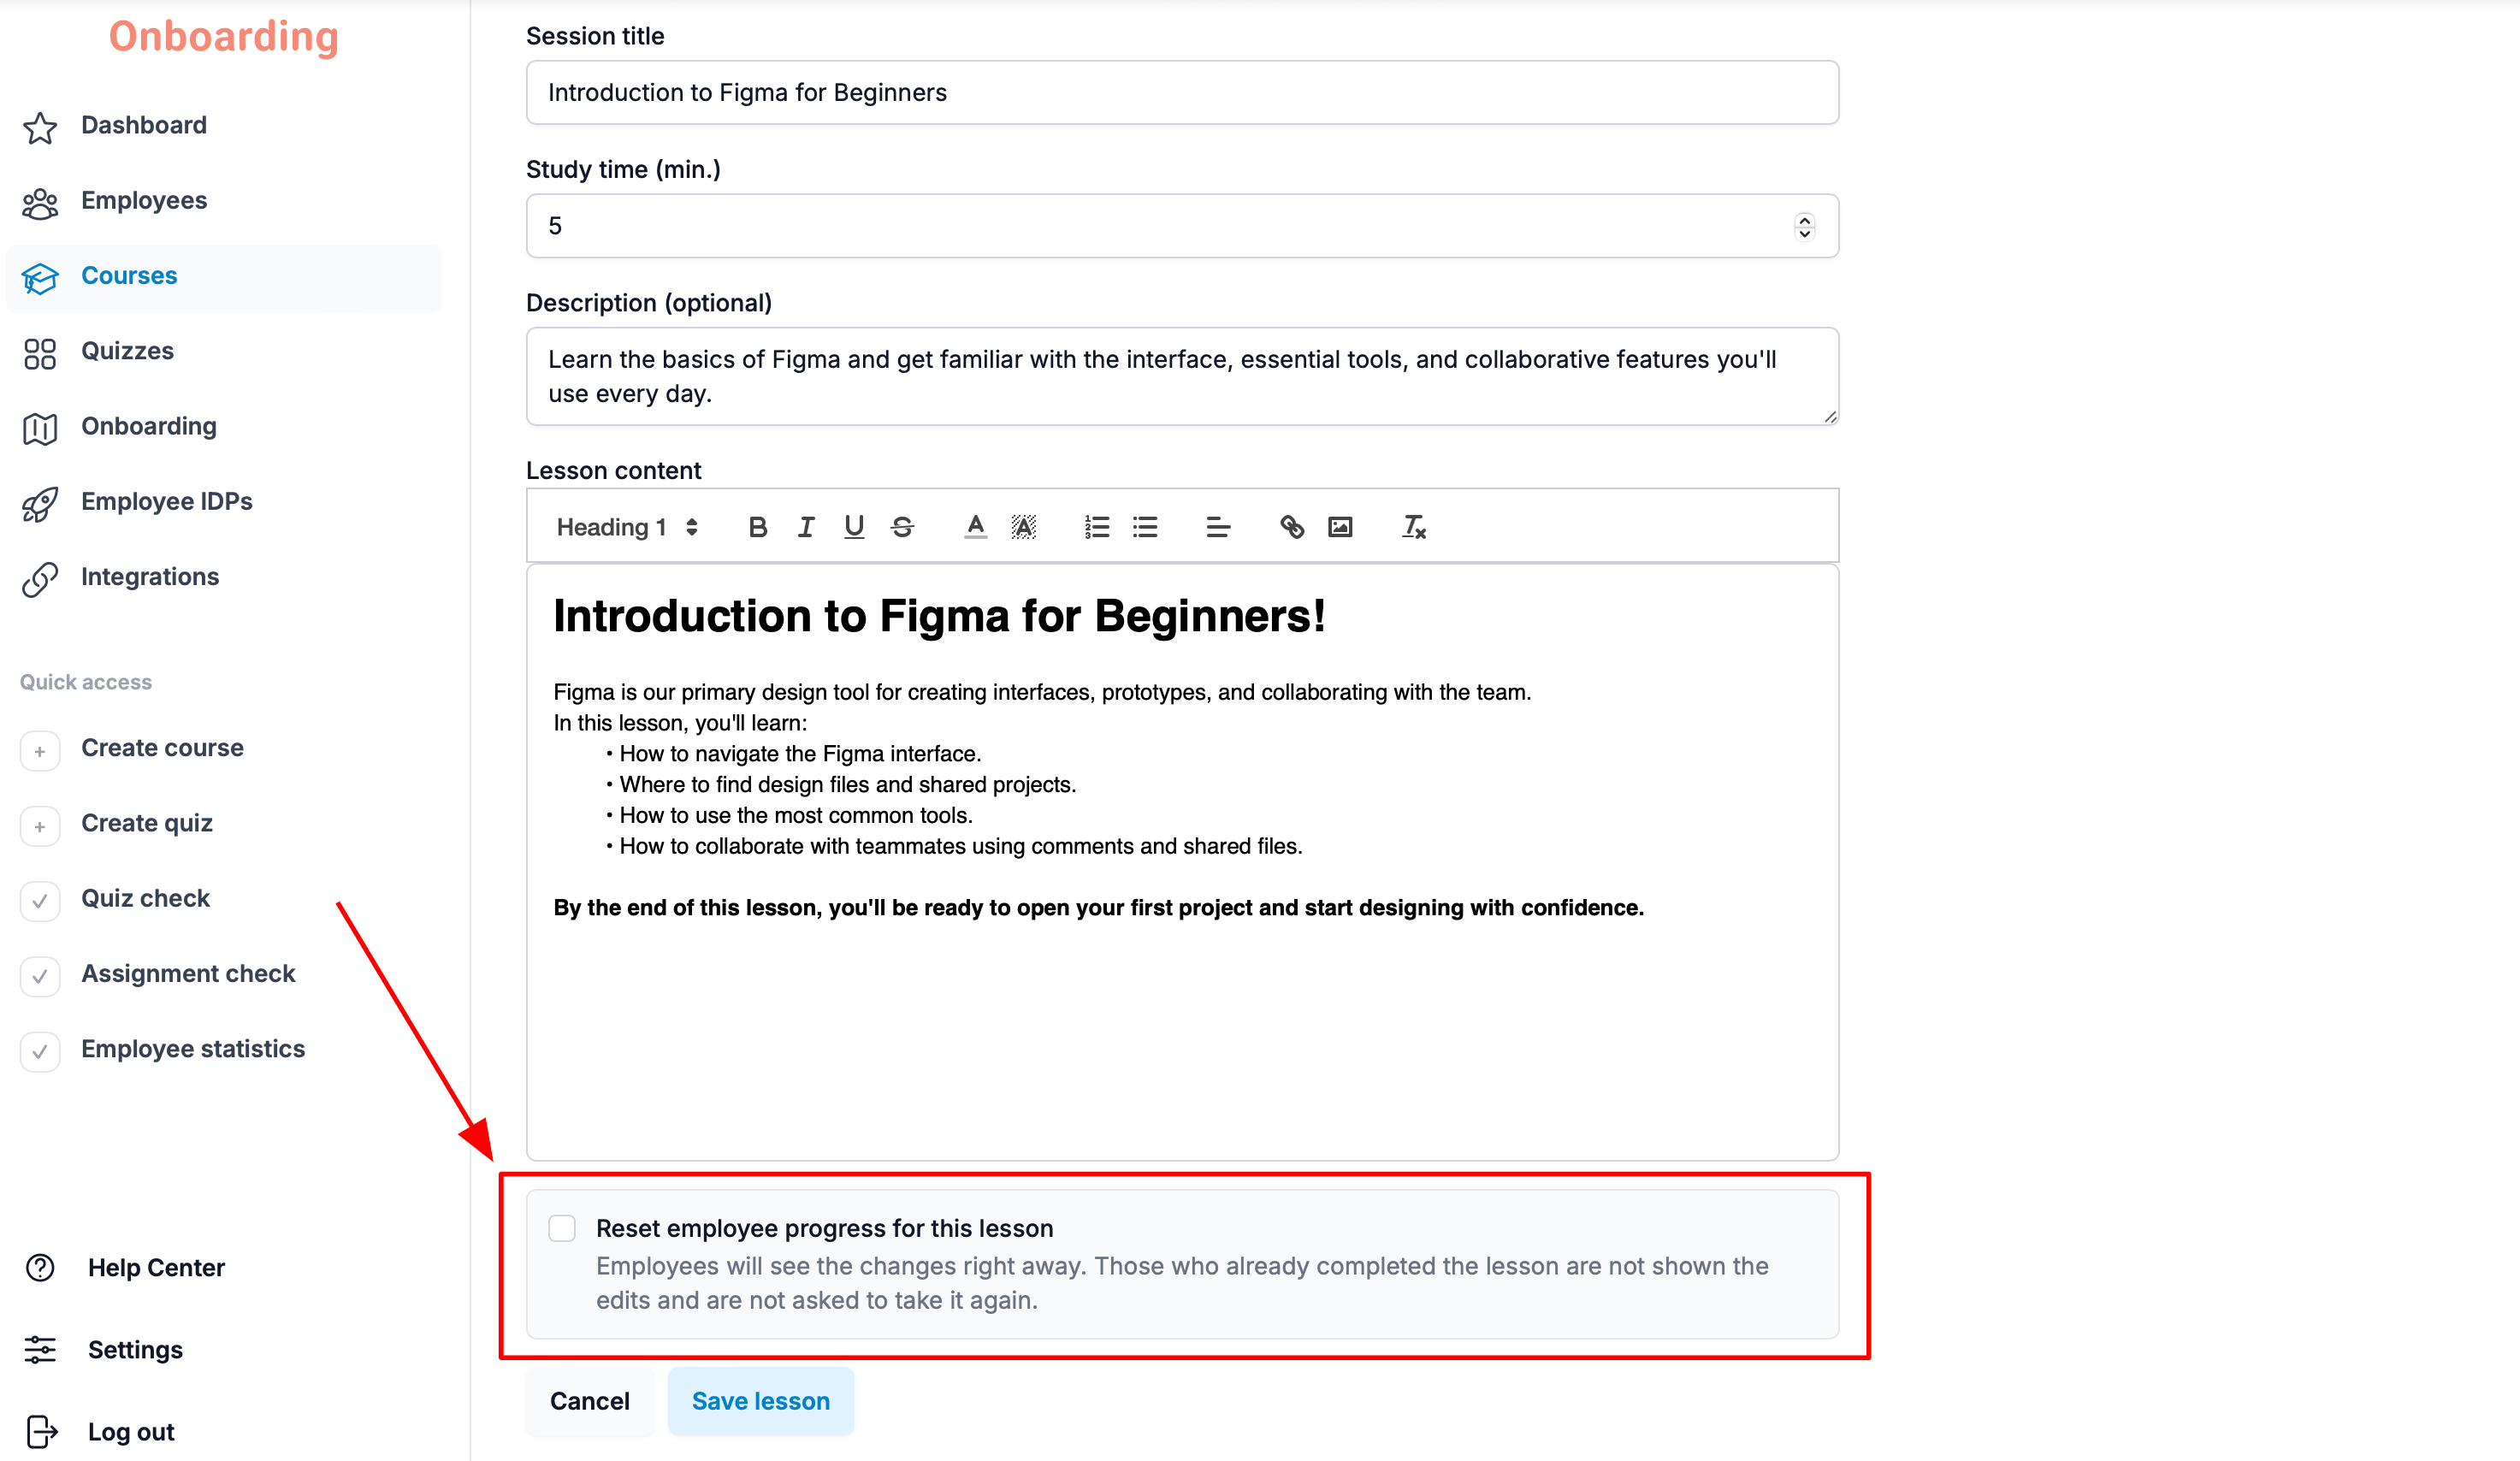
If the checkbox is turned off
After you save the changes:
- the changes are automatically applied to all employees who have access to the course;
- employees who haven't started the lesson yet will see the updated version;
- employees who have already completed the lesson will keep their completion status and results. The lesson will remain marked as completed.
If the checkbox is turned on
After you save the changes:
- the changes are automatically applied to all employees who have access to the course;
- employees who haven't started the lesson yet will see the updated version;
- employees who have already completed the lesson will have their progress and results for that lesson reset. A notification will appear on the employee's dashboard and inside the course to let them know that the lesson has been updated. Changes to the lesson content will be highlighted, and the employee will need to complete the updated lesson again.
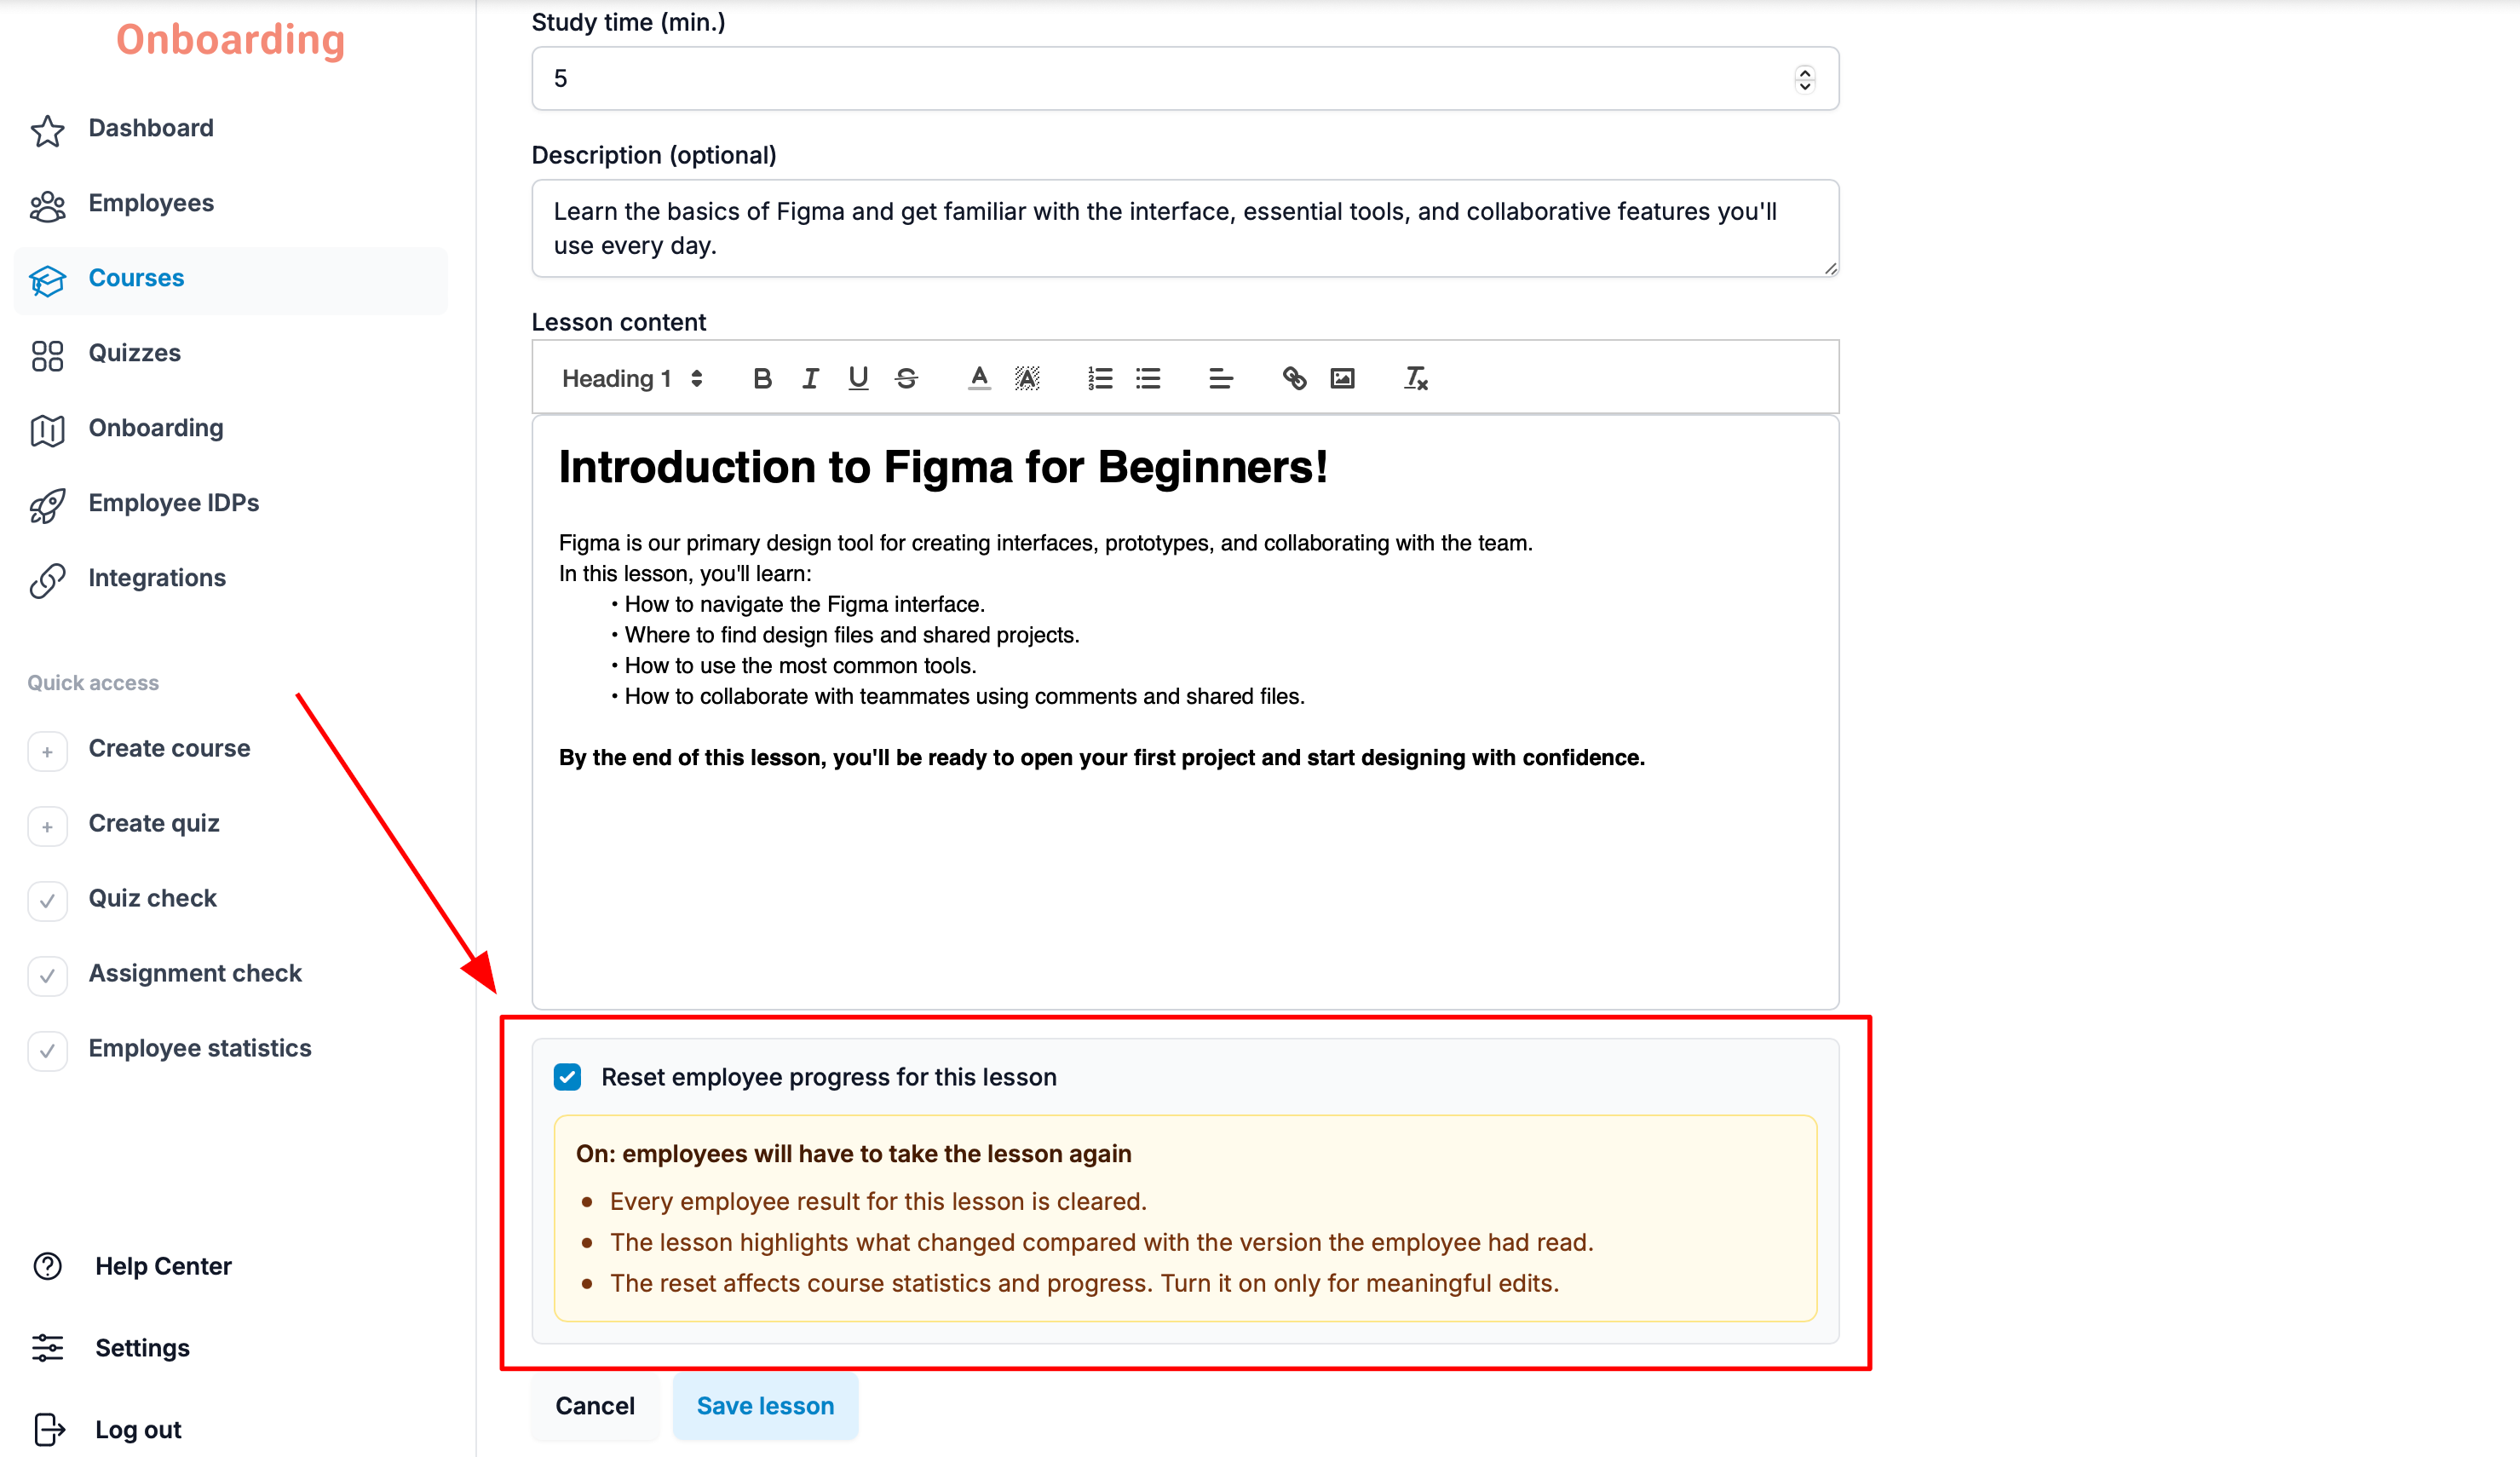
Use the «Reset employee progress for this lesson» checkbox only when making significant changes to the lesson content. Resetting lesson results affects learning statistics and course progress.
After making the changes, click «Save lesson».
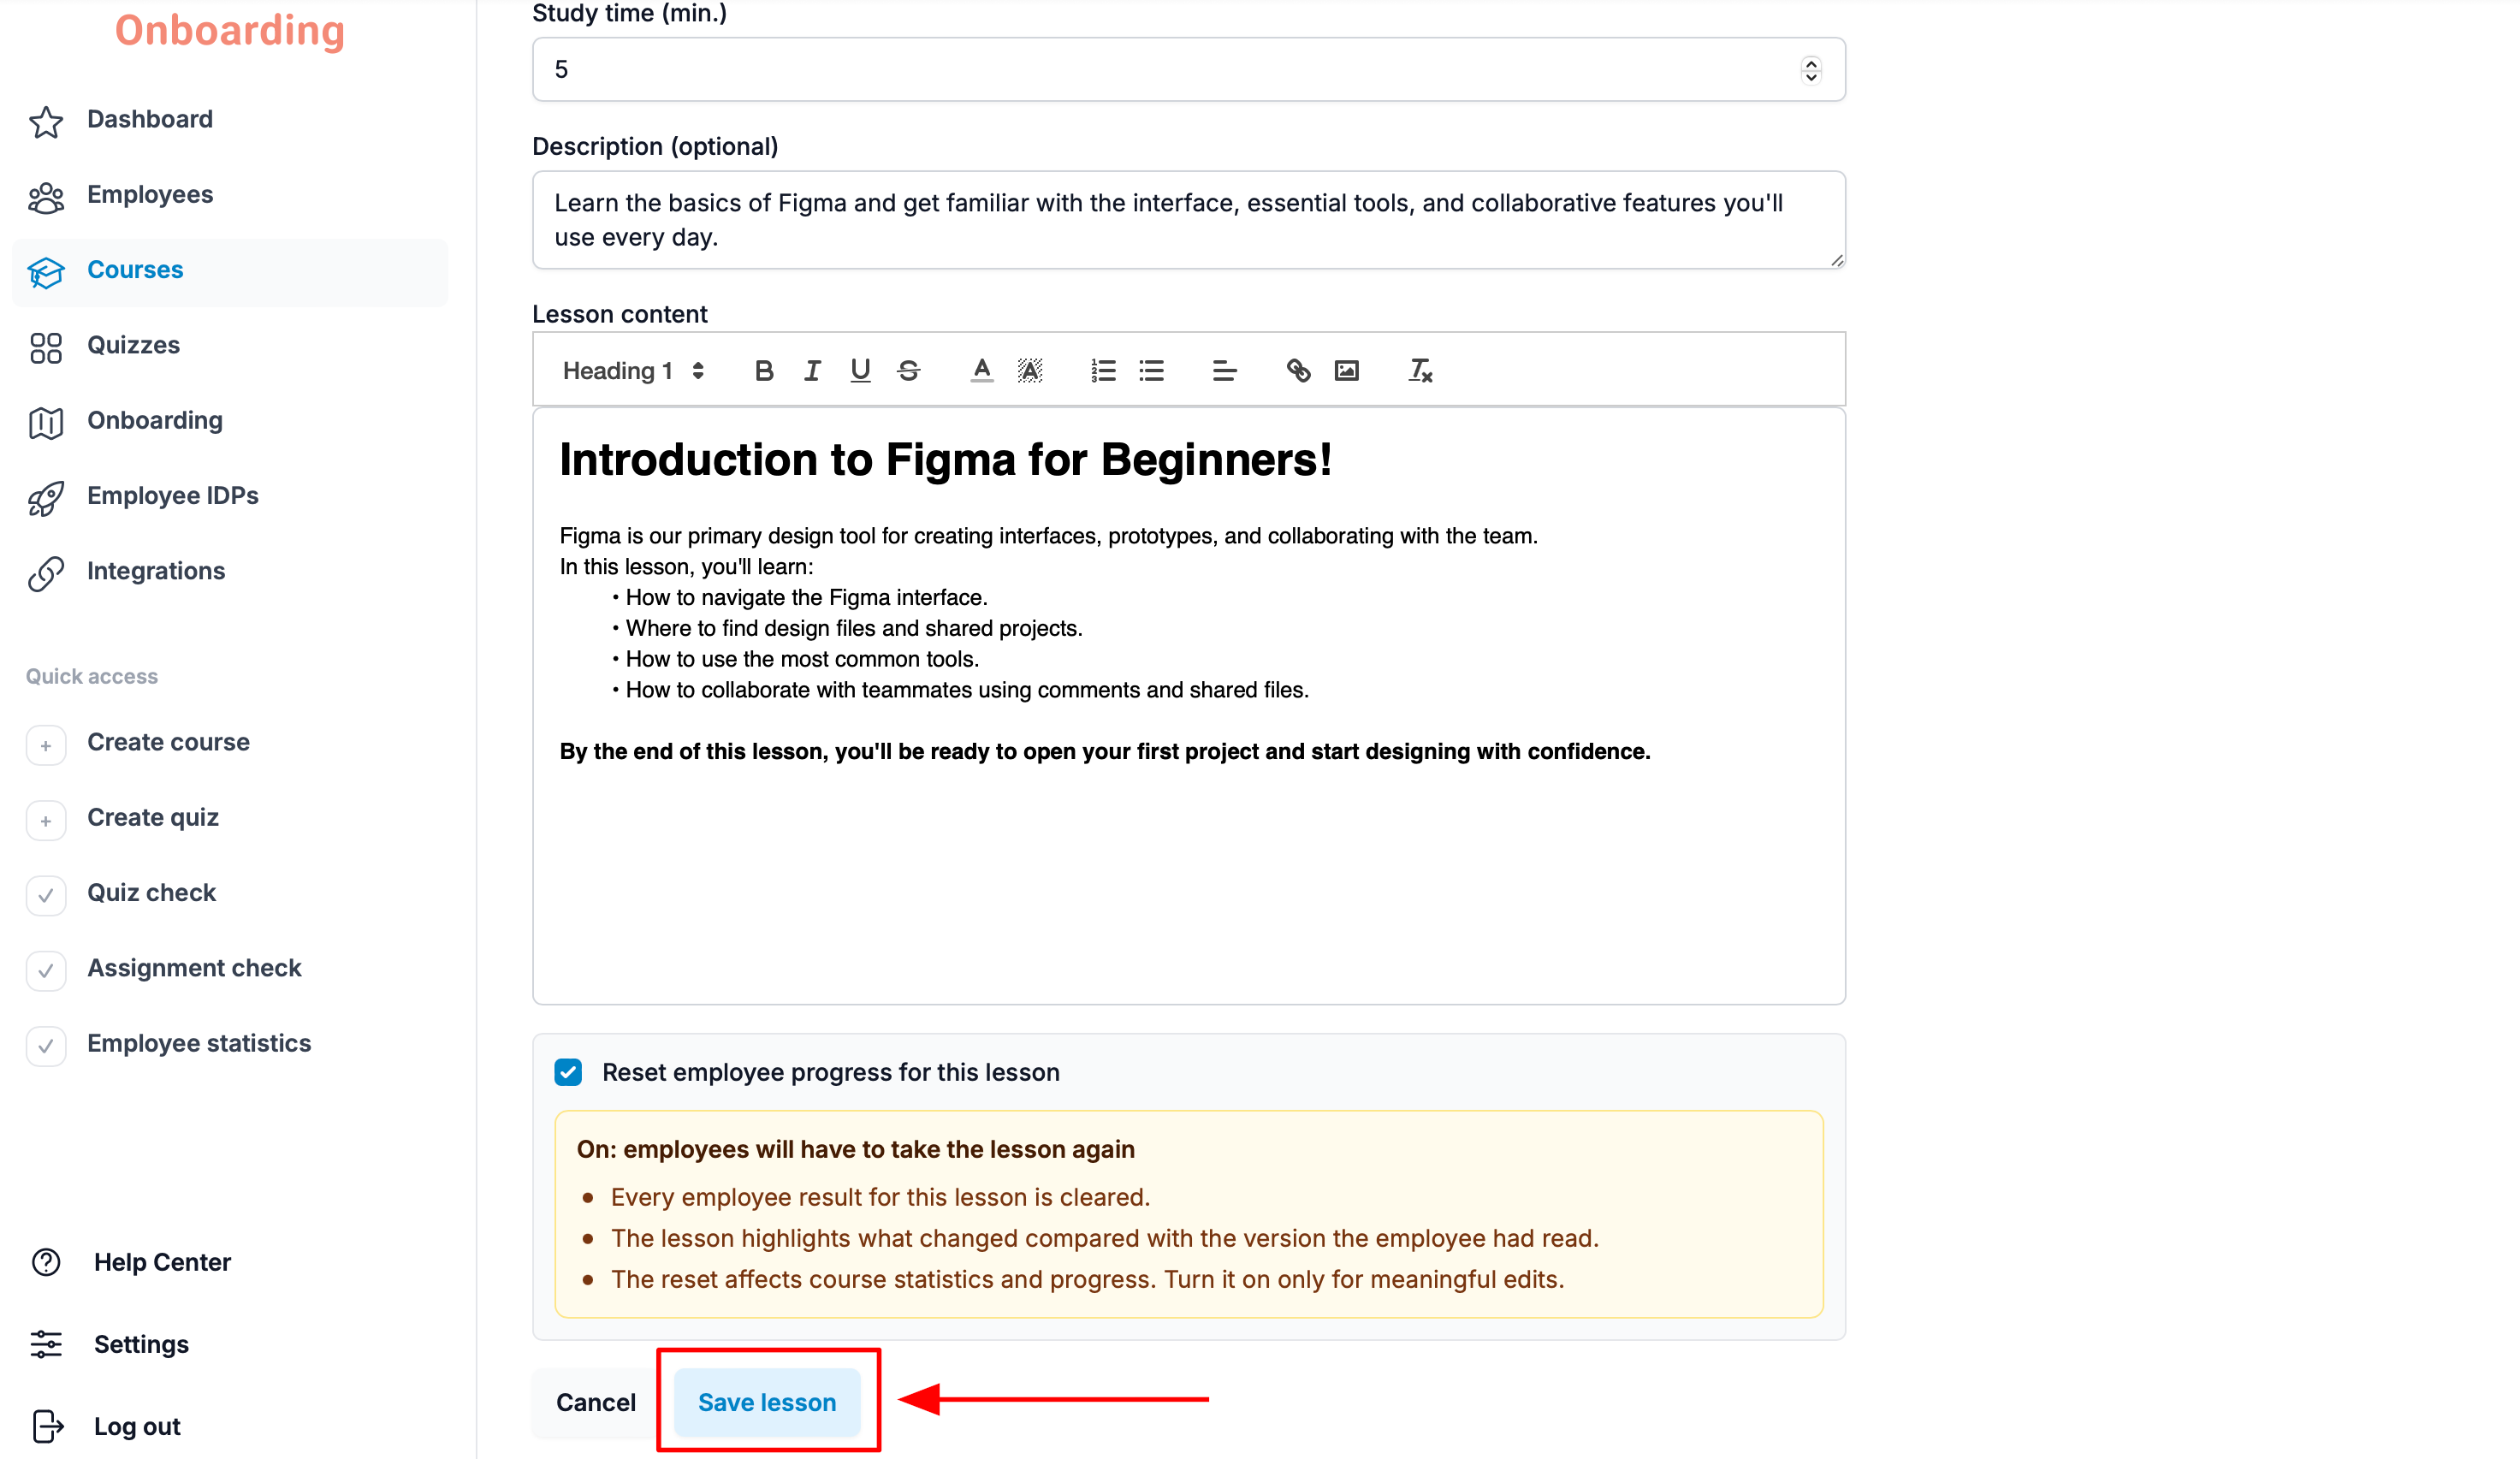
The lesson is saved and immediately available to employees in its updated version 🎉
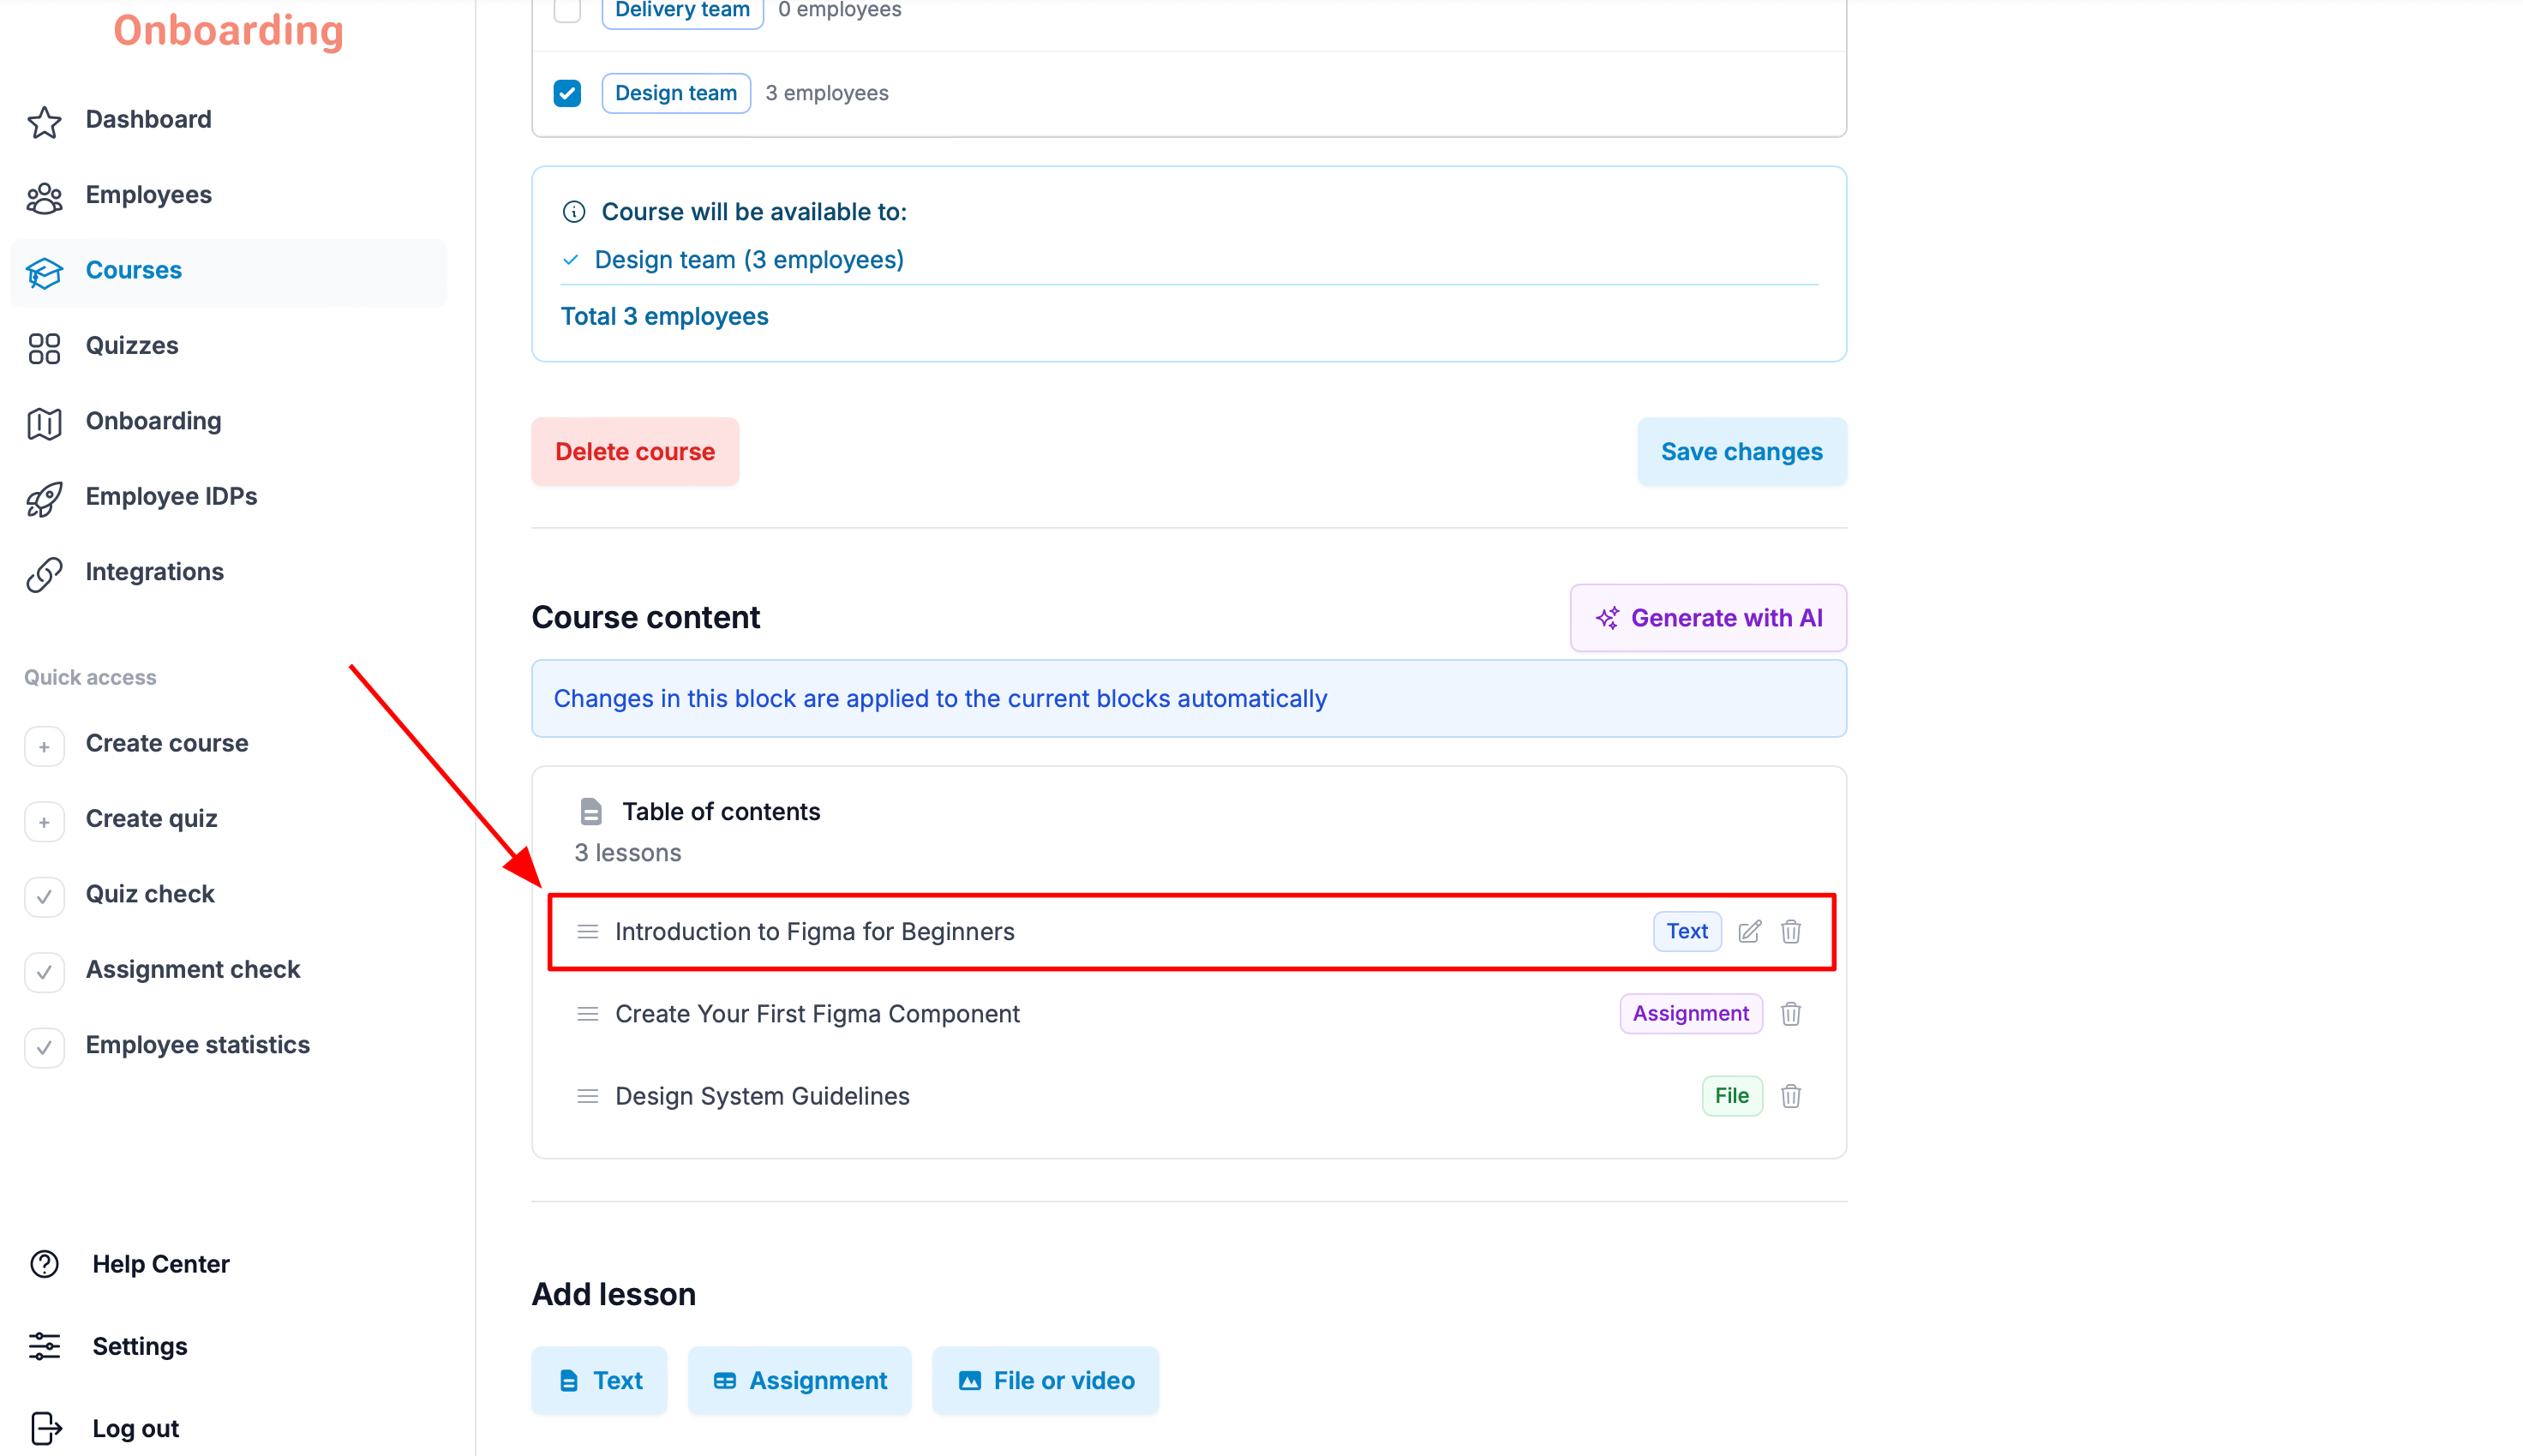
Only Text lessons can be edited. To change an Assignment, File, or Video lesson, delete the existing lesson and create a new one.
All changes made in the «Course Content»section are applied automatically. If you add a new lesson, edit a lesson, or change the course structure, the changes immediately become available to employees who have access to the course.
When you're done, click «Save changes».
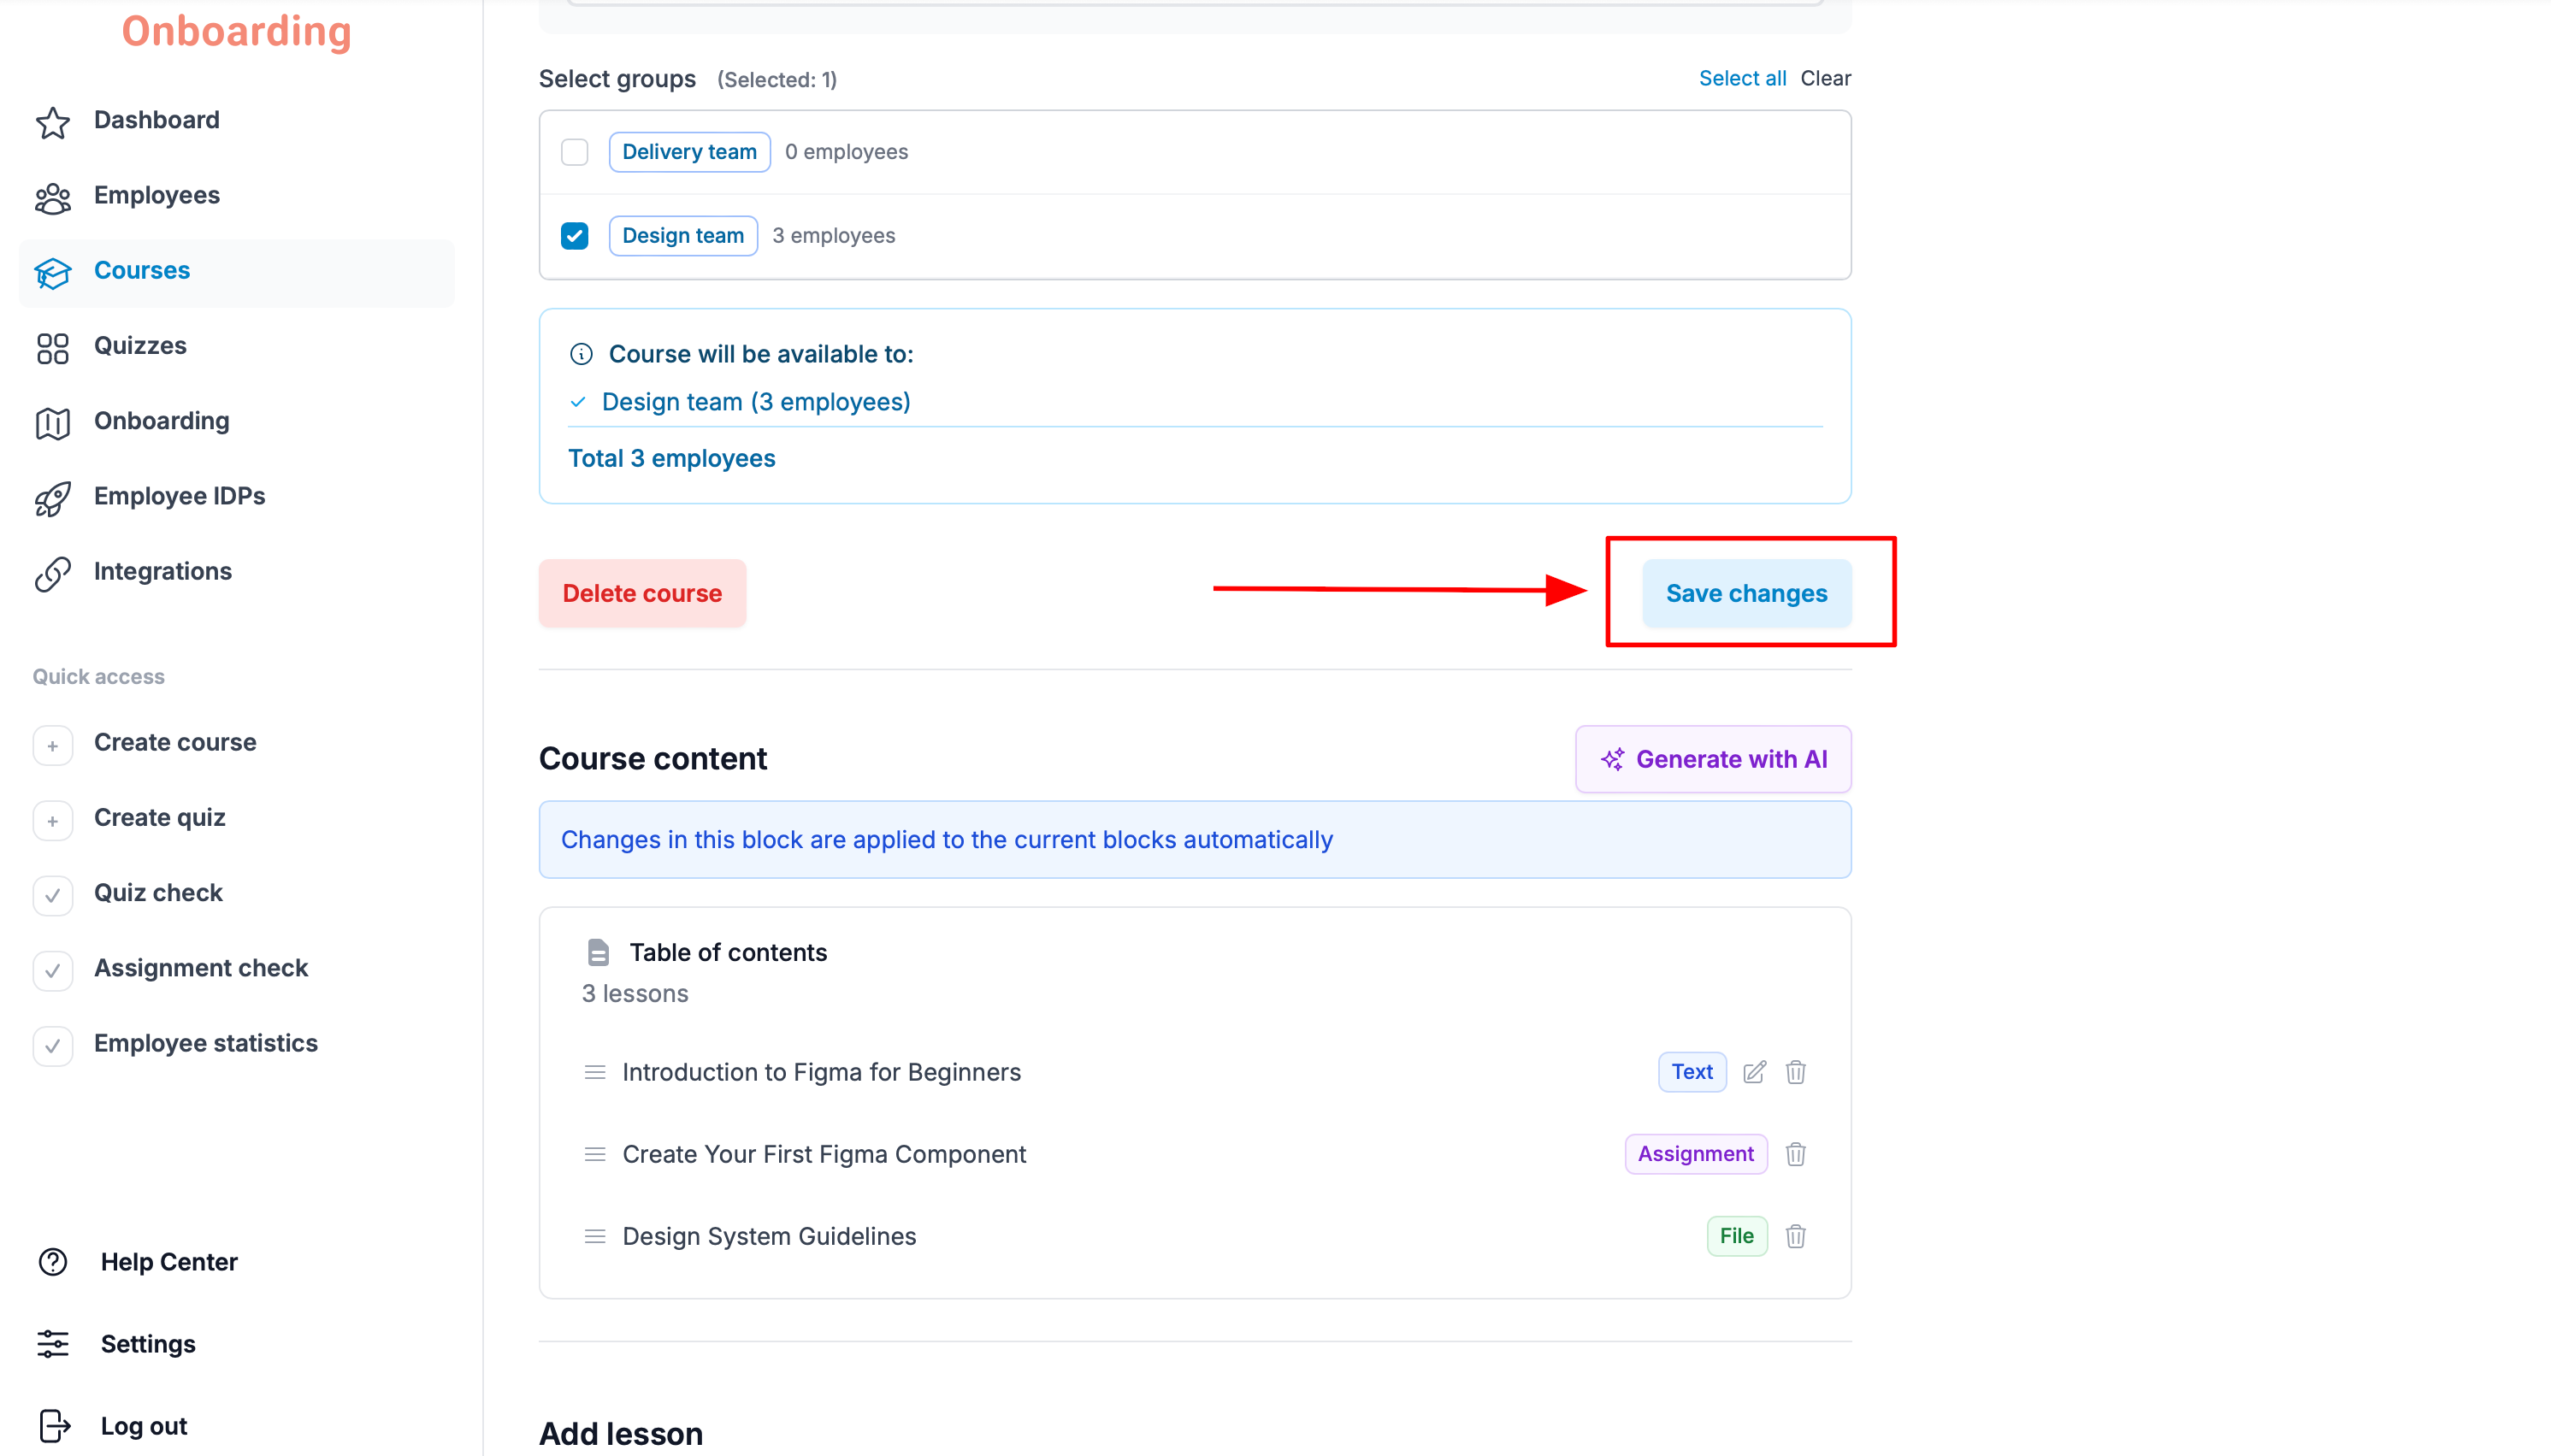
Your changes are saved and visible to the course's users 🎉
How course changes affect employees
All changes made to a course and its lessons are applied to all employees who have access to the course.
This includes both course settings and content:
- course name;
- description;
- cover;
- access settings;
- lessons and assignments;
- lesson order.
Changes apply no matter where an employee is in the course:
- hasn't started yet;
- is currently taking it;
- has already finished it.
Changes to lessons are displayed differently depending on whether the «Reset employee progress for this lesson» checkbox is turned on or off:
- If the checkbox is turned off – changes to the lesson are applied to all employees without any special indication. For employees who have already completed the lesson, it remains marked as completed, and their completion status and results are preserved.
- If the checkbox is turned on – changes are also applied to all employees. For employees who have already completed the lesson, the changes are highlighted on the dashboard and inside the course. Their lesson progress and results are reset, and they need to complete the updated lesson again.
Keep in mind that changes to course content can affect employees' progress.
For example:
- if you delete a lesson an employee has already completed, their course progress will be recalculated;
- if you edit a lesson and turn on the «Reset employee progress for this lesson» checkbox, the progress and results for that lesson will be reset for employees who have already completed it, and the course statistics will be recalculated automatically;
- If you replace existing lessons with new ones, employees will have to work through the new material — even if they had previously finished the course at 100%.
Deleting a course
To delete an existing course, open the «Courses» section, pick the course you need, and click «Edit».
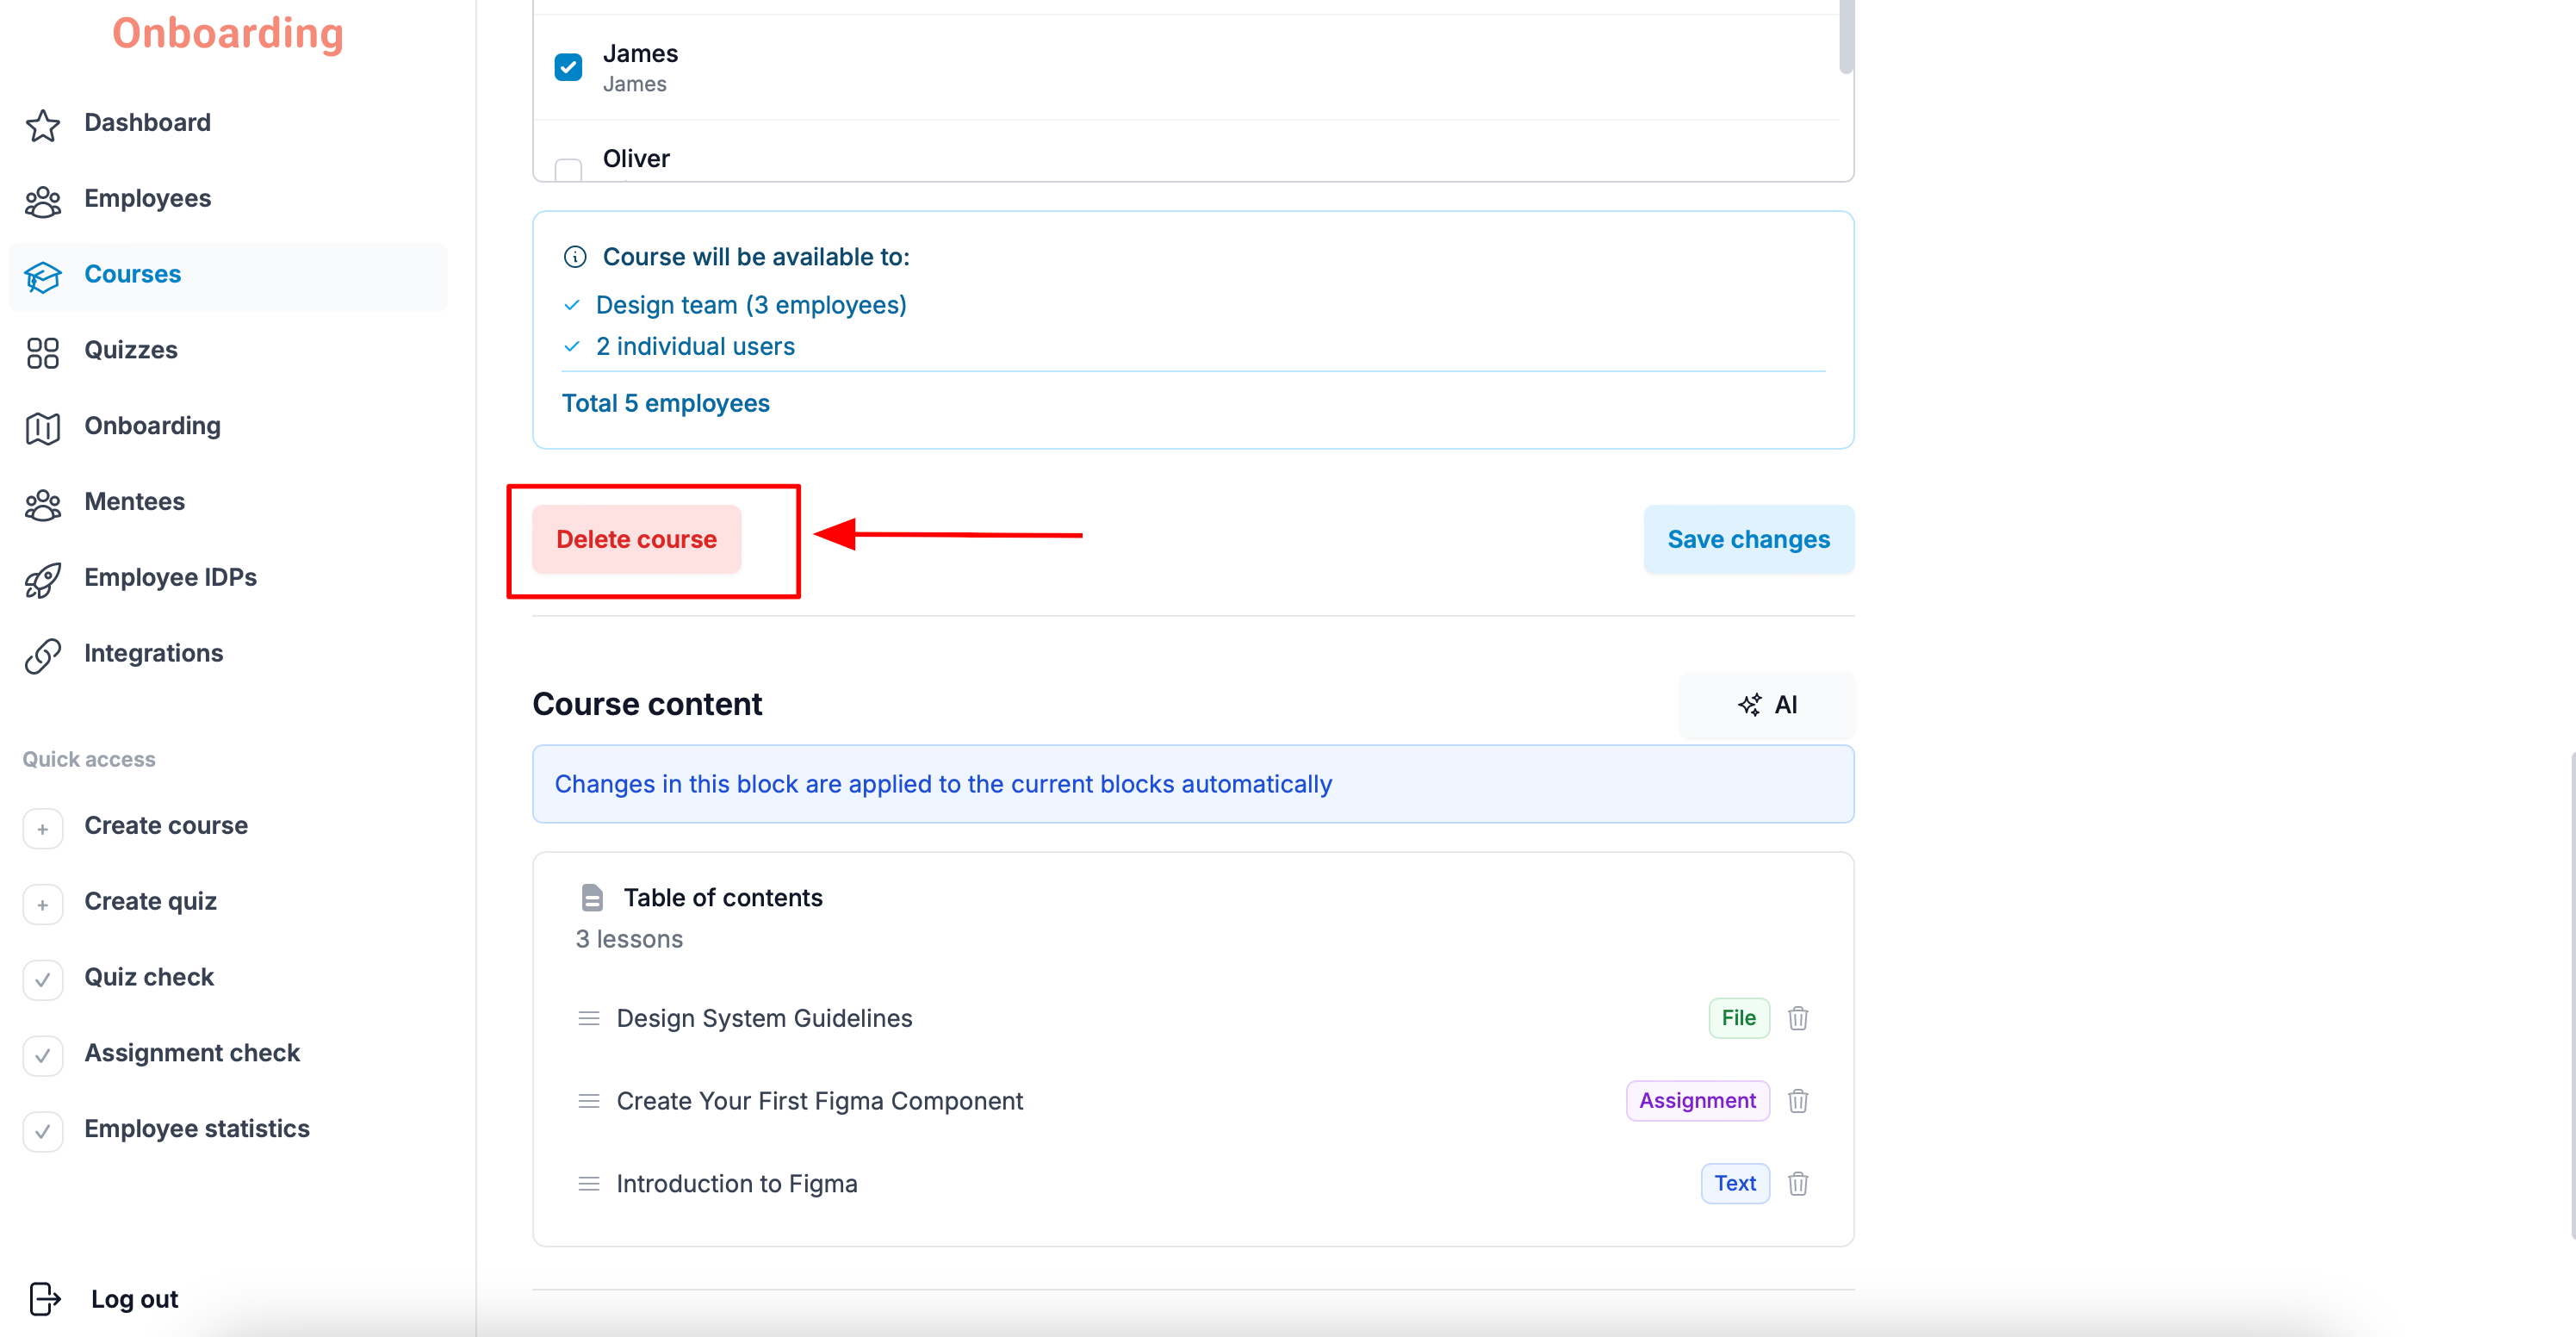
The course editor opens. Click «Delete course» above the «Course content» block.
Confirm the action by clicking «Delete» again in the window that appears.
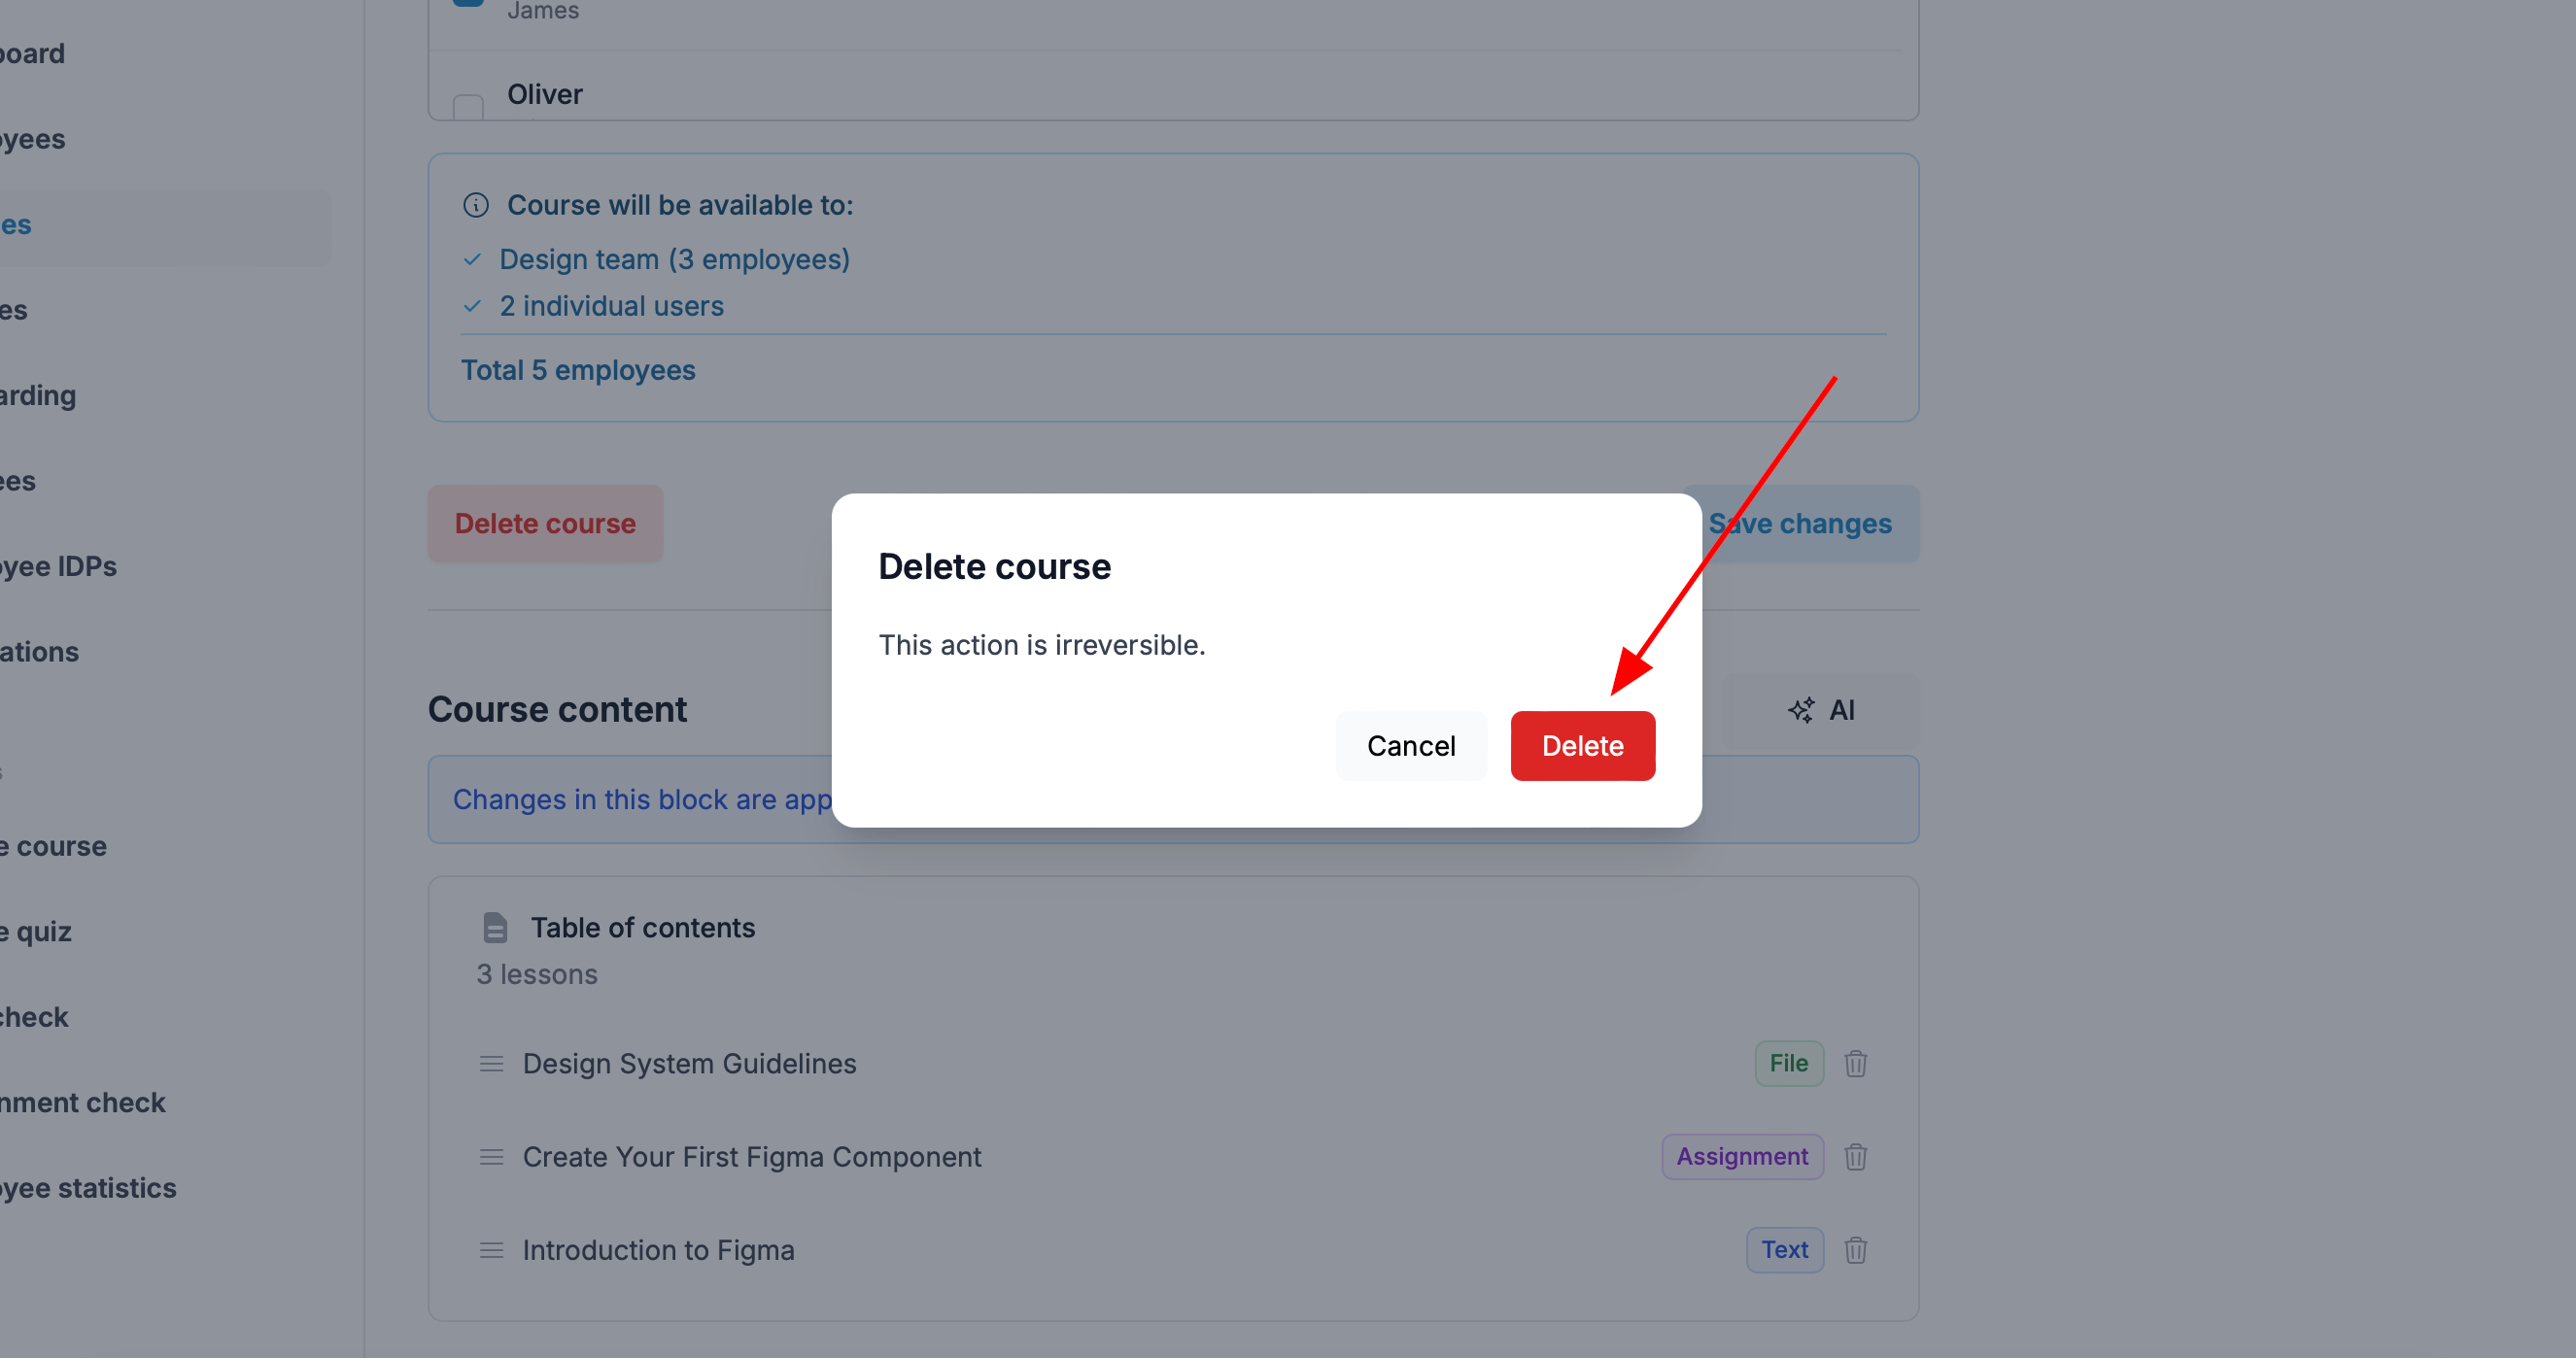
The course has been deleted and no longer appears on the courses page.
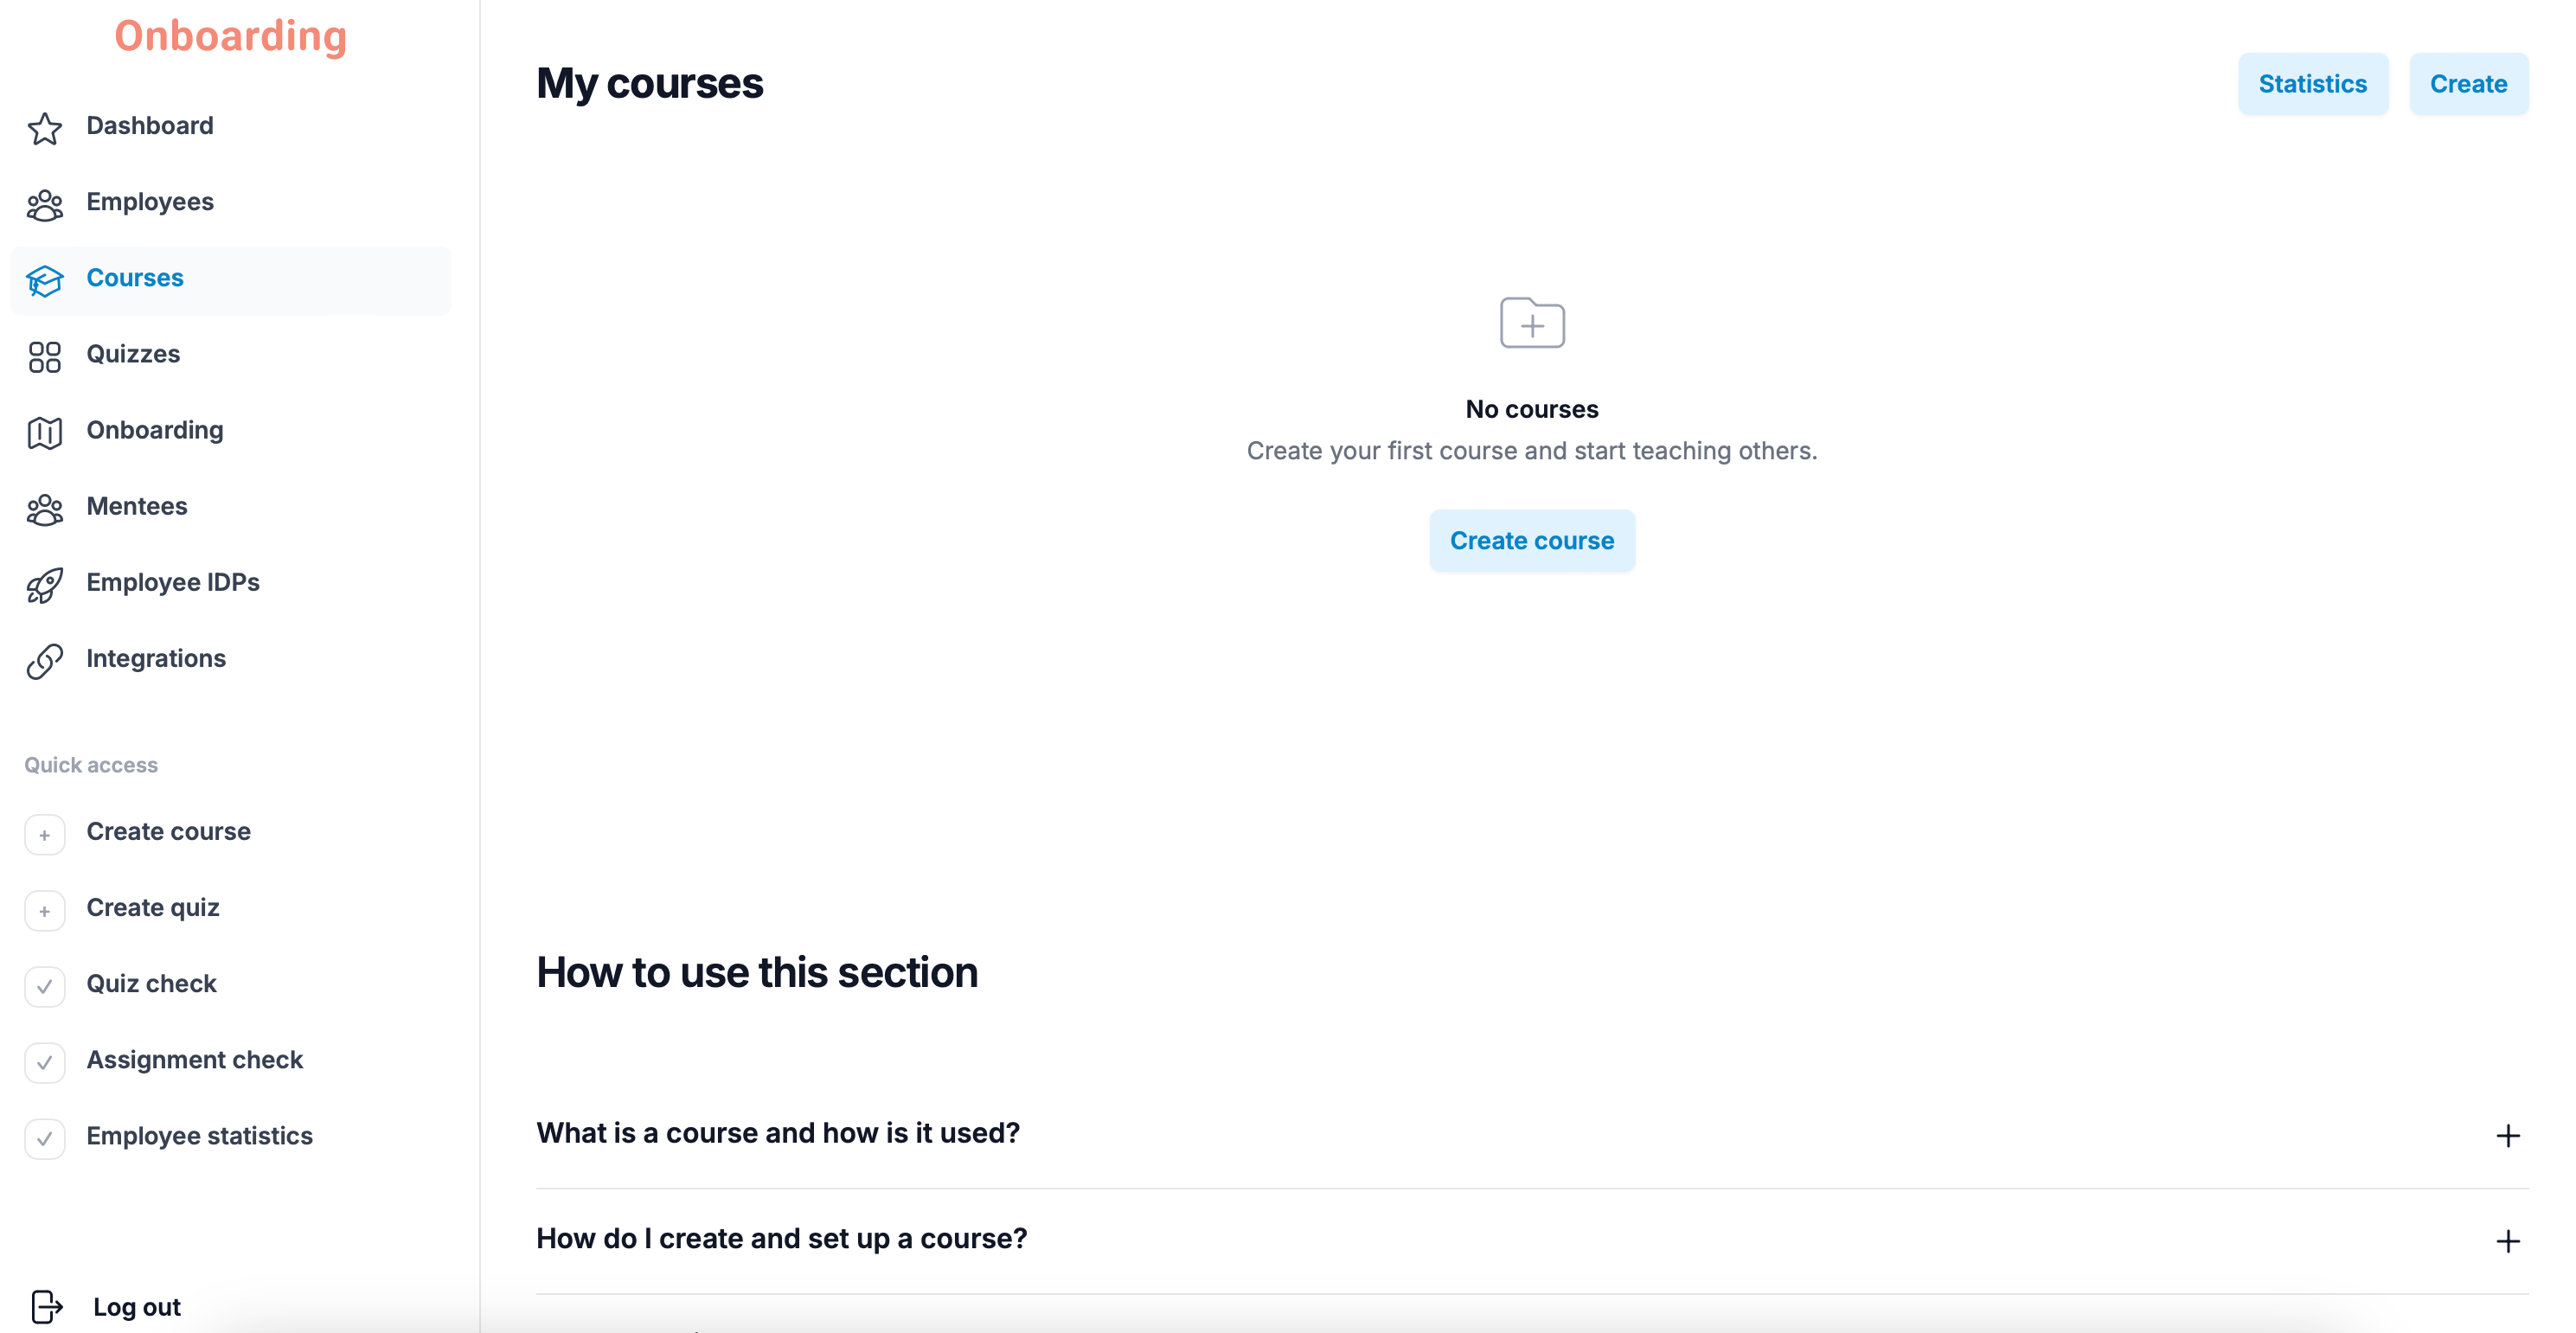
Deleting a course cannot be undone. Once you confirm the deletion, the course cannot be restored.
Deleting a course also removes all the data connected to it, including analytics and employees' progress.
Still have questions?
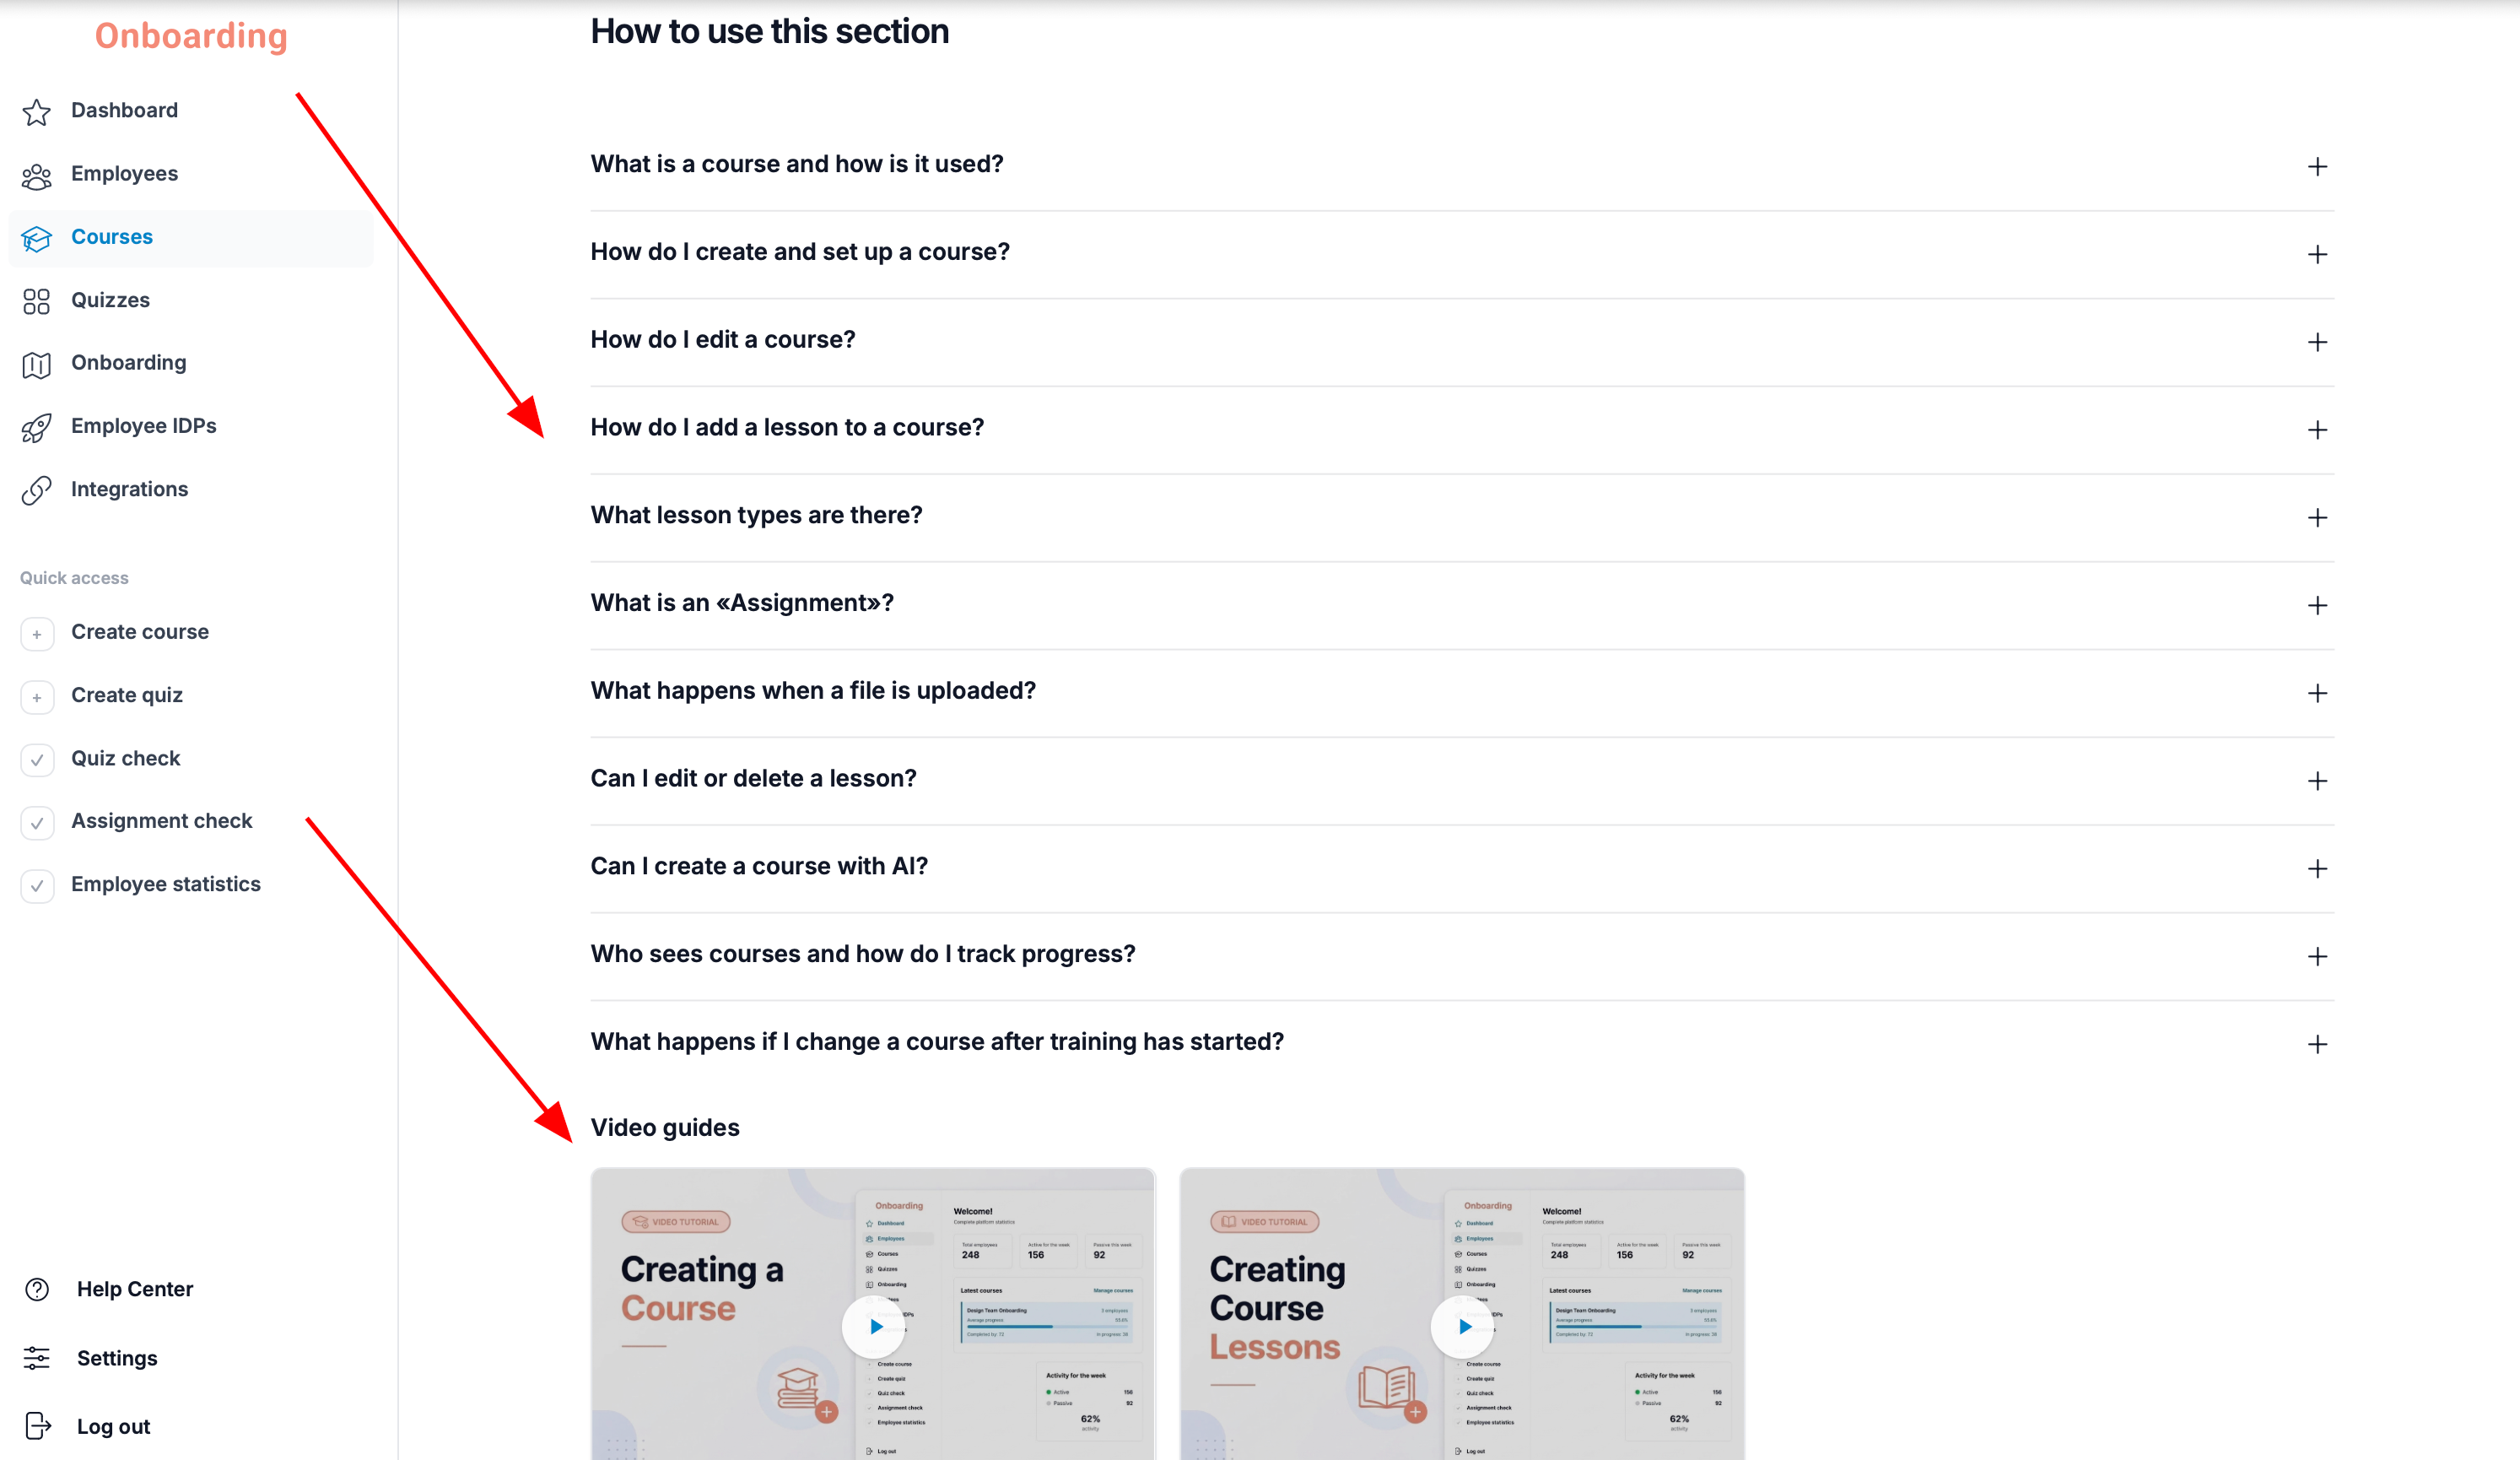
For your convenience, every section of the platform includes a built-in «How to use this section» block with answers to the most common questions and short how-to guides. You'll also find quick links to the Help Center and step-by-step video tutorials covering the section's features.
If you've forgotten how to do something, check there first — chances are the answer is already waiting for you.
If you've hit a technical issue or can't find the answer in the Help Center, write to us at hello@onboarding.team.
We'll look into your request carefully and do our best to help as quickly as possible.